So übertragen Sie YouTube-Musik auf Spotify (3 Methoden)
Wenn wir über einige der größten Musik-Streaming-Dienste da draußen sprechen, Spotify und YouTube Music sind die beiden beliebtesten Optionen. Manchmal wechseln YouTube Music-Nutzer jedoch zu Spotify, da die Musik- und Podcast-Bibliothek sowie die vielfältigen, gut kuratierten Playlists dort umfangreich sind. Bevor Sie von YouTube Music zu Spotify wechseln, sollten Sie Ihre Musikbibliothek zunächst zu Spotify verschieben. So müssen Sie Ihre Playlists nicht erneut auf Spotify erstellen.
Leider bietet YouTube Music keine In-App-Option zum Verschieben von Wiedergabelisten von seinem Streaming-Dienst zu Spotify oder einem anderen beliebten Dienst. So übertragen Sie YouTube Music auf SpotifyWenn Sie Ihren Musikdienst wechseln möchten, ohne Ihre Playlists zu verlieren, benötigen Sie eine Drittanbieter-App. In diesem Beitrag stelle ich einige einfache Lösungen zum Verschieben von YouTube Music zu Spotify vor, die jeder umsetzen kann.
Inhaltsverzeichnis Methode 1: Konvertieren Sie YouTube Music in Spotify unter Windows/Mac [Empfohlen]Methode 2: YouTube-Musik online auf Spotify übertragenMethode 3: Übertragen Sie YouTube Music auf Spotify auf iOS/AndroidHäufig gestellte FragenMeine Liste jetzt abspielen
Methode 1: Konvertieren Sie YouTube Music in Spotify unter Windows/Mac [Empfohlen]
Wie übertrage ich YouTube Music auf Spotify unter Windows und Mac? Obwohl weder Spotify noch YouTube Music eine einfache Methode zur Übertragung bieten und die von YouTube Music heruntergeladenen Songs DRM-verschlüsselt sind, können Sie Tools oder Dienste von Drittanbietern verwenden, um YouTube Music-Songs und -Wiedergabelisten manuell und ohne Einschränkungen auf Spotify zu übertragen. Hier empfehlen wir Ihnen, zunächst Konvertieren Sie YouTube Music-Songs oder -Wiedergabelisten in DRM-freies MP3 Dateien und importieren Sie sie dann in Spotify, um sie bequem offline wiederzugeben.
AMusicSoft YouTube Music Converter ist ein leistungsstarkes Tool, mit dem Sie Songs von YouTube Music herunterladen, YouTube Music DRM entschlüsseln und als Audiodateien in MP3, AAC, FLAC, WAV, M4A und anderen gängigen Formaten speichern können. DRM-freie YouTube Music-Songs können Sie alle in Spotify importieren. Wenn Sie mehrere Songs und personalisierte Playlists auf YouTube Music haben, kann die benutzerfreundliche Software diese auch mit wenigen Klicks im Stapel herunterladen. Für jeden neuen Nutzer bietet das Tool eine kostenlose Testversion für einen Monat!
Wie übertrage ich YouTube Music mit AMusicSoft auf Spotify? Jetzt können wir damit kostenlos Musik von YouTube Music auf Spotify konvertieren.
STEP 1. Laden Sie AMusicSoft YouTube Music Converter herunter und installieren Sie es auf Ihrem Computer.
Kostenlos Herunterladen Kostenlos Herunterladen
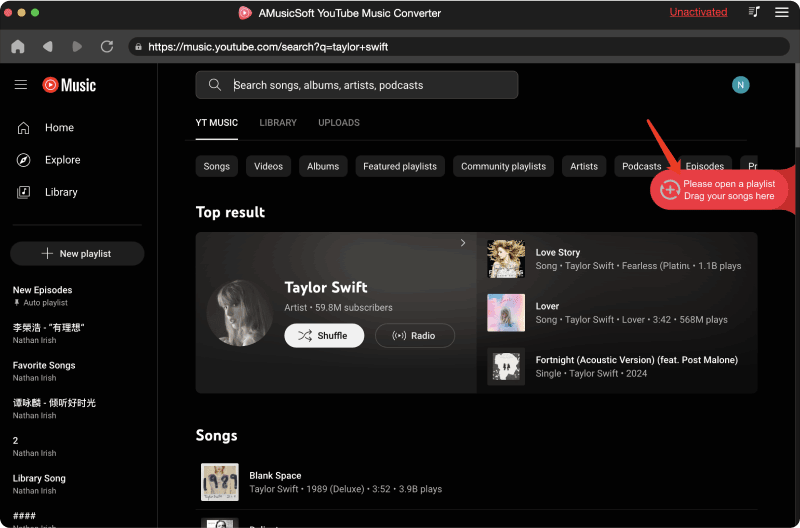
STEP 2. Starten Sie AMusicSoft YouTube Music Converter nach der Installation. Klicken Sie auf der Hauptoberfläche auf „YouTube Music Webplayer öffnen“, um sich beim integrierten YouTube Music Webplayer anzumelden. Ziehen Sie anschließend Ihre Songs oder Playlists direkt auf die Hauptoberfläche des Konverters.
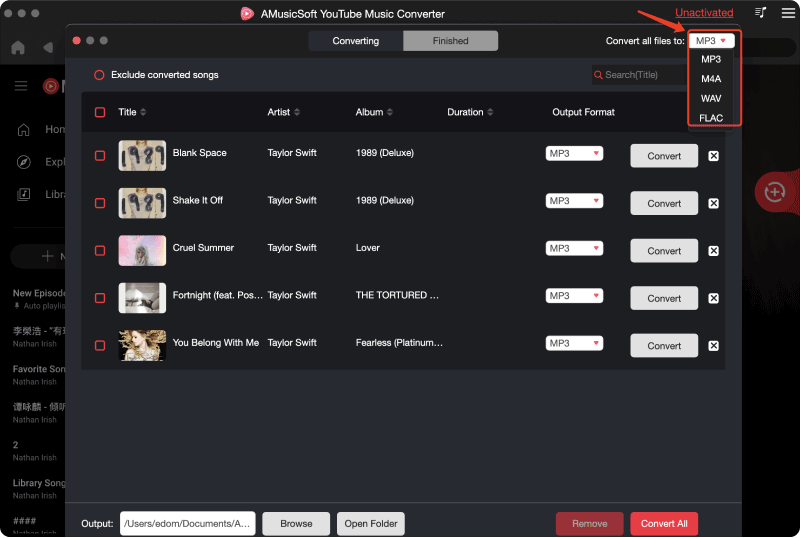
STEP 3. Sobald die Songs vollständig in den Konverter importiert wurden, können Sie die Ausgabeeinstellungen festlegen. Unterstützt werden MP3, AAC, M4A, WAV und FLAC als Ausgabeformate. Wir empfehlen MP3, da es ein universelles Format ist, das mit den meisten Plattformen wie YouTube Music kompatibel ist. Sie können auch weitere Parameter festlegen.
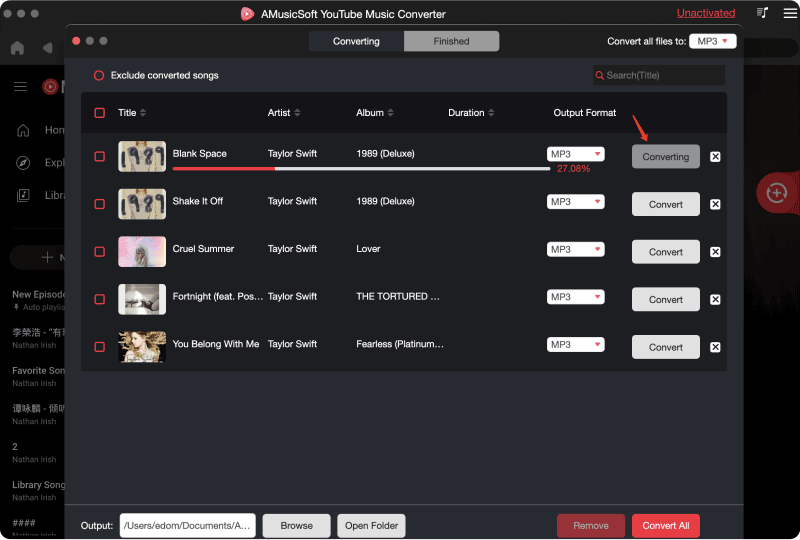
STEP 4. Sobald die Einstellungen abgeschlossen sind, klicken Sie auf „Konvertieren“, um den Download der YouTube Music-Songs direkt zu starten. Warten Sie einen Moment, denn AMusicSoft YouTube Music Converter führt die Konvertierung effizient für Sie durch. AMusicSoft behält ID3-Tags bei, um die Überprüfung der Informationen und die Organisation der Dateien zu erleichtern.
STEP 5. Sobald die YouTube Music-Songs erfolgreich auf Ihren Computer heruntergeladen wurden, besteht der nächste Schritt darin, diese Downloads auf Spotify hochzuladen. Öffnen Sie dazu Spotify auf Ihrem Computer und melden Sie sich bei Ihrem Konto an.
STEP 6. Gehen Sie zu „Bearbeiten“ > „Lokale Dateien“ > „Quelle hinzufügen“. Wählen Sie die heruntergeladenen Songs und Playlists aus, die Sie zu Spotify übertragen möchten. Klicken Sie auf „OK“. Anschließend werden Ihre Songs und Playlists von YouTube Music zu Spotify übertragen!

Methode 2: YouTube-Musik online auf Spotify übertragen
Wie überträgt man YouTube Music ohne Softwareinstallation zu Spotify? Heutzutage gibt es viele Online-Tools, die den Transfer von Playlists zwischen verschiedenen Musik-Streaming-Plattformen erleichtern. Wenn Sie nach einem Online-Tool suchen, ist Soundiiz zweifellos die beste Wahl. Soundiiz ist ein kostenloses webbasiertes Tool, mit dem Sie Ihre Playlists ohne Softwareinstallation zwischen verschiedenen Musik-Streaming-Diensten übertragen können. So können Benutzer ihre Musik-Playlists einfacher speichern und verwalten. Soundiiz hat eine ansprechende, einfache Benutzeroberfläche. So verwenden Sie Soundiiz, um Ihre YouTube Music zu Spotify zu übertragen:
STEP 1. Rufen Sie Soundlitz in Ihrem Webbrowser auf und klicken Sie auf die Schaltfläche „Kostenlos starten“. Melden Sie sich anschließend über Spotify, Google, Facebook oder Apple bei Ihrem Konto an.
STEP 2. Suchen Sie nach YouTube Music und klicken Sie auf „Verbinden“, um die Plattform mit Ihrem YouTube Music-Konto zu autorisieren.
STEP 3. Wählen Sie in der linken Seitenleiste die Registerkarte „Übertragen“. Wählen Sie Spotify als Quellplattform.
STEP 4. Gehen Sie zu Playlists. Wählen Sie die zu konvertierende Playlist aus und klicken Sie auf Bestätigen. Wählen Sie abschließend Spotify als Ziel, um die ausgewählten Apple YouTube-Playlists sofort zu speichern. Die Übertragung startet sofort. Wenn Sie die Spotify-App öffnen, finden Sie dort alle Playlists und die Musik ist abspielbar.
Soundiiz ist zwar ein kostenloses Tool zum Übertragen von YouTube-Musik auf Spotify, Apple Music, Deezer usw., bietet jedoch keinen stapelweisen Transfer von Playlists. Außerdem gibt es ein tägliches Übertragungslimit. Mit der kostenlosen Version von Soundiiz können nur 200 Titel pro Playlist übertragen werden. Um alle Musikdaten auf einmal zu übertragen, müssen Sie 4.50 $/Monat für die Premium-Mitgliedschaft bezahlen. Wenn Sie dieses Limit umgehen möchten, testen Sie AMusicSoft YouTube Music Converter, um eine unbegrenzte Anzahl von Songs, Playlists und Alben zu übertragen.
Methode 3: Übertragen Sie YouTube Music auf Spotify auf iOS/Android
Können Sie YouTube Music auf Ihren iOS-/Android-Geräten zu Spotify übertragen? Natürlich gibt es auch hilfreiche Optionen, die Sie ausprobieren können. Hier ist eine zuverlässige App zur Installation auf Android- und iOS-Geräten, mit der Sie in wenigen einfachen Schritten die Playlist-Übertragung zwischen YouTube Music und Spotify schnell und einfach durchführen können. Schauen Sie doch einfach mal rein.
FreeYourMusic ist eine benutzerfreundliche App, die rund 20 beliebte Streaming-Plattformen unterstützt und Ihnen die flexible Übertragung von Musikressourcen ermöglicht, darunter Apple Music, Amazon Music, Deezer, Pandora, YouTube Music, Tidal und Spotify. Sie ist sowohl mit Android- als auch mit iOS-Geräten kompatibel und kann direkt im Google Play Store oder App Store installiert werden. Wie übertrage ich YouTube Music auf Spotify auf Mobilgeräten? Folgen Sie den folgenden Schritten:
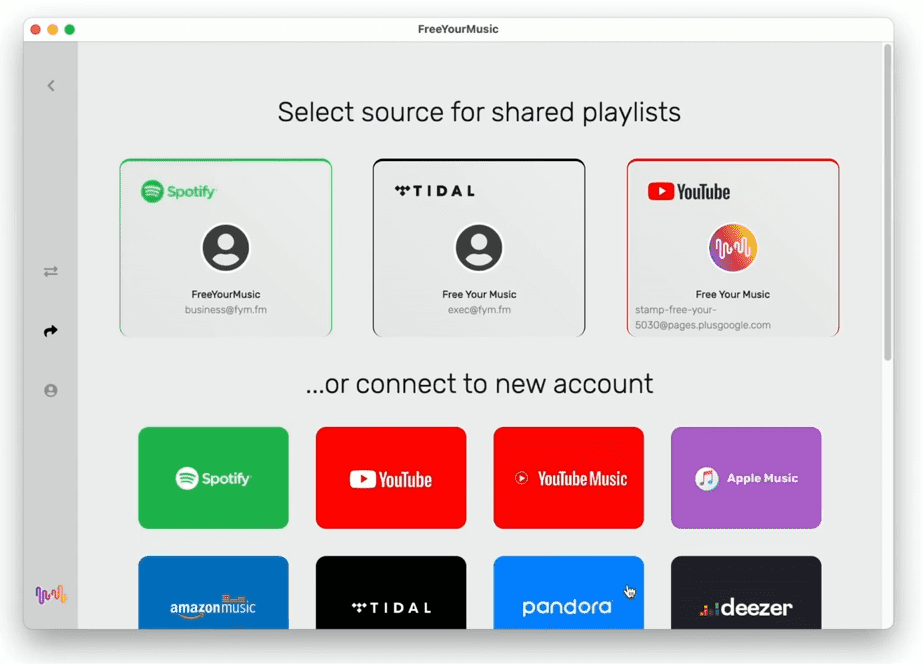
STEP 1. Sobald Sie die FreeYourMusic-App auf Ihrem Mobilgerät haben, öffnen Sie sie und wählen Sie YouTube Music als Quelle. Wählen Sie dann Spotify als Zielplattform.
STEP 2. Sobald Quell- und Zieldienste identifiziert sind, wird die Liste Ihrer YouTube Music-Song-Wiedergabelisten angezeigt. Wählen Sie die Wiedergabelisten, die beliebtesten Wiedergabelisten oder die Alben aus, die Sie in der mobilen App übertragen möchten.
STEP 3. Tippen Sie auf „Übertragung beginnen“, und Sie sehen, wie der Übertragungsvorgang beginnt.
Während die kostenlose Version die Übertragung einer einzelnen Playlist mit bis zu 100 Songs unterstützt, gewährt die kostenpflichtige Version unbegrenzte Exporte. Der Abonnementpreis von FreeYourMusic ist relativ hoch und umfasst ein monatliches Basispaket für 14.99 $, ein Jahrespaket für 49.99 $ und ein lebenslanges Paket für 249.99 $. Wenn Ihr Budget reicht, können Sie es herunterladen und ausprobieren.
Häufig gestellte Fragen
Die Schritte zum Übertragen von YouTube Music zu Spotify auf Desktop- und Mobilgeräten sind einfach. Manchmal kann es jedoch zu Problemen beim Verschieben von YouTube Music zu Spotify kommen. Nachfolgend finden Sie hilfreiche FAQs.
F1: Wie kann ich nach der Übertragung Duplikate aus Spotify entfernen?
Doppelte Titel können sich immer in Spotify-Playlists einschleichen, egal wie vorsichtig Sie sind. Sie können sie jedoch ganz einfach über Ihren Computer oder Ihr Mobilgerät (über Ihren Browser) aus Ihrer Playlist entfernen.
- Auf dem Desktop: Öffnen Sie die Spotify-App und wählen Sie oben den Filter „Playlists“. Navigieren Sie zu der Playlist, die Sie bereinigen möchten. Klicken Sie in der Spaltenüberschrift auf „Titel“, um die Songs entsprechend anzuzeigen. Achten Sie auf identische Songtitel und Albumcover. Um einen doppelten Song zu entfernen, klicken Sie mit der rechten Maustaste auf den doppelten Titel und wählen Sie „Aus dieser Playlist entfernen“.
- Auf dem Handy: Öffnen Sie die Spotify-App. Gehen Sie zu Bibliothek > Playlist. Suchen Sie eine Playlist und suchen Sie oben rechts auf dem Bildschirm nach der Option „Sortieren“. Wählen Sie „Titel“. Scrollen Sie durch die Playlist und suchen Sie nach aufeinanderfolgenden Songs mit identischem Titel oder Songs, die doppelt vorhanden zu sein scheinen. Tippen Sie neben dem doppelten Titel auf die Schaltfläche „Mehr“ und wählen Sie dann „Aus dieser Playlist entfernen“.
F2: Was mache ich, wenn einige meiner Songs nicht übertragen wurden?
Dies kann leider manchmal vorkommen. Manchmal liegt es daran, dass ein Künstler oder Song beim Streaming-Dienst nicht verfügbar ist oder das Tool die Metadaten nicht lesen konnte, um ihn zu finden. Sie können Songs über AMusicSoft YouTube Music Converter stapelweise herunterladen und manuell zu Spotify hinzufügen.
Meine Liste jetzt abspielen
Wussten Sie, wie Sie YouTube Music auf Spotify übertragen? Obwohl YouTube Music die Übertragung von Dateien auf andere Musik-Streaming-Plattformen nicht zulässt, können die oben genannten Drittanbieter-Tools Ihnen die Arbeit abnehmen, Ihre Playlists neu erstellen zu müssen. Allerdings erfüllt nicht jedes Tool Ihre Anforderungen. Außerdem sind einige Tools kostenpflichtig, sodass Sie mit Kosten rechnen müssen.
Während Soundiiz und FreeYourMusic spezialisierte Lösungen für die Übertragung von Playlists anbieten, bietet AMusicSoft YouTube Music Converter einen umfassenderen Ansatz: Sie können Ihre gesamte YouTube-Musikbibliothek herunterladen und zu Spotify übertragen, ohne ein Musikstück zu verpassen. Wenn Sie dieses Tool auch nützlich finden, probieren Sie AMusicSoft einfach aus!
Menschen Auch Lesen
- Gelöst: Warum unterstützt Alexa YouTube Music nicht?
- Warum funktioniert YouTube Music nicht? Probieren Sie diese Lösungen aus
- So laden Sie kostenlos Musik von YouTube auf den Computer herunter (2 Möglichkeiten)
- Wie lädt man Songs von YouTube ohne Premium herunter?
- Die 8 besten kostenlosen YouTube-Musik-Downloader, die Sie ausprobieren können
- 3 einfache Möglichkeiten, Musik von YouTube auf das iPhone herunterzuladen
 Über den Autor
Robert Fabry ist ein begeisterter Blogger und Technik-Enthusiast. Vielleicht kann er Sie mit ein paar Tipps anstecken. Außerdem hat er eine Leidenschaft für Musik und hat zu diesen Themen für AMusicSoft geschrieben.