Comment se désabonner d’Apple Music sur tous vos appareils ?
Apple Music propose un vaste catalogue de chansons, des playlists personnalisées et des stations de radio personnalisées qui attirent des millions d'utilisateurs dans le monde. Cependant, pour des raisons de coût, de faible utilisation ou par préférence pour un autre service, vous pourriez décider de vous désabonner. se désabonner d'Apple MusicDans ce guide, nous vous expliquerons les étapes essentielles pour résilier votre abonnement Apple Music sur tous vos appareils et vous conseillerons sur la sauvegarde de votre musique au cas où vous décideriez de revenir au service ultérieurement. Que vous utilisiez un iPhone, un iPad, un Mac ou même un PC Windows, ce guide vous fournira des instructions claires pour gérer votre abonnement. Apple Music abonnement efficace.
Guide des matières Partie 1. Devrions-nous annuler l’abonnement à Apple Music ?Partie 2. Sauvegardez votre musique avant de résilier votre abonnement Apple MusicPartie 3. Comment annuler votre abonnement Apple Music ?Partie 4. Résumé
Partie 1. Devrions-nous annuler l’abonnement à Apple Music ?
Avant de décider de vous désabonner d'Apple Music, il est important d'évaluer votre utilisation et vos besoins. Dans cette section, nous aborderons quelques raisons valables pour lesquelles vous pourriez vouloir vous désabonner :
- Prix:Apple Music facture des frais mensuels, et vous pourriez trouver cela trop cher, surtout si vous ne l'utilisez pas assez souvent.
- Alternatives:Il existe d'autres services de streaming musical comme Spotify, Amazon Music ou YouTube Music qui peuvent offrir un meilleur rapport qualité-prix, des fonctionnalités différentes ou un catalogue musical qui vous convient mieux.
- Utilisation peu fréquente:Si vous n'écoutez pas souvent de la musique, l'abonnement ne vaut peut-être pas l'investissement.
- Stockage :Les téléchargements d'Apple Music peuvent occuper de l'espace sur votre appareil, ce qui peut devenir un problème si vous disposez d'un espace de stockage limité.
En fin de compte, la décision d'annuler ou non dépend de votre utilisation, de vos préférences et de votre budget. Prenez le temps de peser le pour et le contre en fonction de vos besoins musicaux.
Partie 2. Sauvegardez votre musique avant de résilier votre abonnement Apple Music
Se désabonner est relativement simple, mais il est important de sauvegarder vos musiques et playlists téléchargées avant de vous désabonner d'Apple Music. Si vous avez téléchargé de la musique pour une écoute hors ligne, la résiliation de votre abonnement entraînera la perte de l'accès à ces morceaux. En revanche, vous ne pouvez pas transférer ces morceaux téléchargés sur des appareils non Apple pour les écouter, car Apple Music utilise la technologie DRM (gestion des droits numériques) pour protéger le contenu musical de sa bibliothèque.
Pour conserver vos morceaux et playlists préférés au format sans DRM, même sans abonnement actif, utilisez un outil de suppression de DRM comme AMusiqueSoft Spotify Music Converter libère tout le potentiel de votre musique en la libérant des restrictions DRM d'Apple.
AMusicSoft Apple Music Converter prend en charge une interface et des fonctions d'application faciles à gérer et il peut supprimer le DRM des éléments Apple MusicUne fois les résultats de la conversion obtenus, vous pouvez partager ou transférer librement les chansons téléchargées via Apple Music vers d'autres appareils ou services, sans restriction. Même si Les chansons Apple Music sont griséesVous pouvez les restaurer immédiatement. Il prend également en charge les formats audio MP3, FLAC, WAV, AAC, AC3 et M4A, et garantit une qualité de conversion très agréable à écouter.
Comment sauvegarder votre musique pour être sûr de la conserver même sans abonnement actif ? Suivez le guide étape par étape ci-dessous.
Étape 1 : Cliquez sur le bouton Téléchargement gratuit ci-dessous pour sauvegarder vos chansons sans DRM sur votre PC Windows ou Mac ! Avec le logiciel AMusicSoft, votre écoute Apple Music ne sera plus limitée par les DRM !
Téléchargement gratuit Téléchargement gratuit
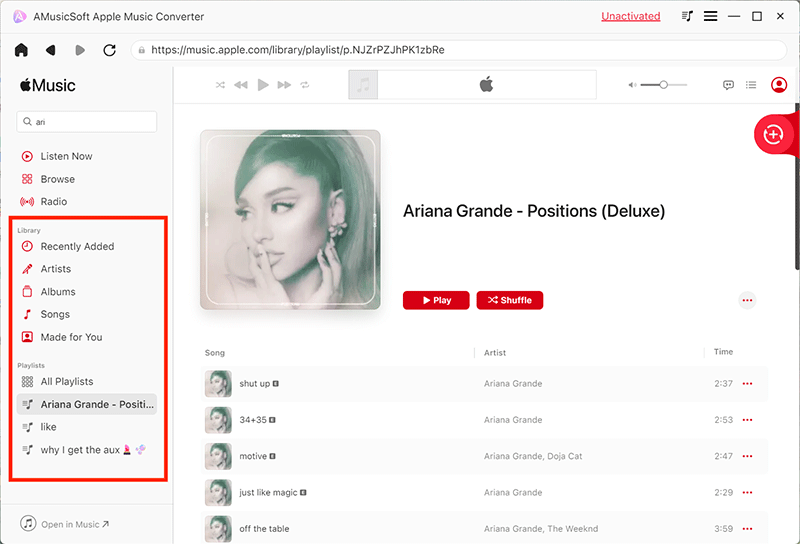
Étape 2 : Grâce à son interface utilisateur conviviale et simple, vous pouvez accéder au lecteur Web Apple Music intégré pour vous connecter à votre compte après le lancement. Lorsque vous localisez la bibliothèque musicale, parcourez et trouvez la musique que vous souhaitez convertir. AMusicSoft prend également en charge la conversion par lots, vous pouvez également ajouter une liste de lecture ou un album entier en une seule fois, ce qui vous permet également d'économiser votre énergie et votre temps.
Étape 3 : Après cela, procédez à la sélection du format de sortie à utiliser. Ici, nous choisissons le format MP3 car c'est le format audio le plus flexible. Vous êtes également libre d'ajuster les paramètres de sortie en fonction de votre qualité de sortie préférée. Vous pouvez également sélectionner le dossier de sortie pour le stockage des fichiers.

Étape 4 : Convertissez maintenant les fichiers sélectionnés en cliquant sur le bouton "Convertir" dans le coin inférieur droit de l'interface.
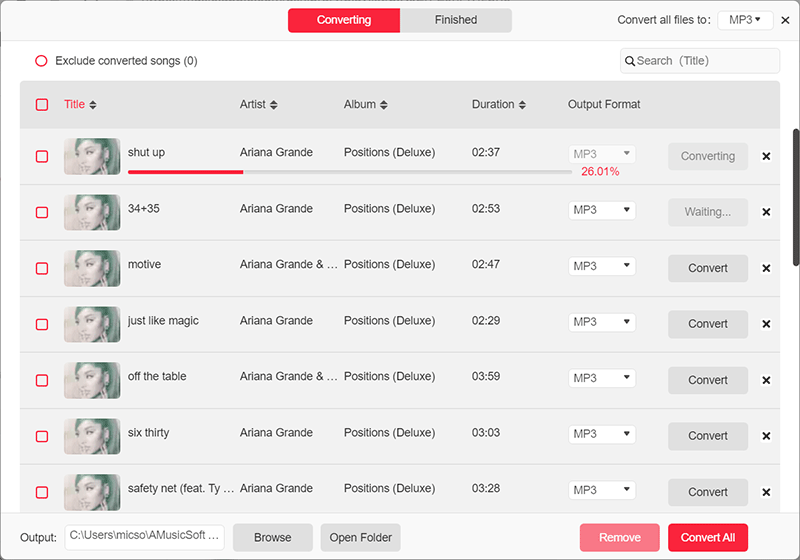
Une fois la conversion terminée, le fichier MP3 s'affichera dans le dossier de destination défini à l'étape précédente. Vous pouvez maintenant vérifier votre sauvegarde avant de vous désabonner d'Apple Music. Ce convertisseur Apple Music gratuit permet de conserver les balises ID3 et les métadonnées telles que la pochette, le titre, l'artiste, l'album, le genre et l'année. Vous pouvez facilement organiser les morceaux convertis et les reconnaître sur des lecteurs compatibles ID3.
Partie 3. Comment annuler votre abonnement Apple Music ?
En suivant les étapes ci-dessus, vous pouvez conserver votre musique même après avoir résilié votre abonnement. Pour vous désabonner, suivez ces étapes selon l'appareil que vous utilisez :
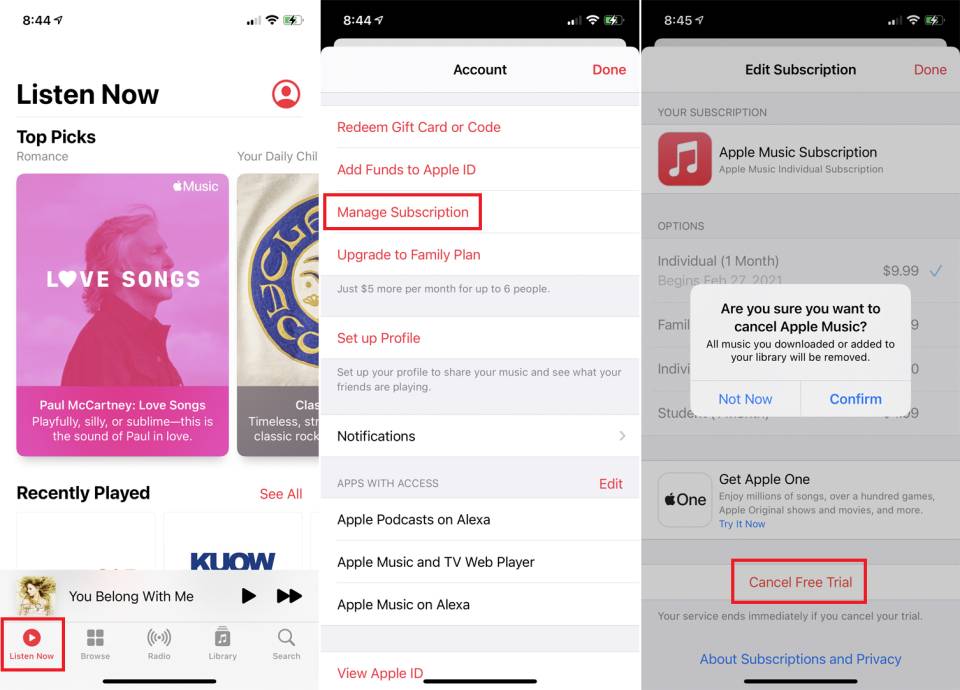
Pour appareil iOS
- Lancez votre application Apple Music et remarquez les onglets placés dans la partie inférieure.
- Parmi les onglets affichés, cliquez sur l'onglet "Pour vous".
- Dans la nouvelle fenêtre affichée, vous verrez l'icône de votre profil. Celui-ci est situé dans la partie supérieure droite. Cliquez ensuite sur cette icône.
- Dans l'option que vous voyez, sélectionnez Gérer l'abonnement.
- Pour vous désabonner d’Apple Music, appuyez sur le bouton Annuler l’abonnement.
Pour Mac
- Ouvrez l'application App Store et cliquez sur le nom et l'image de votre compte dans le coin inférieur gauche.
- Cliquez sur Paramètres du compte. Faites défiler jusqu'à Abonnements, puis cliquez sur Gérer.
- À côté de l'abonnement Apple Music, cliquez sur Modifier. Cliquez sur Annuler l'abonnement. S'il n'y a pas de bouton Annuler ou Annuler l'abonnement, l'abonnement a déjà été annulé.
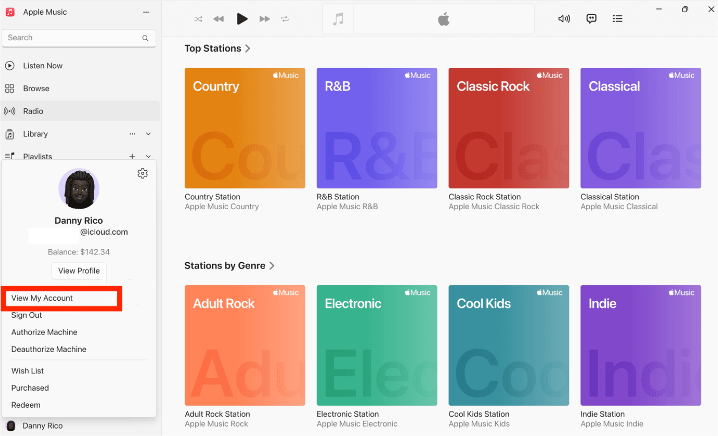
Pour Windows
- Pour vous désabonner d'Apple Music sur Windows 11, ouvrez l'application Apple Music. Cliquez sur votre nom en bas de la barre latérale, puis choisissez « Voir mon compte ». Vous devrez peut-être vous connecter avec votre identifiant Apple.
- Faites défiler jusqu'à la section « Paramètres ». À côté de « Abonnements », cliquez sur « Gérer ». Trouvez l'abonnement Apple Music, puis cliquez sur « Modifier ».
- Cliquez sur Annuler l'abonnement. Si aucun bouton « Annuler » ou « Annuler l'abonnement » n'est disponible, l'abonnement a déjà été annulé.
Pour Android
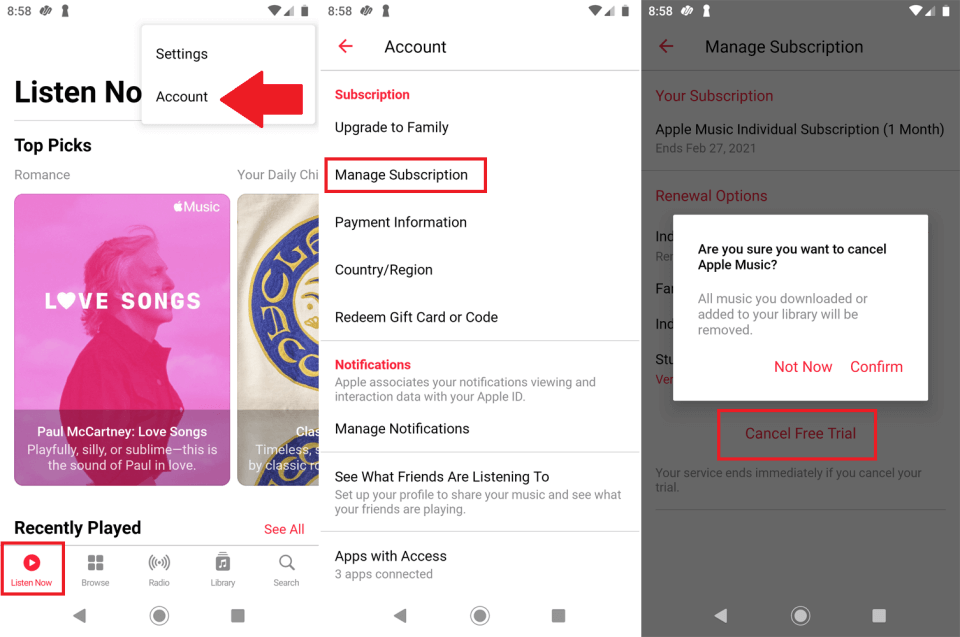
- Exécutez l'application Apple Music sur votre téléphone Android.
- Sélectionnez l'onglet Écouter maintenant dans la partie inférieure, puis cliquez sur le bouton à trois lignes situé dans la nouvelle fenêtre.
- Après cela, les options de menu apparaîtront dans lesquelles vous devrez sélectionner le bouton Compte.
- Quelques secondes plus tard, la fenêtre Compte s'ouvrira. Choisissez Gérer l'abonnement et appuyez sur Annuler l'abonnement, puis cliquez sur le bouton Confirmer qui s'affiche dans la fenêtre contextuelle.
Partie 4. Résumé
Se désabonner d'Apple Music est simple, mais il est essentiel de sauvegarder au préalable toute musique que vous souhaitez conserver. Si vous estimez qu'Apple Music ne répond plus à vos besoins, que ce soit en raison de son coût, d'une utilisation peu fréquente ou d'une préférence pour d'autres services, vous pouvez facilement vous désabonner d'Apple Music sur tous vos appareils. N'oubliez pas qu'une fois l'abonnement résilié, vous perdez l'accès à la musique téléchargée, mais les chansons achetées restent accessibles si vous utilisez AMusicSoft Apple Music Converter.
Les gens LIRE AUSSI
- Comment changer le forfait Apple Music sur votre appareil ?
- Combien coûte le plan familial Apple Music
- Connaître "Devez-vous payer pour Apple Music"
- Des moyens simples d’obtenir une remise pour étudiants Apple Music
- Guide pour obtenir un abonnement annuel Apple Music
- Comment obtenir Apple Music gratuitement sans carte de crédit ?
- Le moyen le plus simple de passer d'Apple Music au plan étudiant
 A propos de l'auteur
Robert Fabry est un blogueur passionné, un passionné de technologie, et peut-être pourra-t-il vous contaminer en partageant quelques astuces. Il a également une passion pour la musique et a écrit pour AMusicSoft sur ces sujets.