iTunes Windows に音楽をエクスポートするにはどうすればいいですか?
お気に入りの音楽をバックアップする方法を知りたい場合は、音楽のバックアップ方法に関するガイドが役立ちます。 iTunes Windowsへのエクスポート こちらへ。iTunesは初期の頃はプロフェッショナルなメディアプレーヤー兼管理ツールとして好評を博していましたが、使用中に多くの問題が発生し、中には知らないうちに音楽やプレイリストを失ってしまうという報告がユーザーから相次いでいます。お気に入りの音楽を永久に保存するには、iTunesからパソコン、USBドライブ、クラウドストレージサービスなど、お好きなメディアデバイスに曲をエクスポートまたは転送してみてください。iTunesからすべての音楽をエクスポートするにはどうすればいいでしょうか?このチュートリアルでは、iTunesの音楽とプレイリストをエクスポートする手順をすべてご紹介します。詳しくは、ぜひお読みください。
コンテンツガイド パート1. WindowsでiTunesプレイリストを手動でエクスポートするパート2. WindowsでiTunesプレイリストをテキストまたはXMLファイルとしてエクスポートするパート3. WindowsでiTunesプレイリストをMP3にエクスポートするパート3:結論
パート1. WindowsでiTunesプレイリストを手動でエクスポートする
バックアップを転送できます iTunes 新しいパソコンを購入した場合、古いパソコンから新しいパソコンに音楽ライブラリをエクスポートする必要があります。そこで、iTunesからWindowsパソコンに音楽をエクスポートする方法をご紹介します。iTunesからWindowsにプレイリストを手動でエクスポートする方法は以下のとおりです。
ステップ 1:
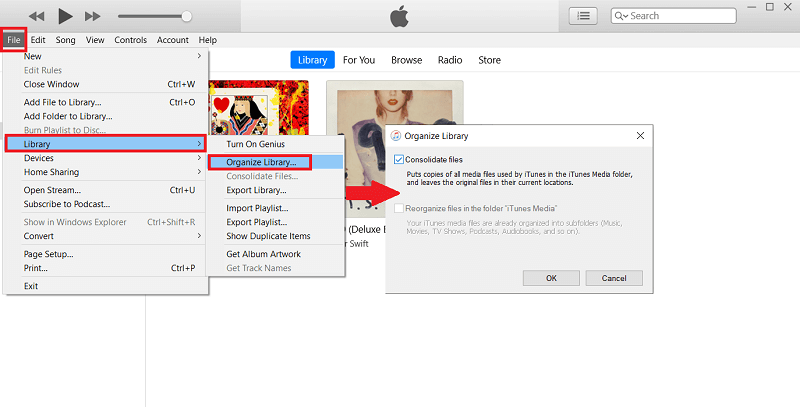
ライブラリ内のすべてのファイルを最初に iTunes フォルダに統合すると、ライブラリを新しいコンピュータに簡単に移動できます。そこで、iTunes を開き、「ファイル」>「ライブラリ」>「ライブラリを整理」を選択します。 「ファイルを統合」を選択します。
ステップ 2:
「編集」>「環境設定」を選択し、「詳細設定」をクリックします。 「iTunes Media フォルダーの場所」セクションから、iTunes ライブラリを保存するフォルダー名を取得できます。 iTunes フォルダーのパスをコピーします。 iTunes を終了します。
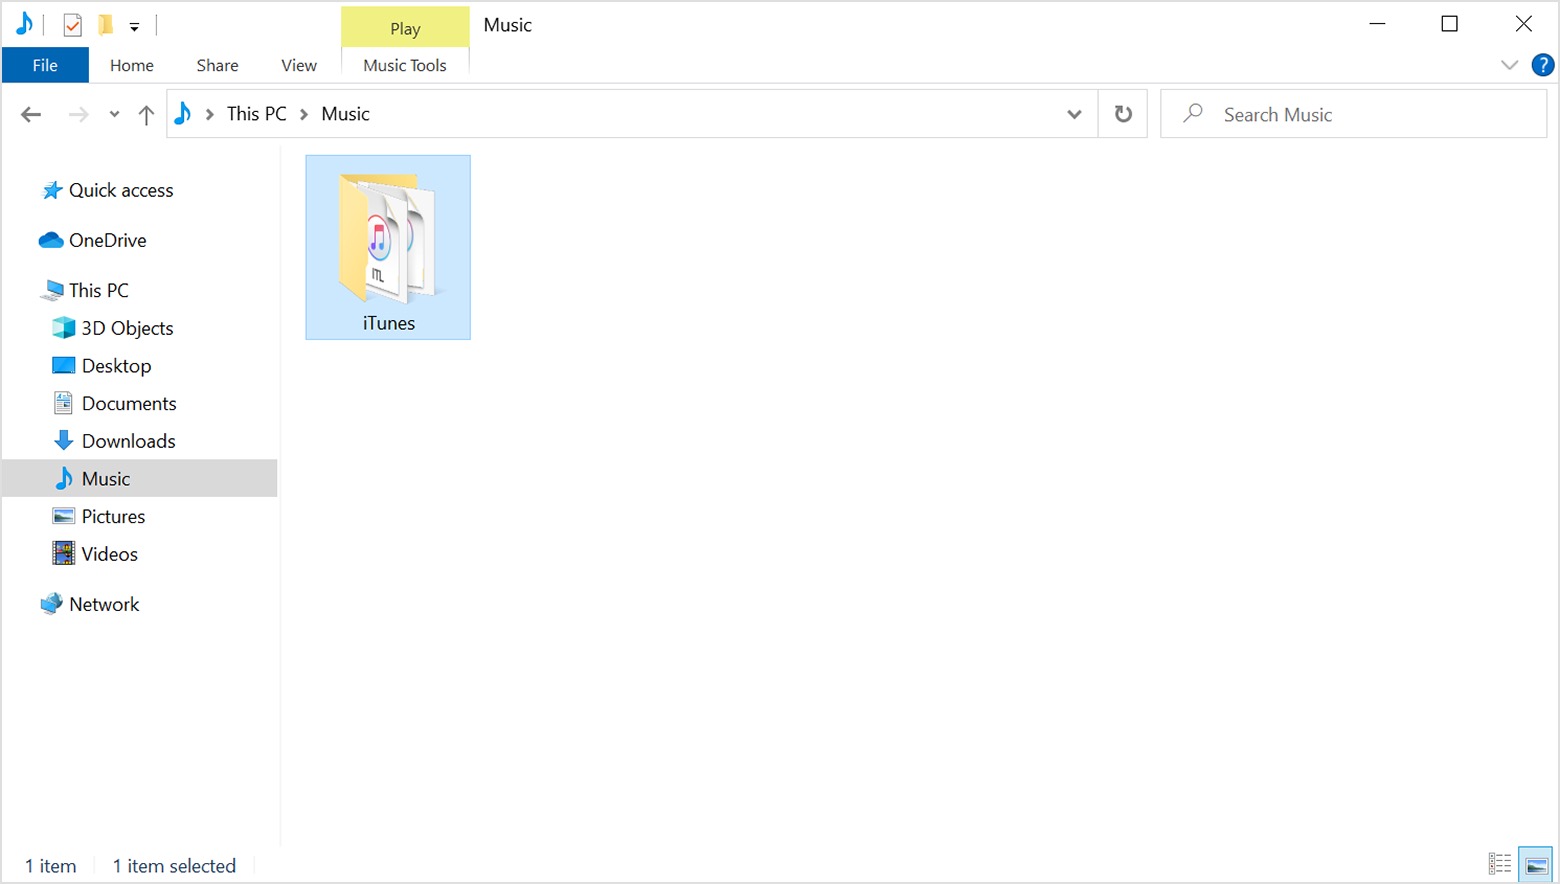
ステップ 3: ファイルエクスプローラーでiTunesフォルダに移動します。iTunes Windowsに音楽をエクスポートするには、iTunesフォルダを元の場所からデスクトップ、別のフォルダ、または外付けドライブにドラッグします。
iTunesからコンピュータに音楽を転送するのは簡単ですが、時間のかかる方法のように思われます。エクスポートされたファイルはモバイルデバイスで再生できない場合があります。
パート2. WindowsでiTunesプレイリストをテキストまたはXMLファイルとしてエクスポートする
iTunes Windows版への音楽エクスポートでは、曲の情報をエクスポートしてデータベースや他のアプリで利用することもできます。難しそうに聞こえるかもしれませんが、正しい手順に従えば実はとても簡単です。iTunesプレイリストをシートファイルにエクスポートするには、以下の手順をご確認ください。
ステップ 1:
WindowsでiTunesを開きます。開いたら、「プレイリスト」タブを選択します。「プレイリスト」タブを選択すると、コレクションにあるすべてのプレイリストが画面の左側に表示されます。
ステップ 2:
リストからエクスポートしたいものを選択します。選択後、「ファイル」タブをタップし、次に表示されるメニューから「プレイリストのエクスポート」オプションを選択します。
ステップ 3:
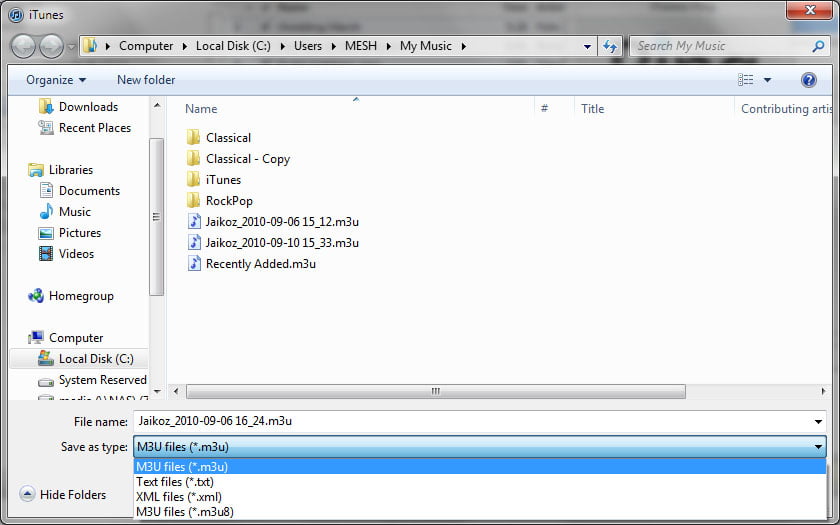
数秒後に新しいウィンドウが表示されるので、ファイル名が変更されていないか、正しいかを確認してください。また、「ファイルの種類」ボタンを選択し、「テキストファイル(*.txt)」を選択してください。エクスポートしたiTunesファイルをiTunesアプリに戻す予定の場合は、XMLファイル形式を選択してください。
ステップ 4:
iTunes Windows 用に音楽をエクスポートするには、「保存」ボタンを押して、プロセスが完了するまでしばらく待ちます。
パート3. WindowsでiTunesプレイリストをMP3にエクスポートする
DRMフリーのiTunesアイテムはすべてDRM保護されています。2003年から2009年の間にiTunesで購入した音楽、ビデオ、テレビ番組、オーディオブックは、現在もDRM保護されています。さらに、iTunesは別のアプリに置き換えられており、その一つがApple Musicです。Appleは、Apple Musicで利用できるすべてのデジタルコンテンツの配信をFairPlayと呼ばれるDRM技術で防止し、著作権侵害を抑制しています。そのため、iTunesを使ってDRM保護された音楽をWindowsのiTunesに直接エクスポートすることはできません。
唯一の方法は、専門的なツールを使うことです。 AMusicSoft Apple Music コンバータ DRM の解除に関しては非常に熟練しています。 MP3形式だけでなく、AAC、FLAC、WAV、AC3、M4Aなどの形式に音楽ファイルを変換してダウンロードすることもできます。 これらの形式から得られる利点の XNUMX つは、ほとんどすべての音楽プレーヤーで簡単にアクセスできることです。 たとえば、自由にできます RokuでApple Musicをストリーミング またはAlexa。
さらに、AMusicSoftは最大5倍の速さで処理を完了することができ、変換処理後も元の音質を維持する能力に優れています。IDタグやメタデータ情報など、曲の重要な詳細も保存できます。 Apple Music ライブラリ全体を復元する サブスクリプションをキャンセルした後でも。
ステップ 1:
このアプリケーションはWindowsとMacのオペレーティングシステムに対応しています。下の無料ダウンロードボタンをクリックして、このアプリをコンピューターにインストールしてください。アプリケーションを開くと、音楽ライブラリが自動的に読み込まれます。
ステップ 2:
AMusicSoftソフトウェアを開き、内蔵ウェブプレーヤーに入り、Apple IDでサインインします。エクスポートしたい曲を検索します。曲を「+」ボタンにドラッグするだけで、ソフトウェアがApple Musicからデータを取得します。

ステップ 3:
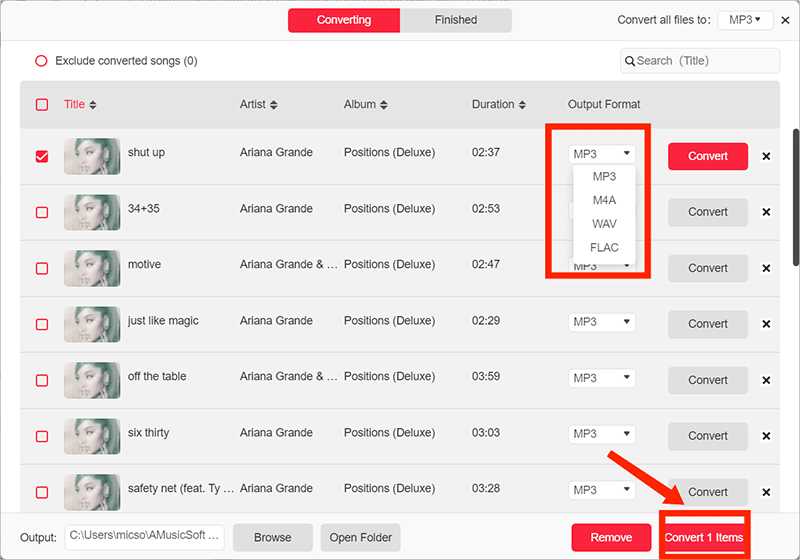
iTunesのプレイリストがAMusicSoftアプリに読み込まれたら、「フォーマット」オプションをクリックします。出力形式はMP3に設定できます。次に、出力フォルダを選択します。

ステップ 4: 正しい形式と出力パスの選択が完了したら、「変換」ボタンをクリックして変換を開始します。完了すると、変換されたすべての曲が「完了」セクションに表示されます。
AMusicSoft Apple Music Converterを使って、iTunesプレイリストをMP3形式にエクスポートできました。変換されたMP3ファイルはDRM制限が解除されているため、お好きなMP3プレーヤーやデバイスで聴くことができます。AMusicSoft Apple Music Converterは、iTunesプレイリストをMP3にエクスポートするプロセスを簡素化し、音楽コレクションを制限なく楽しめるようにします。
パート3:結論
上記の内容から、iTunes Windowsへの音楽エクスポートの具体的な手順をご理解いただけたかと思います。このガイドが、お気に入りの音楽を簡単に永久にバックアップするお役に立てば幸いです。また、 AMusicSoft Apple Music コンバータ DRM フリーの音楽を好きなオーディオ形式でダウンロードできます。これは無料のソフトウェアです。Mac と Windows の両方で利用できる無料試用版を使って、とにかく自分で試してみることをお勧めします。
人々はまた読む
 著者について
Robert Fabry は熱心なブロガーであり、テクノロジーに強い関心を持つ人物です。彼がヒントをいくつか共有することで、皆さんを魅了してくれるかもしれません。彼は音楽にも情熱を持っており、AMusicSoft で音楽に関する記事を執筆しています。