Learning How To Create Apple Music Profile
Apple Music is one of the most used online music streaming sites of today. It has been consistently delivering good services to their subscriber which is why it has been also so popular. We cannot deny the fact that as time goes by; the number of subscribers of Apple Music has been doubled, and is growing faster than ever.
If you are a lover of music, and you want to try something new, Apple Music is one great choice. In this article, we will be learning how to create Apple Music profile. It is useful in one of the latest new features of Apple Music. It can help you share your curated playlists or your most loved songs with anyone you wanted.
Aside from the process of how to create Apple Music profile, we will also learn about your friends’ playlists if you are one of their followers, and also one incredible way to share songs from Apple Music with your friends and loved ones. This one is really interesting since you can be able to learn a lot of beneficial things about Apple Music, there is still a lot to discover as you go on through the article, so you better read it until the very end.
Contents Guide Part 1. How To Create Apple Music Profile?Part 2. How To Find Following Friend's Playlists?Part 3. Bonus: Share The Apple Music To Your FriendPart 4. To Summarize It All
Part 1. How To Create Apple Music Profile?
So, how are you going to create an Apple Music profile? The steps are quite long however they are easy to follow and to understand. This is a new social feature of Apple Music and of course one of the basic things that you must have in your Apple Music profile. We will be listing all the steps down below so that you can immediately follow if you are looking for steps on how to create Apple Music profile.
- On your device, launch your Apple Music application, and then proceed to the section that says “For You”.
- You will then see an “Avatar” on the top right corner of the interface, you have to tap it.
- Then once you see “Start Sharing with Friends”, tap it.
Once you are done with the three steps listed above, you will then need to set your Apple Music profile information, here are the steps on how you set your profile.
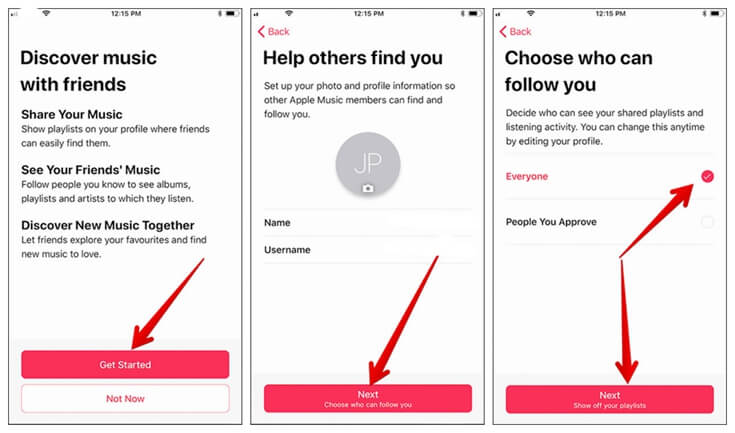
- You need to tap “Get Started”, which is located on the page of “Discover Music with Friends”.
- You need to set your name, image, and the username that you will be using in the section tagged as “Help Others Find You”. Once you have set everything, tap “Next”.
- Thirdly, you have the choice of who will see your playlists. You have the choices such as “People Your Approve”, or “Everyone”. On the other hand, in case you will have a change of heart you can always change anytime you wanted.
- Then start choosing the songs or the playlists that you want to share with your friends. In case you do not want to share any of your songs or playlists, you could tap the “Hide All”. To be able to set the final changes that you have made, click “Next”.
- You can now start looking for more friends with whom you intend to share your playlists. In the pop-up notification, click “Invite” or “Follow”, you can also try to search for more friends using the social media options like “Instagram”, “Facebook”, or “Twitter”.
- Then, for the final step, you must set the way you can receive notifications. You also have two options like “Artists and Programs”, or “Friends”, if you do not want to, you can turn them “Off”. Then you have to tap “Done” to be able to finish everything.
Now that your Apple Music profile is created, you can always tap the “Avatar” anytime that you want to view your profile page. You can also edit anything on your Apple Music profile such as the name, or the image itself that represents you as the owner of the Apple Music profile.
Part 2. How To Find Following Friend's Playlists?
Now that you have learned how to create Apple Music profile, the next thing that you have to learn is the process of how to find following friends’ playlists. In this post, we will also share with you the step-by-step procedures on how you are going to do it.
- Using your device, launch the Apple Music application and proceed to the “For You” section.
- Once you see the avatar that represents your account, tap it. It will lead you to your profile.
- Then for you to be able to see all your followers and friends that you follow, scroll down.
- If you have chosen which friend’s playlists are you going to look at, click him or her, and then you will see the list of playlists that he or she shared.
- To add the playlists to your library, you must tap “Add”.
You can also share your playlist with your friends so that once they go to your profile they could choose which one suits their taste, here’s how you do it.
- On your iPhone, launch the Apple Music application; you must have the latest version of iOS or the iOS 11 to be able to proceed.
- Then, proceed to “For You”, and then tap your avatar to be able to go to your profile.
- Tap the “Edit” button.
- Then proceed to the section that says “Shared Playlists”, then you can now start editing which playlists are you willing to share with your friends and followers.
Part 3. Bonus: Share The Apple Music To Your Friend
In the previous part we have shared with you how can you be able to share your playlists with all of your friends. The steps are quite easy; however, it is also a reminder that to be able to do it you should be subscribed to the paid version of the application. To some, this amount of money can already be so helpful to cope with everyday needs, so do you think there is a way that you can be able to share your favorite songs with your friends, without spending that much?
You would be glad if you are still here and currently reading this part of the article, because as what the title of this part is saying, this one might be the bonus part that you have always been looking for. For the bonus part, we want to share with you a tool that you can use to share your songs with your friends. This tool can do so many things for the users and you would be surprised if you have learned about this one.
The tool that we are talking about is the AMusicSoft Apple Music Converter, a professional converter that is efficiently used in the conversion of music files from a certain file type into another one depending on the purpose that you have. For example, you can transfer Apple songs to MP3, FLAC, M4P, WAV, ETC.
If you also worry that by transferring or sharing the music files, DRM may get in the way, through the use of this professional converter, DRM will be removed alongside the process of conversion. So it means that there is no limit to sharing your music files with your tons of friends anytime you wanted. As what we have talked about, you do not need to be subscribed to any online music streaming site if you have AMusicSoft Apple Music Converter with you, it also means that you can be able to enjoy your saved money and use it for other important things.
Aside from all the beautiful things mentioned above, AMusicSoft Apple Music Converter is also easy to use and has a very mere interface that anyone can use. We will be learning the steps on how to use his professional converter below.
- The first step that you have to do is to download the professional converter and have it installed on your personal computer. Once the AMusicSoft Apple Music Converter is already installed, you can now start choosing the music files that you want to convert. This professional converter supports multiple conversions so you can choose a whole album or a whole playlist.
- Make a folder where you will be storing the files that you want. You can rename the folder based on your own choices. For you to save the music files that you have converted on your created folder, you can directly save them, use the drag and drop method, or the copy and paste method.

- To finalize the whole process, click “Convert”.
Part 4. To Summarize It All
There are a lot of ways to share your music with your loved ones and friends. We have discussed two of the most reliable methods that you can use. We hope that you have learned a lot of things that can be of benefit to you as you enjoy listening to and sharing your most loved songs with your friends, family, and loved ones.
People Also Read
 About The Author
Robert Fabry is an ardent blogger, and an enthusiast who is keen about technology, and maybe he can contaminate you by sharing some tips. He also has a passion for music and has written for AMusicSoft on these subjects.