How to Create Ringtone in iTunes
You are currently listening to your favorite track in iTunes when suddenly you heard it as someone’s ringtone, then you thought how cool it is and you want to know how can you possibly do that too.
Don’t worry because we got you covered! In addition to creating ringtone in iTunes, we can also set Apple Music as ringtone. And by reading this article you can learn how to make a custom ringtone on iPhone and also create ringtone in iTunes with just simple steps. Are you getting excited? Then, let’s get started!
Contents Guide Part 1. How to Create Ringtone in iTunes or Remove It?Part 2. How Do You Make A Song as Your Ringtone on iPhone?Part 3. Bonus: Remove DRM from Apple Music without SubscriptionPart 4. To Sum Everything Up!
Part 1. How to Create Ringtone in iTunes or Remove It?
So, how to create ringtone in iTunes? In this section, I will provide you the simple steps which will serve as a guide so you can have your customized ringtone using your iTunes.
![]()
Steps on How to create Ringtone in iTunes
- Launch your iTunes on your laptop or desktop.
- Choose the song that you wish to use from your iTunes Library, just be sure that the song that you wanted is in your iTunes because you will be going to trim it so you can make it as your ringtone.
- Search the part of the song that you wanted to use by double-clicking the song in iTunes so you can play it, then select the section that you will use as your ringtone.Note that the length of the ringtone should not exceed more than 40 seconds, you can use the time-stamp at the upper portion of the iTunes while the song is playing as your guide.
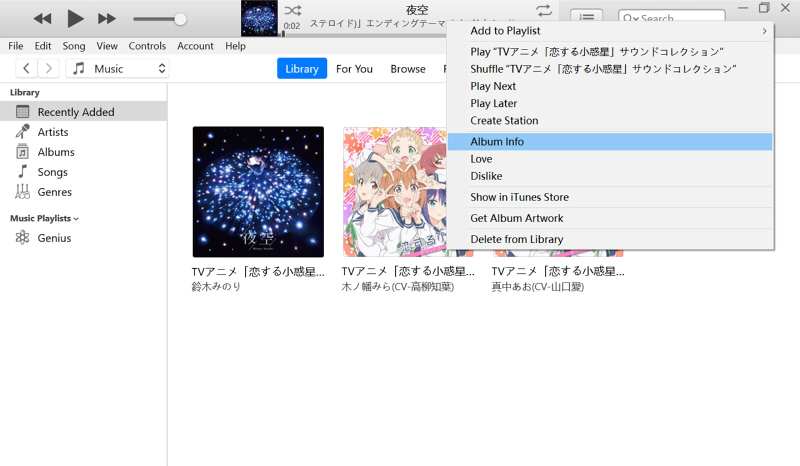
- Then open the song's information by clicking the song itself, then for windows users click “Edit” and for Mac “File”. Next, select and click “Get Info” (Mac) or “Song info” (Windows), a drop-down menu will appear after that.
- Next, select the Options tab that is on the top of the information menu.
- Now comes the 6thsteps of creating Ringtone in iTunes. Check or tick the “start” and “stop” boxes that are close to the upper portion of the window, just right below the “media kind” section, for you to adjust or make changes with the start and stop time of the song that you selected.
- Place in the “start” and “stop” text box, the part of the song you wish it to start and end.
- Once you are satisfied, click the “OK” button to save changes and to exit the information menu as well.
- Next, you need to make an AAC version of the song, by selecting the song and clicking the “File”, then on the drop-down menu click Convert and select Create AAC version on the pop-out menu.If the song that you changed didn’t appear go to the Import Settings of “Preferences”, click “Import Using” and select AAC Encoder in the drop-down menu.
- Select the location of the AAC version by clicking “File”, then “Show in Windows Explorer” for Windows or “Show in Finder” for Mac. It will direct you to the file’s location on your computer.
- Next, we have to change it from the AAC file to the M4R file. I provide separate steps if you are using Windows or Mac because it will vary.
For Windows:
- Click on the View tab
- Tick the “File name extensions” box.
- Select the “.m4a” version of the song by clicking it.
- Go to the Home tab, then choose Rename, then simply change m4a with m4r at the end of the song file name, click enter, and OK to complete the process.
For Mac:
- Choose the AAC file of the songs.
- Then, select the AAC file of the songs, next click the “File” item in the menu, a drop-down menu will appear, and select Get Info.
- Next, in the “Name & Extension” make m4a to m4r, then press the “Return” button and once Use m4r is prompted just click it.
Now that we have completed the process of creating ringtones in iTunes, Let me now guide you on how or where are ringtones in iTunes 12 and also create ringtone in iTunes on mac, so you can add it to your device.
If Your Version of iTunes Is Earlier Than 12.6.5
- Transfer your file into the Automatically Add to iTunes folder that can be seen inside your media folder. The ringtone will be included in the Tones section of the library and also in the Tones folder in the media folder.
- Click the Edit Menu at the selection menu if you can’t find the Tones on the drop-down menu.
- Next, click on the icon adjacent to the media selection menu once you connected your device. Set the sync options on the device’s Tones tab.
- You may now sync your device.
If Your Version of iTunes Is Later Than 12.7
- Connect your device to your computer
- Make sure that your sidebar in iTunes is visible, enable it if it is hidden.
- Copy and paste or Drag and drop (it is said that Windows users experience problems in iTunes when they run it as administrators) your ringtone to your device from your Finder or Windows Explorer. It depends on which method will work either dropping it on iTunes sidebar or Tones section.
- It is said that the Tones section within the iTunes library is not dedicated anymore.
- Normally, the tones created using earlier versions of iTunes will be seen in the Tones folder that is inside the media folder.
- The ringtones that were shared to iTunes with GarageBand could be found in the media folder named “Import”
If you are using macOS 10.5 Catalina
- Connect the device to your Mac, then on the Finder click the general tab.
- Simply Drag and drop you’re the .m4r file of the tone from the open Finder window to the General tab of your device.
Concerns after updating iOS

It is reported that some users experience that their existing tones were unable to play after they updated their iOS and even, they can’t add new tones. If you experience the same thing, try to remove all the available tones in your device, then reboot and try to repeat the process of adding ringtones.
For you to remove the tones just follow the steps I provided below.
If you are using iTunes 12.7 or later
- Connect the iOS device to your iTunes.
- Choose it by selecting the icon that is visible just next to the drop-down tool of the media selection.
- If it is necessary, Modify manual management on the Summary tab.
- Choose unwanted tones and delete the selected tones on My Device.
- If desired, you can switch back to syncing with designated content.
Note:
You should be able to switch a synced device to manual management and vice versa without the current content being replaced or removed.
How to Remove tones that are hidden
There are times that after you create ringtone in iTunes, it cannot be found in your device’s iTunes. If ever you encounter this, you can use a third-party utility such as iFunBox or a similar one to make changes in your device’s raw file system.
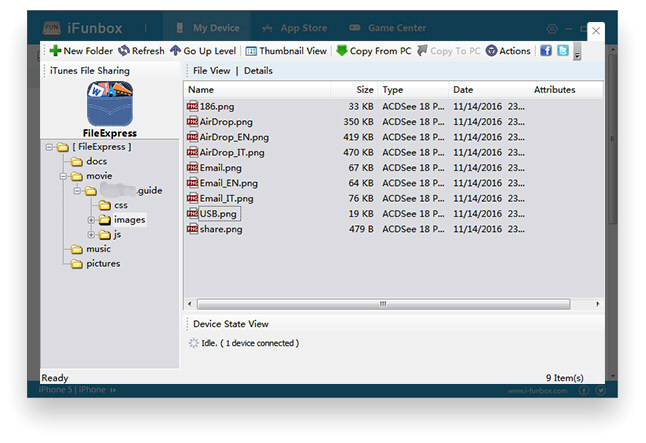
If you are using iFunBox, go to My Device, next select Toolbox, search for User File System for Windows or Raw File system for Mac, then select iTunes_Control and finally Ringtones so you can locate the needed folder.
Any available customed tones that are in your device will appear as 4 letter files name with .m4r extension. By deleting all available .m4r files inside the folder, all the customs tones in your device will be cleared out.
You may consider deleting .plist as well that also available in this folder. If you don’t have the original copies of the tones, you can copy them first before deleting them permanently.
Note: If you are a Windows 10 user, you may have to uninstall your iTunes if it was installed using Microsoft store and reinstall it using the iTunes64setup.exe that is available on the Apple website for it to work with iFunBox.
Also, take note that there will be a potential risk that will make your device unstable if you made an incorrect adjustment, so just to be sure, make an initial Backup on your device in case something might go wrong.
Part 2. How Do You Make A Song as Your Ringtone on iPhone?
Just like what I mentioned in the previous section, after you create ringtone in iTunes you may now use it on any device but here, we will specifically discuss how to make a ringtone on iPhone. Refer to the following steps I provided below.
- First, connect your iPhone to your computer by plugging your unit’s USB cable into the USB port of your computer.
- Look for the iPhone icon which can be found on the upper-left portion of the iTunes window. By doing this, it will instantly open to the iPhone’s page and a list of content that is visible on your iPhone will be on your iTunes Windows left-hand side.
- The tones page will be visible once you click the tab “On My Device” which can be found on the left side of your iTunes window.
- You may now add the ringtone to your Tones page by clicking and dragging the .m4r version of the song that you wanted into your iTunes Window and simply drop it there. The ringtone will be visible on the next page once it is successfully transferred.
- After you have done transferring the customized ringtone, click sync. It is the white button that is on the lower-right side of your iTunes window.
- Wait for few seconds to finish the synchronization of your ringtone to your iPhone. If you notice that the progress bar is no longer available at the top of your iTunes window, then it means that the synchronization is done and you may remove your iPhone from your computer or continue how to set the ringtone on your iPhone.
How to set the ringtone on your iPhone.
- Tap on the Settings of your iPhone.
- On your settings, look for the Sounds & Haptics then click it. For iPhone 6s or earlier, just simply tap on Sounds.
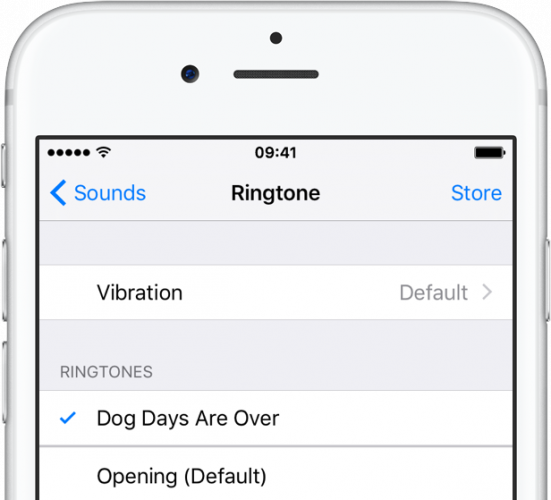
- Tap on or click on Ringtone. You can see it in just below "SOUNDS AND VIBRATION PATTERNS".
- In your “RINGTONES” section, select the name of the ringtone you wish to set as the default ringtone of your iPhone. There will be a blue checkmark that is visible on the left of it that telling that this will be used as your phone’s custom ringtone.
- You can also set your ringtone to any of your contacts by going to your Contacts App, then select the name of the contact, search for Ringtone, and click it. Set the ringtone and just tap Done.
By following the steps above you can now use any songs to create ringtone in iTunes and you also know how to make a custom ringtone on iPhone. Sounds cool right?
Part 3. Bonus: Remove DRM from Apple Music without Subscription
As a bonus tip, if you are an Apple Music user or planning to subscribe then this tip will benefit you. Do you know that you can remove the DRM of tracks in there even without subscriptions? Seems impossible? Then we will make it easier for you, all you need is a powerful tool that can make it possible. This is AMusicSoft Apple Music Converter.
So, what is special about this software. This software is an all-in-one converter that is capable of removing the DRM of the song once you converted it. All you have to do is launch the software and it will automatically scan your Apple Music library even your iTunes, then after that, you can easily select the songs you want to convert.
Don’t worry if you are a first-timer because the design was designed to be user-friendly. If you want to try this amazing program, you can download the installer on its official website and see it for yourself.
Part 4. To Sum Everything Up!
Learning how to create ringtone in iTunes and use it to customize the tone of your incoming calls is much enjoyable than your ordinary phone’s default ringtone.
This can also enhance your creative side and also your mood. I hope this post helped you and made you discovered that you can also create ringtone in iTunes.
People Also Read
- Ondesoft iTunes Converter: iTunes Converter for Mac/Windows
- How To Download Ringback Tones On Android From Apple Music
- 3 Easy Solutions to Fix Apple Music Not Showing Up In iTunes
- How to Play iTunes Music on Chromecast Audio
- How To Play Apple Music On Fitbit iPhone?
- Solutions on How to Fix iTunes Song Greyed Out
- How You Like Me Now Ringtones Download Free On Apple Music
- How to Transfer Music from iPod to Computer without iTunes
 About The Author
Robert Fabry is an ardent blogger, and an enthusiast who is keen about technology, and maybe he can contaminate you by sharing some tips. He also has a passion for music and has written for AMusicSoft on these subjects.