Comment exporter de la musique pour iTunes Windows ?
Si vous voulez savoir comment sauvegarder votre musique préférée, vous aimerez le guide sur la façon de faire de la musique exportation pour iTunes Windows Bien qu'iTunes ait été bien accueilli à ses débuts comme lecteur et gestionnaire multimédia professionnel, de plus en plus d'utilisateurs signalent de nombreux problèmes lors de son utilisation, certains perdant même leur musique ou leurs playlists sans le savoir. Pour sauvegarder votre musique préférée, vous pouvez essayer d'exporter ou de transférer des morceaux d'iTunes vers un ordinateur, une clé USB, un service de stockage cloud ou tout autre support multimédia. Comment exporter toute ma musique depuis iTunes ? Ce tutoriel explique comment exporter de la musique et des playlists iTunes ! Lisez la suite pour en savoir plus.
Guide des matières Partie 1. Exporter manuellement une liste de lecture iTunes sous WindowsPartie 2. Exporter une liste de lecture iTunes sous Windows au format texte ou XMLPartie 3. Exporter une playlist iTunes sous Windows au format MP3Partie 3. Conclusion
Partie 1. Exporter manuellement une liste de lecture iTunes sous Windows
Vous pouvez transférer votre sauvegarde iTunes Si vous avez acheté un ordinateur, vous pouvez transférer la bibliothèque musicale de votre ancien ordinateur vers un nouveau. C'est pourquoi nous souhaitons exporter de la musique pour un ordinateur Windows fonctionnant sous iTunes. Voici comment exporter manuellement des playlists d'iTunes vers Windows :
Étape 1 : Vous pouvez d'abord consolider tous les fichiers de votre bibliothèque dans le dossier iTunes pour faciliter le déplacement de votre bibliothèque vers un nouvel ordinateur. Alors, ouvrez iTunes, choisissez Fichier > Bibliothèque > Organiser la bibliothèque. Sélectionnez "Consolider les fichiers".
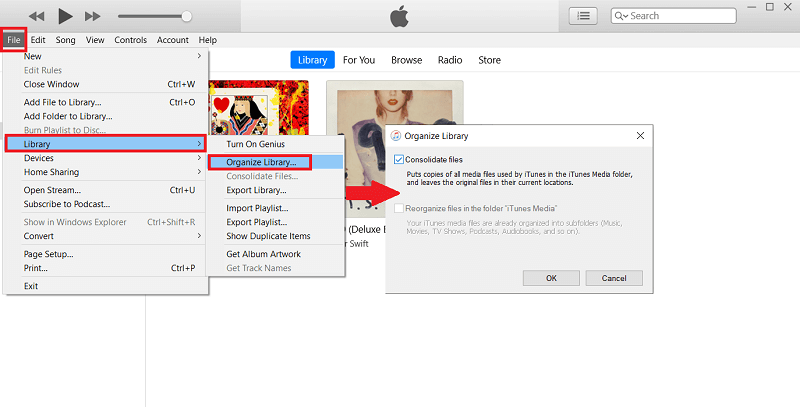
Étape 2 : Choisissez Edition > Préférences, puis cliquez sur Avancé. Dans la section « Emplacement du dossier iTunes Media », vous pouvez obtenir le nom du dossier dans lequel stocker votre bibliothèque iTunes. Copiez les chemins des dossiers iTunes. Quittez iTunes.
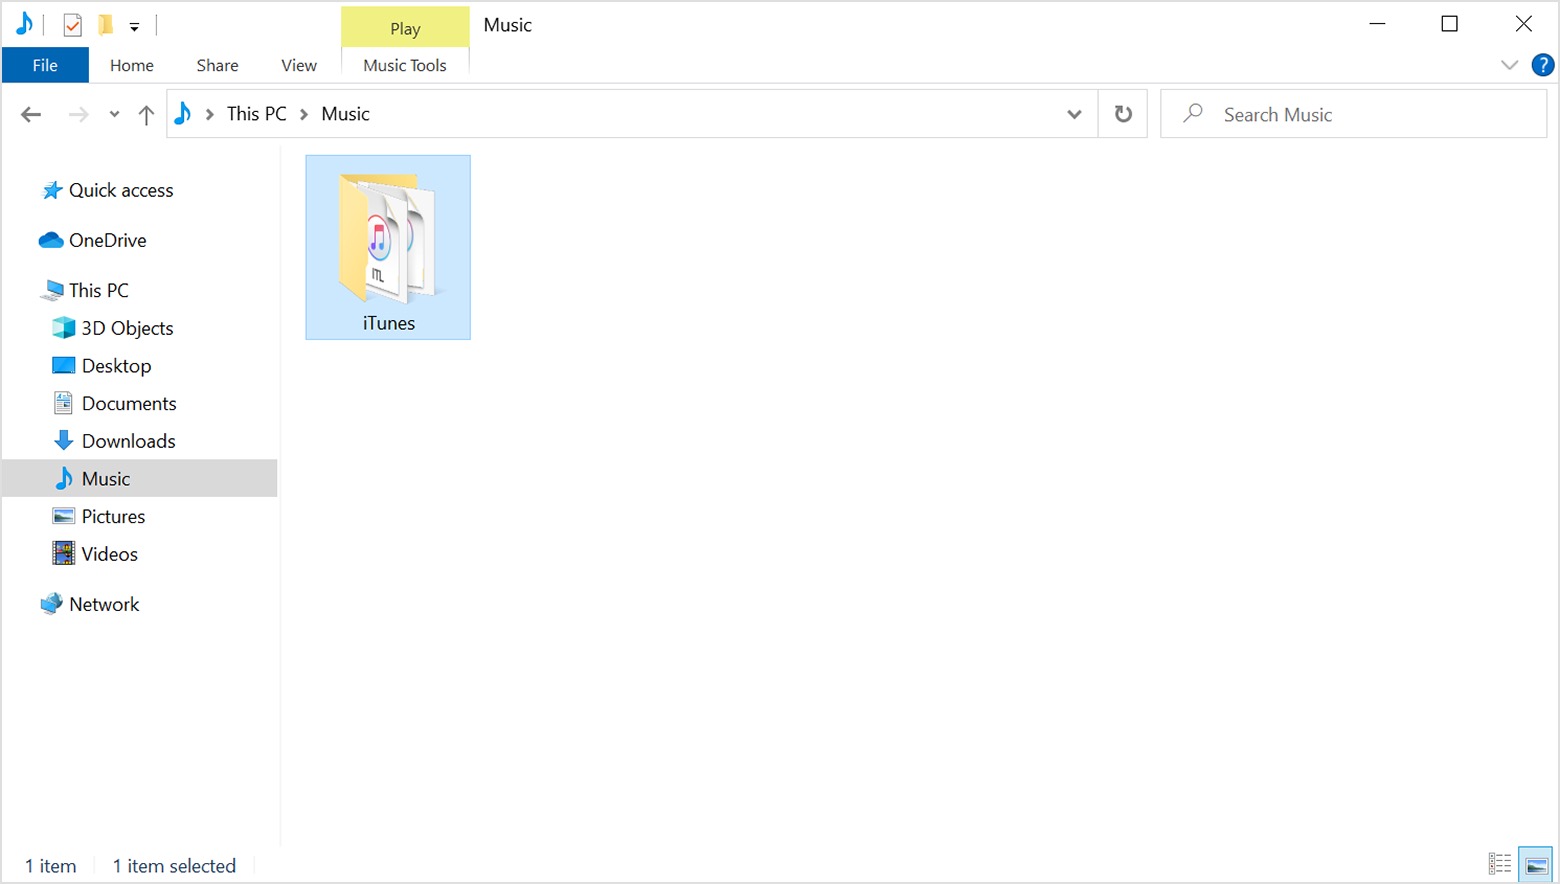
Étape 3 : Accédez à votre dossier iTunes dans l'Explorateur de fichiers. Pour exporter de la musique pour iTunes Windows, faites glisser le dossier iTunes de son emplacement vers le Bureau, un autre dossier ou un disque externe.
Bien que le transfert de musique d'iTunes vers votre ordinateur soit très simple, la méthode peut sembler longue. Les fichiers exportés risquent de ne pas être lisibles sur les appareils mobiles.
Partie 2. Exporter une liste de lecture iTunes sous Windows au format texte ou XML
Pour exporter de la musique vers iTunes Windows, vous pouvez également exporter les informations d'un morceau pour les utiliser dans une base de données ou une autre application. Cela peut paraître compliqué, mais c'est en réalité assez simple une fois la procédure suivie. Pour exporter une playlist iTunes vers un fichier Sheet, suivez les étapes ci-dessous :
Étape 1 : Ouvrez iTunes sur Windows. Après ouverture, sélectionnez l'onglet « Playlists ». Une fois cet onglet sélectionné, toutes les playlists de votre collection s'afficheront. Elles sont placées sur la partie gauche de l'écran.
Étape 2 : Dans la liste, sélectionnez ceux que vous souhaitez exporter. Ensuite, appuyez sur l'onglet Fichier, puis choisissez l'option « Exporter la playlist » dans le menu qui s'affiche.
Étape 3 : Une nouvelle fenêtre s'affichera dans quelques secondes. Vérifiez que le nom du fichier n'a pas été modifié et qu'il est correct. Sélectionnez ensuite le type de fichier, puis Fichiers texte (*.txt). Si vous souhaitez réintégrer les fichiers iTunes dans l'application iTunes après les avoir exportés, choisissez plutôt le format XML.
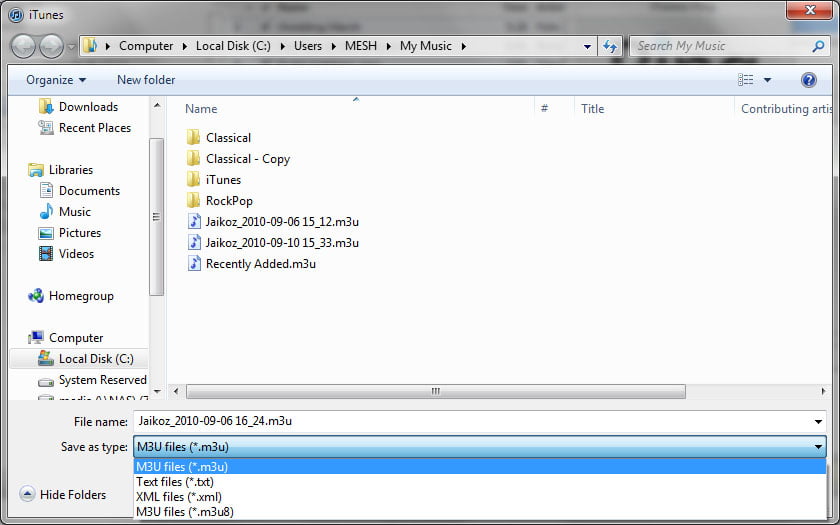
Étape 4 : Pour exporter de la musique pour iTunes Windows, appuyez simplement sur le bouton Enregistrer et attendez un moment jusqu'à ce que le processus soit terminé.
Partie 3. Exporter une playlist iTunes sous Windows au format MP3
Tous les éléments iTunes sont exempts de DRM. La musique, les vidéos, les séries TV et les livres audio achetés sur iTunes entre 2003 et 2009 sont toujours protégés par DRM. De plus, iTunes a été remplacé par des applications distinctes, dont Apple Music. Apple utilise la technologie DRM appelée FairPlay pour empêcher la distribution de tout le contenu numérique disponible sur Apple Music et ainsi limiter le piratage. Il est donc impossible d'exporter directement de la musique protégée par DRM vers iTunes Windows via iTunes.
La seule façon possible est d'utiliser un outil professionnel, à savoir Convertisseur de musique Apple Music d'AMusicSoft qui est très habile en matière de suppression de DRM. Il peut même convertir et télécharger des fichiers musicaux non seulement au format MP3 mais aussi au format AAC, FLAC, WAV, AC3 et M4A. L'un des avantages que vous pouvez tirer de ces formats est qu'ils sont facilement accessibles par presque tous les lecteurs de musique. Par exemple, vous pouvez librement diffuser de la musique Apple sur Roku ou Alexa.
De plus, AMusicSoft peut terminer le processus jusqu'à 5 fois plus rapidement et est également très capable de conserver la qualité originale du son même après le processus de conversion. Il peut même conserver les détails importants des chansons, y compris les balises d'identification et les informations de métadonnées. Vous pouvez restaurer toute votre bibliothèque Apple Music même après la résiliation de l'abonnement.
Étape 1 : Cette application est compatible avec les systèmes d'exploitation Windows et Mac. Cliquez sur le bouton « Télécharger gratuitement » ci-dessous pour l'installer sur votre ordinateur ! Ouvrez ensuite l'application et elle chargera automatiquement votre bibliothèque musicale.
Téléchargement gratuit Téléchargement gratuit
Étape 2 : Ouvrez le logiciel AMusicSoft, accédez au lecteur web intégré et connectez-vous avec votre identifiant Apple. Recherchez ensuite le morceau que vous souhaitez exporter. Faites-le simplement glisser vers le bouton « + » et le logiciel récupérera les données depuis Apple Music.

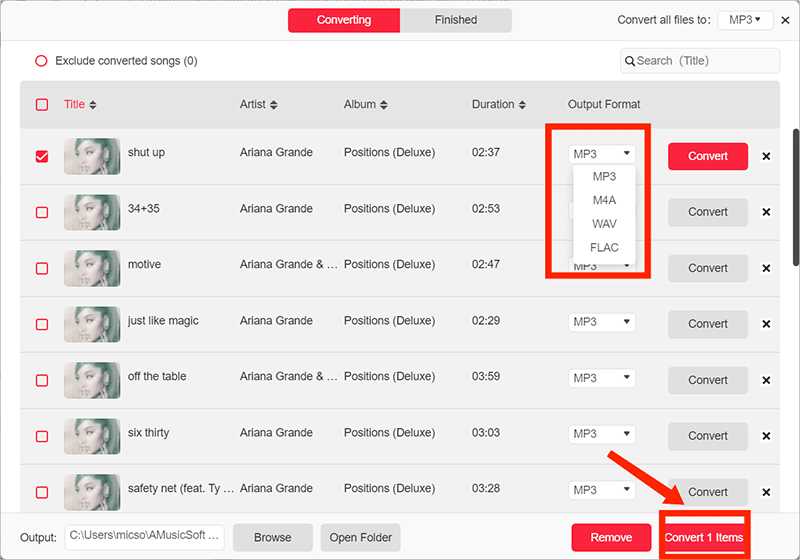
Étape 3 : Une fois vos playlists iTunes chargées dans l'application AMusicSoft, cliquez sur l'option Format. Vous pouvez définir le format de sortie au format MP3. Sélectionnez ensuite le dossier de sortie à utiliser.

Étape 4 : Si vous avez fini de choisir le bon format et le chemin de sortie, cliquez sur le bouton « Convertir » pour lancer la conversion. Une fois cela fait, vous pouvez maintenant voir toutes vos chansons converties dans la section « Terminé ».
Vous avez maintenant exporté vos playlists iTunes au format MP3 avec AMusicSoft Apple Music Converter. Ces fichiers MP3 convertis sont libres de toute restriction DRM, vous permettant de les écouter sur le lecteur MP3 ou l'appareil de votre choix. AMusicSoft Apple Music Converter simplifie l'exportation de vos playlists iTunes au format MP3 et vous permet de profiter pleinement de votre collection musicale.
Partie 3. Conclusion
À partir du contenu ci-dessus, nous avons détaillé les étapes exactes pour exporter de la musique vers iTunes Windows. Nous espérons que ce guide vous aidera à sauvegarder facilement et définitivement votre musique préférée. Nous vous recommandons également Convertisseur de musique Apple Music d'AMusicSoft pour télécharger de la musique sans DRM dans n'importe quel format audio de votre choix. C’est un logiciel gratuit, nous vous conseillons quand même de l’essayer par vous-même avec sa version d’essai gratuite disponible sur Mac et Windows !
Les gens LIRE AUSSI
- GUIDE COMPLET : Comment télécharger la bibliothèque iTunes sur un nouvel ordinateur
- Comment utiliser iTunes pour rechercher de la musique ajoutée ?
- Comment se désabonner d'iTunes sur iPhone, Android et ordinateur
- Corrigé : l'application iTunes ne parvient pas à démarrer correctement sous Windows 10/8/7
- Comment organiser et renommer des albums dans iTunes
- Comment réparer mon iTunes ne reconnaît pas mon iPod
- Comment supprimer des chansons sur iTunes sur iPad, ordinateur de bureau ou mobile
 A propos de l'auteur
Robert Fabry est un blogueur passionné, un passionné de technologie, et peut-être pourra-t-il vous contaminer en partageant quelques astuces. Il a également une passion pour la musique et a écrit pour AMusicSoft sur ces sujets.