“Does Apple Music Cancel By Itself”, Is It Possible?
“Does Apple Music cancel by itself?”
This question is commonly asked by Apple Music users. For whatever reason they have in asking such a question, let us weigh down the possibilities that can cause your Apple Music to be canceled automatically.
So, with the help of the discussion below, know if it is really possible for Apple Music to cancel itself, along with the procedures to follow on how to end your Apple Music subscription.
Contents Guide Part 1. Does Apple Music Automatically Cancel?Part 2. How to Cancel Apple Music Subscription (iPhone or iPad)Part 3. How to Cancel Apple Music Subscription (PC)Part 4. How to End Apple Music Subscription on AndroidPart 5. Bonus: How to Keep Apple Music Forever after Canceling the SubscriptionPart 6. Conclusion
Part 1. Does Apple Music Automatically Cancel?
To start with “does Apple Music cancel by itself” topic, one possible reason why your Apple Music would be canceled automatically could be about your subscription. If this gets expired because you forgot to pay your monthly fee or you did not have it renewed, then after several days or within the day, your plan will be canceled automatically and you will no longer have the access on your library for offline playback. All of the remaining features that can only be enjoyed via subscription will be gone for good.
You may also consider the country restrictions of Apple Music. It is possible that you are just currently located in a place where Apple Music is restricted or banned. This could appear that your plan has been canceled, but the truth is you are just having issues with your location.
If you wish to continue streaming the music files, you will be doing that over the internet. Without it, you won’t be able to see your collection for streaming. But actually, particular to “does Apple Music cancel by itself”, Apple Music won’t be doing it without notice. It will be canceled only if you have done an action that may result to that, which specifically is doing the official procedure in canceling subscription. However, you have to consider as well the external factors that may affect the platform. This includes the internet connection and the device that you are using. In addition to that, it is also possible that internal factors such as bugs, glitches and even the system of the service, can cause an impact to “does Apple Music cancel by itself” issue.
Part 2. How to Cancel Apple Music Subscription (iPhone or iPad)
All of us will surely have our own reasons why would we want to cancel our respective subscriptions. For some, it is not budget-friendly, while for others, it could be a change of heart into using other music-streaming service platforms. Sometimes, it is about the assurance of personal information privacy and then sometimes, the account is just not useful at all.
In relation to does Apple Music cancel by itself topic, for whatever idea causing you to cancel your subscription on your iphone or ipad, I will be tackling below the official procedure that you may follow to cancel your plan. Take a look at the steps below.
On iPhone and iPad
Canceling your plan is very simple and could be done alone on the Settings app of your device.
- On your iPhone or iPad, navigate to the Settings application and then click the button for your name. This is originally at the very top of the window.
- In the window that has opened, scroll until you see the option of iTunes and App Store. Select it next.
- Right after that, a mini window will show up wherein you have to choose the option of View Apple ID. This will require you then to provide your password.
- After doing so, the account settings window will be shown. Browse the window until you see the Subscriptions section. Click on this section to open the Subscriptions window.
- From the new window shown, click Apple Music Membership. This should be followed by the selection of Edit Subscription button.
- In the window displayed, click Cancel Subscription. This is located at the last part of the page.
- Upon doing this, a small window will show up confirming your cancelation. From here, select the Confirm button.
After a few minutes, your Apple Music subscription will be canceled. If you wish to do the process via other way, you may also do it on the Apple Music application. See the detailed steps below.
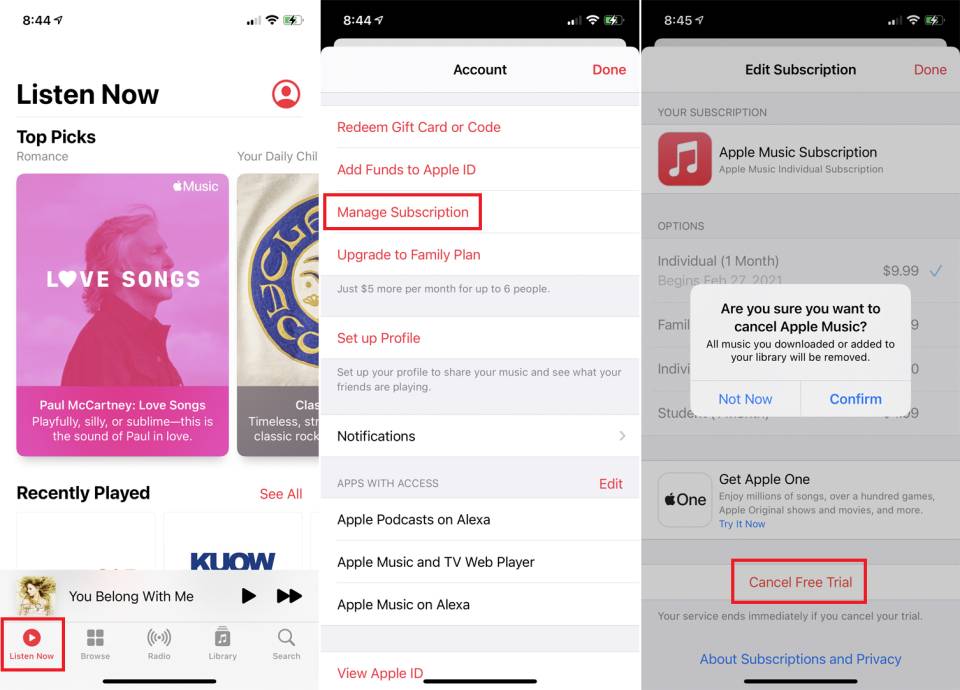
- Fire up your Apple Music application and notice the tabs that are placed at the bottom part.
- Among the tabs shown, click the “For You” tab.
- In the new window shown, you will see your profile icon. This is located at the upper right part. Click this icon then.
- From the option you see, select Manage Subscription.
- Then after that, tap Cancel Subscription button.
Part 3. How to Cancel Apple Music Subscription (PC)
As discussed above, the chances of Apple Music canceling itself are very low since it requires human intervention to do the official steps in canceling it. So, in relation to does Apple Music cancel by itself topic, here is the procedure on how to cancel your subscription on your Windows and Mac.
One way to cancel your Apple Music subscription is through the iTunes application. The procedure to follow on iTunes is also believed to be much easier. So, here is how you do it.
- Open the iTunes application on your Windows or Mac. Look for the "Account" tab in the top menu bar. If you haven't signed in yet on your computer or need to switch accounts, click "Sign Out" or "Sign In" from the dropdown menu.
- After clicking "Account" and signing in, click "View My Account."
- Scroll down the Account page to the Settings section and tap the "Manage" option next to the "Subscriptions" option.
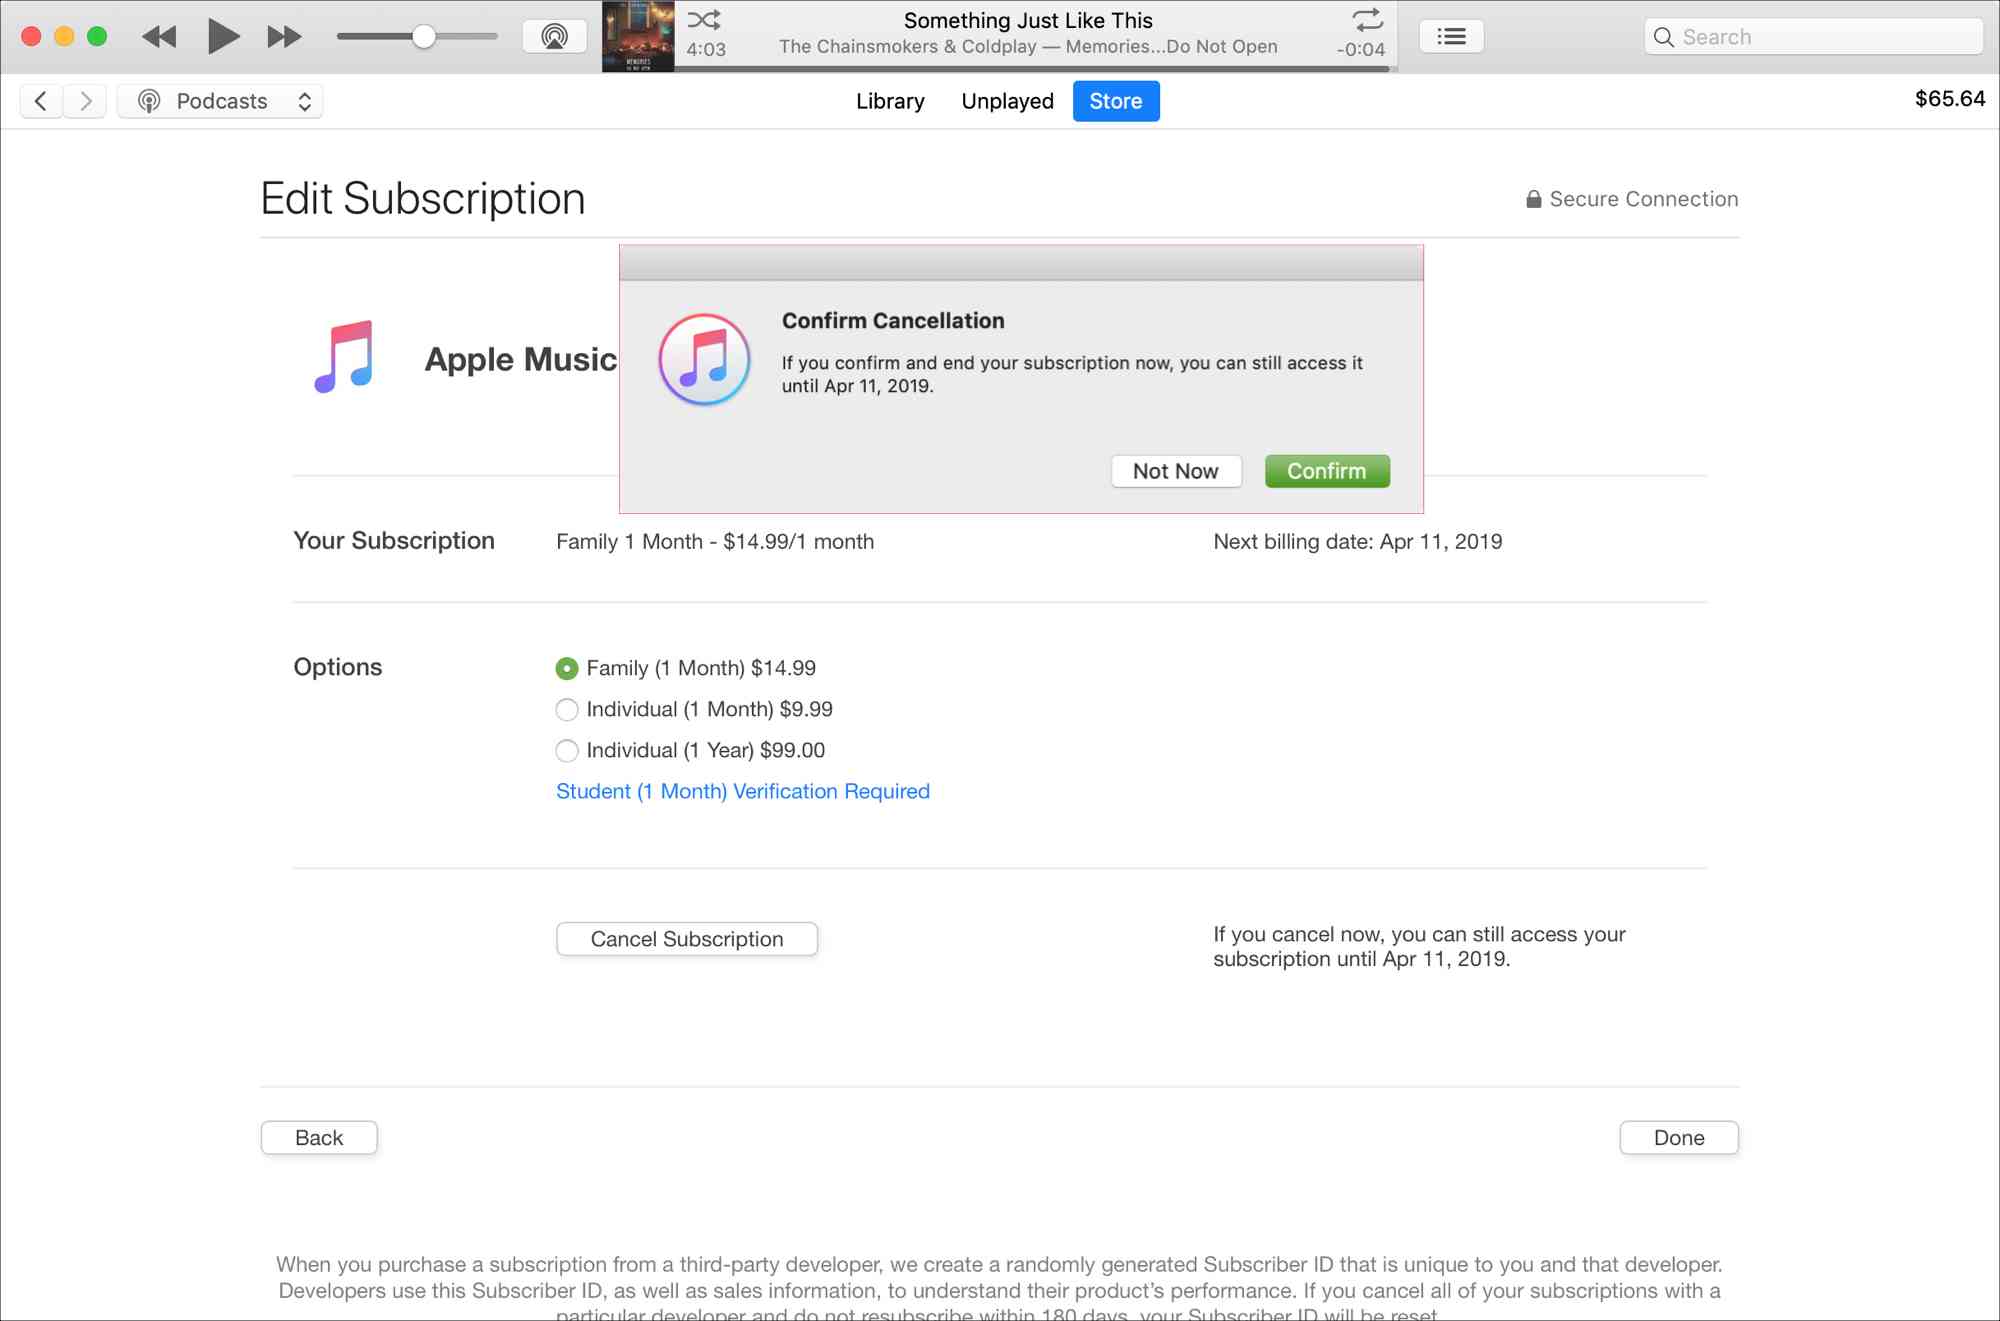
- Now, select the "Edit" option next to "Apple Music."
- Lastly, select the "Cancel Subscription" button and confirm your cancellation to complete the process.
Part 4. How to End Apple Music Subscription on Android
For those who are using Android devices, check out the detailed steps below on how to end your Apple Music subscription in the most convenient way possible.
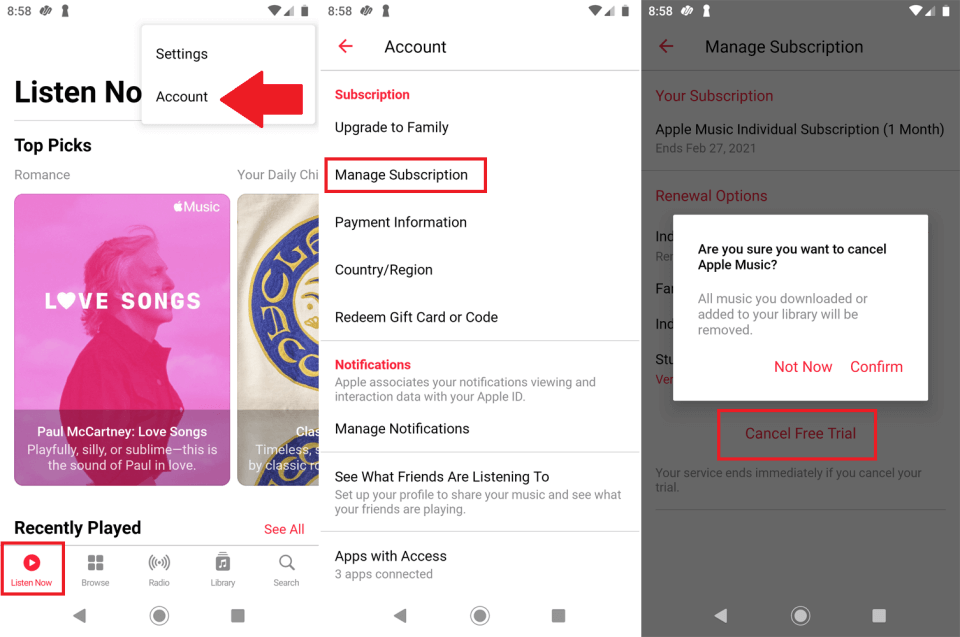
- Run the Apple Music application on your Android phone.
- Select the Listen Now tab at the lower part and then click next the three-line button found in the new window.
- After doing so, menu options will show up wherein you have to select the Account button.
- A few seconds after, the Account window will open. Choose Manage Subscription and tap Cancel Subscription, then click the Confirm button that could be seen in the pop-up window.
Part 5. Bonus: How to Keep Apple Music Forever after Canceling the Subscription
In the previous sections, we have focused about the topic “does Apple Music cancel by itself”. Now, we will tackle about the method that can help you to keep the access on the songs included in your Apple Music collection. Having access on the songs forever even without the subscription is equivalent to downloading the songs and storing them on your device locally.
As you would know, Apple Music files are DRM protected. This means that you cannot just download them whenever you want to. To be capable of doing that, third-party software must be used. For this process, the best tool to use is AMusicSoft Apple Music Converter. Apart from DRM removal, it can guarantee you good quality conversion and download procedures.
It is good to note that all the audio formats that AMusicSoft supports are accessible on most devices. For example, you can freely stream apple music on Roku or Alexa. So, accessing the converted music files won’t be a problem. To add, using AMusicSoft is very manageable to do. The steps in using this tool are all very easy to understand which can help you get done in just a few minutes. This is due to the working speed of AMusicSoft which is 16x quicker.
Follow the steps listed below on how to use AMusicSoft Apple Music Converter in converting the music files.
- In order to begin with the process, you must have the application downloaded first. So, open your browser and then go immediately to the page of AMusicSoft. From there, tap the Download button under Apple Music Converter.
- Then wait for a while until everything in your library is read and recognized. Then, start uploading the songs into AMusicSoft by marking the selection box before each song title you want.

- Right after that, select an output format from MP3, FLAC, WAV, AAC, AC3 and M4A. The destination folder must be chosen as well.
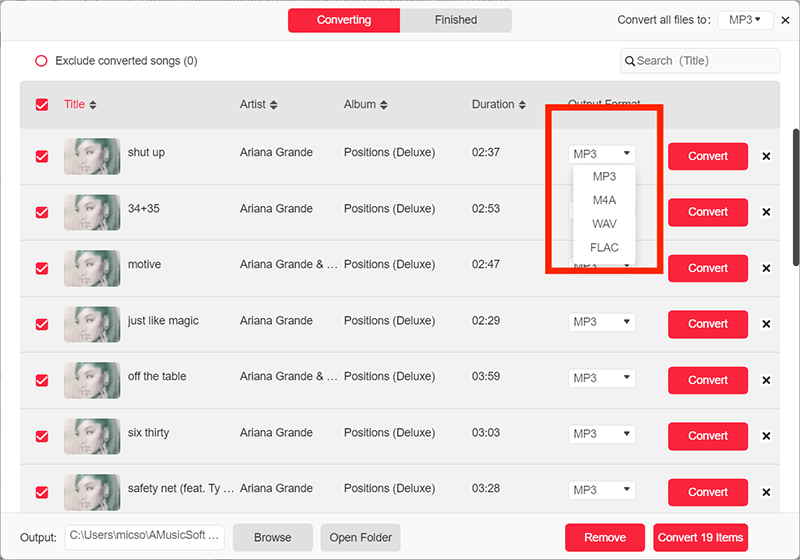
- Let the process start by clicking on the Convert button.

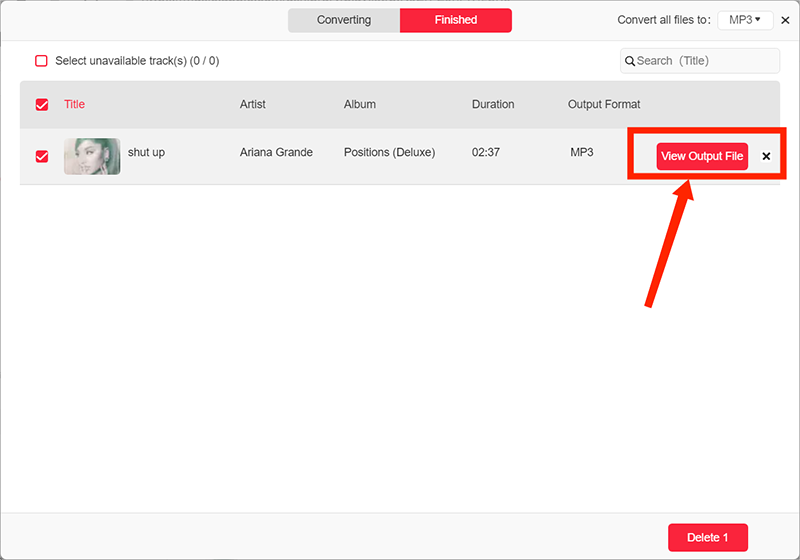
- Lastly, download the converted songs. You can find them in the Converted menu above.
Part 6. Conclusion
As you can see, the procedure to cancel your Apple Music subscription vary depending on the device that you are using for streaming. But if you will notice, they do not differ that much, so, following them would be very easy, especially if you are using multiple type of music players in enjoying them. Once your subscription gets canceled, it will then be impossible for you to keep your Apple Music favorites and retain the access on them. So, to be capable of doing that, you must use AMusicSoft Apple Music Converter, which is indeed the best tool that you may utilize in getting your favorite music. Now, talking about does Apple Music cancel by itself, this is very rare unless you do it yourself.
People Also Read
- How To Prevent Apple Music From Changing Library 2022
- “Can You Keep Apple Music Songs After Trial” – Learn How!
- How To Stop Apple Music From Playing Random Songs?
- Get Rid Of “Apple Music Not Working On iPhone” Problem
- What Is Sync Library Apple Music: Get It Today
- Everything We Need To Know About Apple Music
- Can I Make Apple Music Stop Autoplay?
- Learning How To Get Clean Version On Apple Music
 About The Author
Robert Fabry is an ardent blogger, and an enthusiast who is keen about technology, and maybe he can contaminate you by sharing some tips. He also has a passion for music and has written for AMusicSoft on these subjects.