How To Restore Apple Music Library On iPhone, iPad, Mac, And PC
Most users are encountering problems with regards to their Apple Music library missing after switching to another device. To help you solve the problem, I will be discussing below the easy steps on how to restore the Apple Music library.
One of the most common problems encountered by Apple Music users is the sudden loss of their music library after using a new device in accessing their Apple Music account. They might be wondering for sure how to be able to access the items again. If you wish to have these items back into their location and gain access once again, learn it through the discussion below tackling how to restore Apple Music library.
Contents Guide Part 1. How To Restore Apple Music Library?Part 2. Bonus: Keep Apple Music Forever To Avoid Apple Music Library LostPart 3. Summary
Part 1. How To Restore Apple Music Library?
Since its release, Apple Music has become one of the most famous streaming platforms all over the world. It has accumulated millions of subscribers through its extensive catalog composed of albums and playlists that are mostly searched by people. Aside from that, it has several features and services that can really benefit its users which is why more attention is being caught on this platform.
When you use the streaming app and subscribe to it, you would be able to save a lot of songs that you want into your library. As long as you have the subscription with you, you can download as many songs and videos as you want. But of course, not all the time your library would be working perfectly because some problems will surely occur. One of the most commonly experienced by people is when your library itself will suddenly disappear. Before we tackle the solutions on how to restore Apple Music library, let us know first the possible reasons why this problem is being encountered by the users.
Reasons Why Apple Music Library Could Not Be Found
Apple Music Subscription
This is actually the most possible reason, so, you better make sure that you are still registered in your subscription. If you know in yourself that you did not pay for the whole month, then you should expect already that your subscription is most likely to get canceled. This only means that your Apple Music library will automatically be gone once you forgot to pay for it.
iOS Update
Sometimes the problem is about your device’s system itself. It is much better if you can have the latest iOS version installed on your device. Most of the applications will work perfectly in the updated version. So, if you wish not to encounter different issues concerning Apple applications, it would be best to start with updating your system. You should check your iTunes application as well if you have the latest version installed.
Sync Settings
Another possible reason to add is the Sync settings. You have to check as well if you have correctly synced your library across all devices that you will use in order to be capable of accessing the songs on these devices.
Use Of New Device
Another reason might be that you are using a new device. If this is your situation, then you have to set up your account in iTunes or App store in order to access your library since this is not automatically be activated once you use a new device.
If you already checked all of these possible reasons that might cause your loss of access, then you must check the steps below on how to restore Apple Music library.
How To Restore Apple Music Library On Mac/PC
Let us see below the steps on how to restore Apple Music library on your Mac computer.
- On your device, run your iTunes application.
- Tap on the Preferences tab.
- After that, click the General option in order to see a new menu containing the option for the iCloud Music Library.
- The next step is to select the mini box located before the iCloud Music library in order to activate it.
- Wait for a few minutes until your entire music library has appeared on your application again.
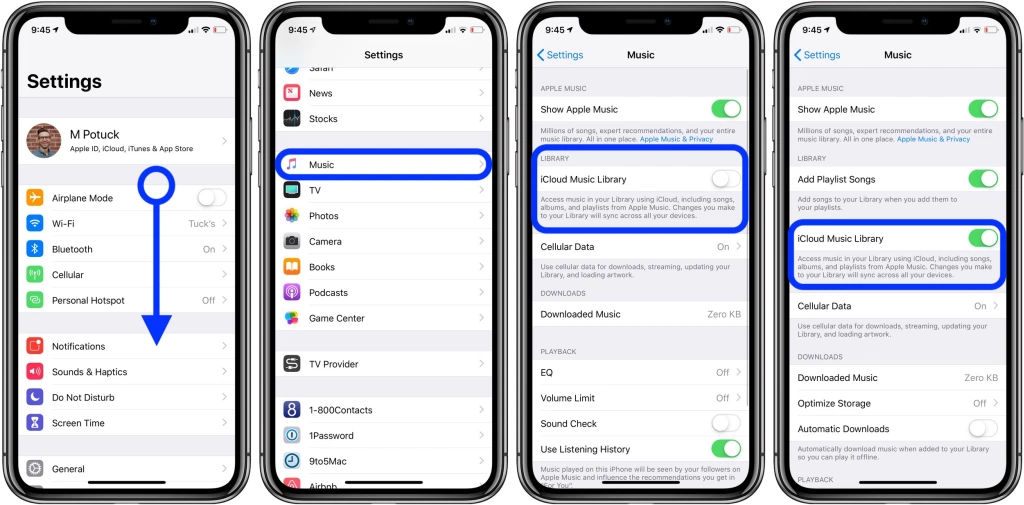
How To Restore Apple Music Library On iPhone/iPad
If you are using an iPhone or iPad instead of streaming your favorite Apple Music songs, check out the procedure below on how to restore the Apple Music library on your used device.
- Get your iPhone or iPad and then navigate to the Settings application.
- Among the options shown, look for Music and then click it once found.
- Upon clicking it, look for the section of the iCloud Music Library.
- As you can see, there is a switch button right next to this option. You have to switch it oppositely and wait until it turns green to have it enabled.
- Once finished, your Apple Music library will then be restored again after some minutes have passed.
Part 2. Bonus: Keep Apple Music Forever To Avoid Apple Music Library Lost
If you do not want to get bothered thinking of the reasons and the solutions on how to restore Apple Music library in the easiest and fastest way possible, then the best thing that you could do is to make sure that your favorite Apple Music items were locally stored in your device. In this case, you would surely be able to avoid problems such as losing access to your Apple Music library.
To help you avoid that, you may use AMusicSoft Apple Music Converter known as the best tool that can help you download your most loved Apple Music items on your used device. It is very capable of DRM removal and is very good as well when it comes to converting the songs into plain formats such as MP3, WAV, FLAC, AAC, M4A, and AC3. Aside from that, once the songs are downloaded, you can surely stream them with the best audio quality. You can even transfer them to any device of your choice. Check out below the easy steps to follow on how to save Apple Music songs using AMusicSoft Apple Music Converter.
- Download and install the application on your device by getting it first from the AMusicSoft website.
- After that, upload the Apple Music songs by simply ticking on the boxes placed before every item you wish to convert.

- Once you are done with the selection, choose the output format that you want through the section below. Also, choose the output settings and the output folder.
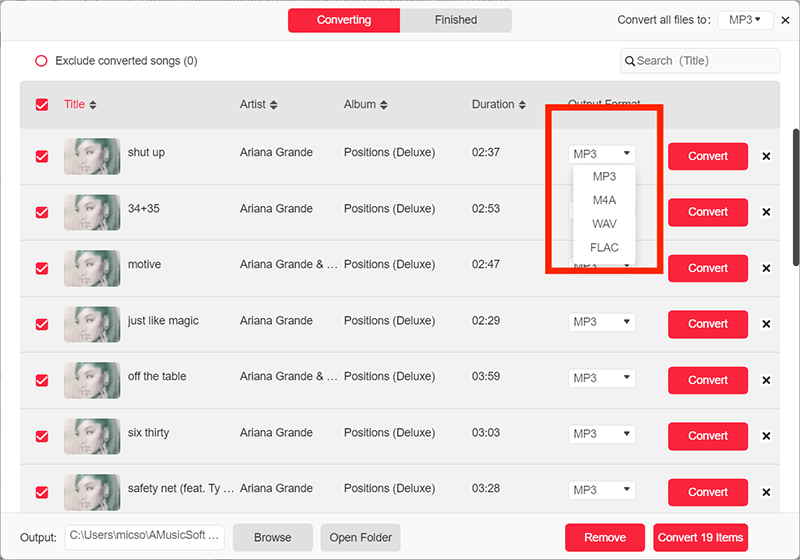
- Tap the Convert button, to begin, the process.

- See the Converted tab above and then check all the finished songs.
Part 3. Summary
In the discussion above, you have learned about the procedures on how to restore the Apple Music library on your respective devices. If you do not want to encounter such problems, again and again, you better use AMusicSoft Apple Music Converter to download and keep all your favorite songs forever.
People Also Read
 About The Author
Robert Fabry is an ardent blogger, and an enthusiast who is keen about technology, and maybe he can contaminate you by sharing some tips. He also has a passion for music and has written for AMusicSoft on these subjects.