How To Transfer Music From iTunes To USB Flash Drive On a Mac
Apple developed iTunes to help its users save and play media files on one platform. Many people love iTunes because you can sync it on other iOS devices without backing up the media library. A challenge appear with iTunes on mac and Windows, you cannot sync media files on these devices. So you have to backup on an external storage device like a USB flash drive.
Nevertheless, how to transfer music from iTunes to USB flash drive on a mac has appeared to be complex. And this article is here to help you; understand how you can transfer such media files directly in parts one and two. Then the second part has insides of how you can do it indirectly using third party tool.
Contents Guide Part 1. How To Transfer Music From iTunes To USB Flash Drive On a Mac Directly?Part 2. Copy iTunes Music From Stored Folder To USB Flash Drive DirectlyPart 3. The Best Way To Download iTunes Music and Move to USB Flash DrivePart 4. Summary
Part 1. How To Transfer Music From iTunes To USB Flash Drive On a Mac Directly?
Of course, iTunes saves your media files on like movies, songs, playlists and ringtones in the iTunes library. All of your iTunes purchases and Apple Music downloads will be saved in the same library. This is a good plan but the problem comes when you want to change your device especially with computers. You can easily sync the iOS devices but not mac computers.
In this case you have to find how to transfer music from iTunes to USB flash drive on a mac as a backup. This process is a simple procedure but the problem you cannot transfer Apple Music downloads because they have encryption. You should also note that iTunes purchases before 2009 might have encryption.
If you have DRM-free files, use the steps below to transfer files directly from iTunes to USB flash drive on mac.
Step #1. Open the iTunes application on your computer and click on the music library to find files you want to transfer.
Step #2. Now insert the USB flash drive on your mac and open the folder you want to backup iTunes files.
Step #3. Then choose the files on iTunes library that you want to transfer and drag & drop on to the folder on flash drive. Give it a moment to transfer.
Part 2. Copy iTunes Music From Stored Folder To USB Flash Drive Directly
Here is also another method of how to transfer music from iTunes to USB flash drive on a mac directly. In this method you have to find the storage folder for iTunes media files and copy it to the USB flash drive. However, you have to find the storage path for iTunes media files. Below is how you can find the storage path.
Step #1. Launch iTunes on your mac and open the media library.
Step #2. Right click on the file you want to transfer and select on “Info”
Step #3. Click on “File” and you will see location at the bottom of the information window.
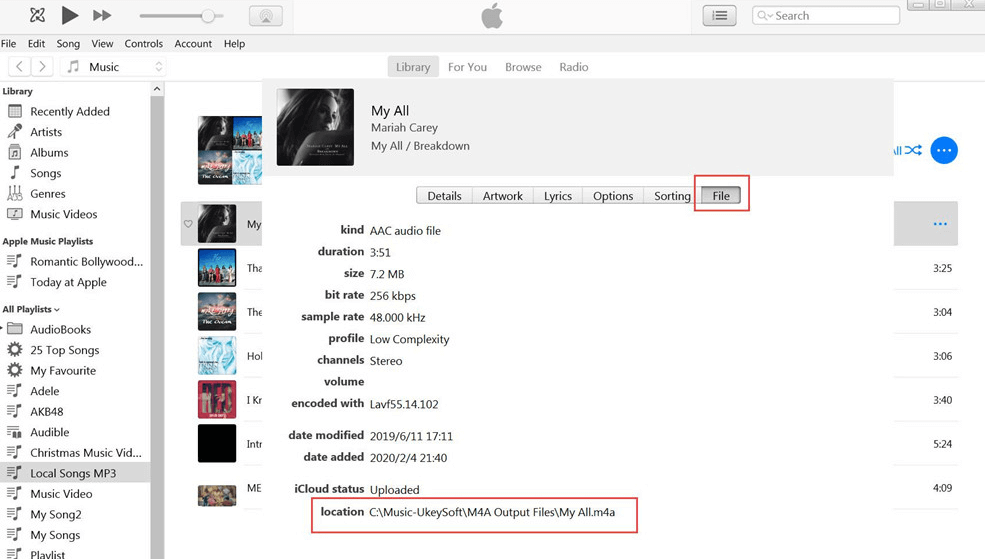
Step #4. Use that path to open the storage folder for iTunes where you will drag & drop the folder into the folder on the USB flash drive.
Part 3. The Best Way To Download iTunes Music and Move to USB Flash Drive
How to transfer music from iTunes to USB flash drive on a mac is very easy from part one and two above. But you cannot directly transfer Apple Music files on iTunes library because of the DRM protection. Yes you can copy the whole iTunes folder but Apple Music files will be saved as cache files. Such files can only play on Apple Music application.
This is why you need an application like AMusicSoft Apple Music converter to remove the DRM protection and save Apple Music as local files. Here you will also transfer Apple Music files without encryption. This software downloads and saves Apple Music in the pre-selected folder on your computer.
Besides downloading, it will also convert Apple Music to other formats such as MP3, WAV, FLAC, AC3 and M4A. All of the above formats come in high quality with 100% clarity and bitrate. Do you think you will waste time? No this software is a time saver with the high conversion rates of 16X that maintain the quality.
ITunes also has media files with DRM protection, but do not worry this application will also convert files on iTunes. The great feature is how it keeps the ID tags and metadata information like the album and artist. But you are not forced to use these information, you can customize it by changing a few characters.
Why struggle with a complicated application? Use this one and enjoy user friendly features like how it automatically syncs Apple Music and iTunes media files to the main window. You also just need a few steps to complete the conversion. It is a great application that can run on mac and PC at the same speeds.
This program can convert more than 100 media files without crashing or reducing the speed. it also gives you a chance to select the output folder and organizes the files perfectly. Below is how to convert Apple Music and transfer it to USB flash drive.
Step #1. Launch the program and allow it to sync Apple Music and iTunes media files to the main window.
Step #2. Select the media files you want them DRM-free. Then choose the output format. Also select the output folder and here we recommend you choose the iTunes storage folder.

Step #3. Click on the convert button and wait for some seconds or minutes.

Step #4. Plug in the USB flash drive on your mac and other the drive’s folder. Also open the iTunes storage folder and drag & drop the media files.
Part 4. Summary
Now you know how to transfer music from iTunes to USB flash drive on a mac. Choose to use the free and direct method in parts one and two but you will not transfer Apple Music files. Then download AMusicSoft Apple Music converter and save the files on your device. This application removes the encryption and makes media files local files. And you can back up and save Apple Music for free forever.
It is an affordable application that gives you free updates. Please understand that attempting to remove or removing DRM protection is illegal, so this app is for personal use only. Contact their customer care if you have any questions.
People Also Read
- How To Convert iTunes To MP3
- The Steps To Follow In Doing iTunes Export MP3 Process
- Two Methods To Try On How To Convert iTunes Songs To MP3
- Best Way To Have iTunes MP3 Download For Free
- Convert iTunes To MP3 On Windows And Mac
- How To Remove DRM From iTunes Music
- The Steps To Follow In Doing iTunes Export MP3 Process
 About The Author
Robert Fabry is an ardent blogger, and an enthusiast who is keen about technology, and maybe he can contaminate you by sharing some tips. He also has a passion for music and has written for AMusicSoft on these subjects.