Using iTunes On How To Create AAC Version?[2025 Updated]
iTunes is one of the best applications that users can use especially when it comes to music management and streaming. This powerful tool can actually do both simple and complicated tasks such as creating another version for the music files that you like to manage. With all the services that it can do, let us focus with the process of using iTunes on how to create AAC version.
The are surely some of you who do not know yet about using iTunes to create AAC version. In some versions of iTunes app, this feature is not available anymore, but in the newer versions released, this is still doable. Check out the complete procedure regarding how to create AAC version using iTunes, which is to be tackled below.
Contents Guide Part 1. What Does Creating Aac Version in iTunes Mean?Part 2. How to Create AAC Version in iTunes App?Part 3. Bonus: How to Convert iTunes AAC to MP3?Part 4. Conclusion
Part 1. What Does Creating Aac Version in iTunes Mean?
Before we start using iTunes on how to create AAC version, let us first know a little about the AAC format. Advanced Audio Coding (AAC) is an audio coding standard for lossy digital audio compression and is produced to serve a better audio quality than MP3.
Many people think AAC is a proprietary Apple format, but that's wrong. AAC is also the default or standard audio format for Nintendo DSi, Nintendo 3DS, YouTube Music, DivX Plus Web Player, PlayStation 4 and various Nokia Series 40 phones. It is supported on a wide range of devices and software such as PlayStation Vita, digital audio players like Sony Walkman or SanDisk Clip, Android and BlackBerry devices, and various in-dash car audio systems.
Apple has adopted AAC as its preferred file format for audio. All songs streamed or downloaded from Apple Music, or sold at the iTunes Store, are in the AAC format. All AAC files offered by Apple are encoded at 256 kbps. After doing the process of using iTunes to create AAC version, you can generate a file in M4A but encoded in AAC. Meaning to say, transferring files from one device to another will be much easier and smoother. But of course, you have to keep in mind that this will only work on those devices supporting the said format.
Part 2. How to Create AAC Version in iTunes App?
Follow the set of steps below about using iTunes on how to create AAC version.
Step No. 1: Launch the iTunes Application
On your used device, look for the icon of the iTunes app and then launch it by doing a double click on it. Upon the opening of the app, from its interface, tap the Help tab at the upper part. In the options shown, select Check for Updates. This will automatically update your current version into the latest one. This will only work for those with old versions installed.
Step No. 2: Add the Tracks or Audio Files to Convert
In order to add the music files, hit the File tab from the menu bar above and then choose the Add File to Library option. At the interface of the track added, do a right click on it and then click the Get Info button. Now, if you cannot remember where you had the tracks saved on your device, you may just use the available ones on iTunes.
Step No. 3: Select the Specific Part of the Song to Convert and Cut It
After selecting the Get Info button, the Information window will show up. As you can see, there are multiple tabs shown above in which you have to choose the Options tab. Click it and then notice the start and stop descriptions below. Right next to them is a checkbox that you must tap to mark them. Keep in mind that these boxes should be marked in order to proceed putting the exact start and stop times. After providing the specific time, click the OK button at the bottom right corner.
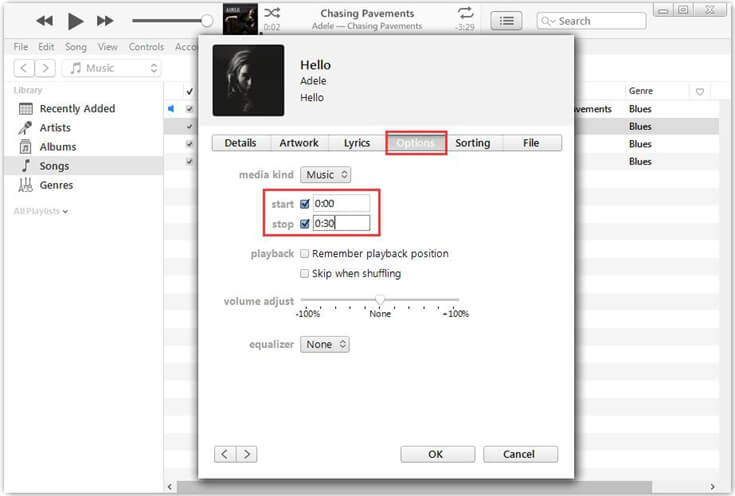
Since we are aiming to use this part as a ringtone, the selected part must not be longer than 30 seconds. If you will do this in an entire song, skip this step and do the next step already which is about creating the AAC version.
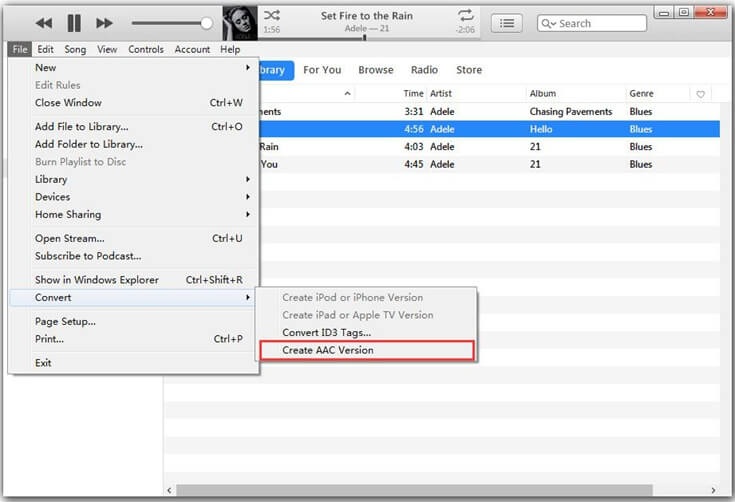
Step No. 4: Create AAC Version
To officially start using iTunes on how to create AAC version, simply do a right click on the song and then tap on Create AAC Version button. After a while, the new version will be released alongside with the original copy. This can be distinguished easily as the new one is shorter than the original.
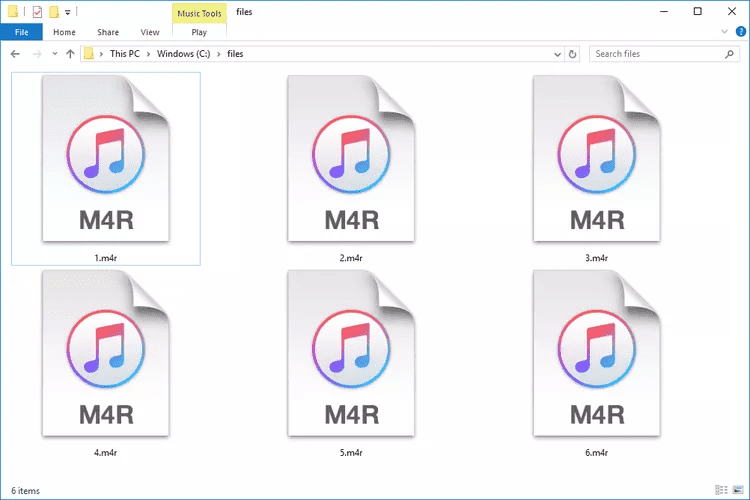
Step No. 5: Change the File Extension
The last step to do will be changing the file extension. To do this, right click again on the newly converted file and then select the option of Show in Windows Explorer in the menu displayed. Once the audio file is showing, click the file and then edit the extension to .m4r.
Part 3. Bonus: How to Convert iTunes AAC to MP3?
After tackling about usingiTunes on how to create AAC version, let us then have the discussion about how you can produce other formats for iTunes and Apple Music tracks aside from AAC.
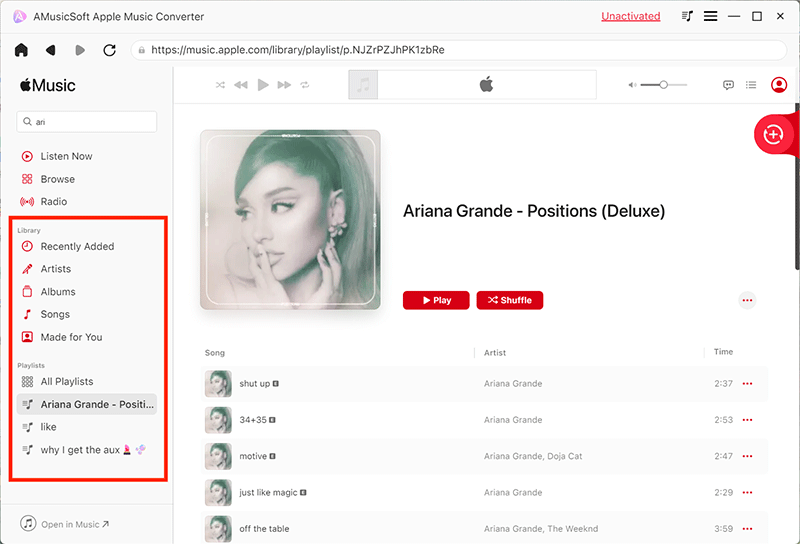
AMusicSoft Apple Music Converter is a powerful converter that can transform the original formats of your audio files into other accessible formats including MP3, WAV, FLAC, AAC, AC3 and M4A. After this, you will get converted iTunes music without DRM protection. Now you can stream these Apple Music songs on Roku TV, Android tablet, Xbox One, PS4, iPad, etc. You can set iTunes music as ringtones for free and move or save them even on external drives!
With AMusicSoft, rest assured that the converted files are of the best quality and are just the same with the original audio. In just a few minutes, the files can be generated already, particularly because if its 16x working speed. If you are just a beginner, happy to tell you that it wouldn’t be that hard for you to start since AMusicSoft Apple Music Converter is very user friendly with a procedure that is super easy to learn.
Here is how AMusicSoft Apple Music Converter download the songs from iTunes or Apple Music app.
- Get the application of AMusicSoft Apple Music Converter and install it on your device to start using it.
- Launch the application and then mark the selection box placed before each song title you’ve chosen for conversion.
- Select the format to use and then provide the end location of the output.

- Tap the Convert button.

- Wait for a while until the results are out and download them from the Converted menu.
Part 4. Conclusion
If you will assess, the steps in usingiTunes on how to create AAC version are just simple. By having an enough knowledge in using the iTunes app, you can quickly get the new format. The complete procedure that you must follow is already given above, so, all you have to do is to follow them correctly. On the other hand, using AMusicSoft Apple Music Converter can help you in getting multiple formats. Once you’ve succeeded in downloading them in such formats, streaming music will be unlimited.
People Also Read
- Apple Music App Is Installing To Non-Apple Devices To Play
- How To Backup Your Playlists Via Apple CD Burner
- Let Us Enjoy The Apple Music Exclusives List!
- What Is iTunes Store Audio Format And How To Play?
- Music Streaming Service Comparison Of 2024: Which Is Better
- How To Turn Off Explicit On Apple Music (2024 Updated)
- Create And Share New Collaborative Playlist On Apple Music
- Easy Ways To Get An Apple Music Student Discount (2024)
 About The Author
Robert Fabry is an ardent blogger, and an enthusiast who is keen about technology, and maybe he can contaminate you by sharing some tips. He also has a passion for music and has written for AMusicSoft on these subjects.