How To Backup Your Playlists Via Apple CD Burner
Among the multiple products of Apple, Apple Music is one of the most widely used by users. This is very evident on the huge number of users that are subscribed to the streaming service. The increasing number of subscribers is most possibly because of the extensive music collection that Apple Music has, amounting to about 75 million tracks in total. All of these titles are from multiple artists from different regions, so, discovering a lot of artists is also one of the advantages that users get from Apple Music.
To enjoy the service more, saving up playlists and securing a back-up copy would really help. So, let me impart important details about Apple CD burner and how to get done with the burning process using different methods available.
Contents Guide Part 1. Can You Burn Apple Music Tracks onto a CD?Part 2. How to Download DRM-free Apple Music Songs on Your Computer?Part 3. How to Burn Apple Music Songs to CD?Part 4. Final Words
Part 1. Can You Burn Apple Music Tracks onto a CD?
In relation to what was mentioned earlier, users need to have a subscription in order to stream music from the platform. With your availed plan, you get to choose any artist or album that you want. However, since the item in Apple Music are all DRM protected, playing them on just any device that you want is impossible. The device that you are about to use must be authorized by Apple Music and the application must be present on the authorized device to play the music. If these considerations are not followed, then you won’t be able to enjoy the service. So, it is either you’ll comply with these factors, get your own subscription or download the files and save them on a CD. The question now is, is there any Apple CD burner usable for this process?
A CD burner can be used right after downloading the Apple Music tracks. But to make it possible, you have to use a professional music converter. By using a tool that can remove the DRM, playing them on any CD player you have will now be allowed. Apart from that, other advantages like saving up an extra copy of your favoured songs is possible that even without your subscription anymore, streaming songs is still doable.
Part 2. How to Download DRM-free Apple Music Songs on Your Computer?
The major requirement that you need when burning Apple Music on CDs is a music converter. There were a lot of tools that you may actually use, however, you have to select the best to save time and effort.
In downloading the tracks, I’d recommend using AMusicSoft Apple Music Converter. With all the specs it has, the processes will just be easy and quick. Let us have below a simple breakdown of its major features.
- DRM removal.
- High quality of audio converted.
- Conversion and download of tracks into the formats of MP3, FLAC, WAV, AAC, AC3 and M4A.
- Easy-to-use user interface.
- 16x conversion speed.
- Preservation of significant details like ID tags and Metadata info.
When using the Apple Music or iTunes app, you may find some playing issues which can be super annoying. Perhaps the iTunes application is unable to start correctly. In some cases, iTunes get album artwork gone, or Apple Music plays automatically. To fix common problems on iTunes or Apple Music, you’re going to need to transfer music to other players for playing smoothly.
Follow the steps below to convert and download iTunes music to utilize when using an Apple CD burner.
- From the AMusicSoft website, download the Apple Music Converter app and install it on your used device.
- Open the application and upload the music files to convert by tapping the selection box before the title you want.

- Select your most preferred format and choose an output folder as well.

- Hit the Convert button to initiate the conversion process.

- Then save the results on your local computer.
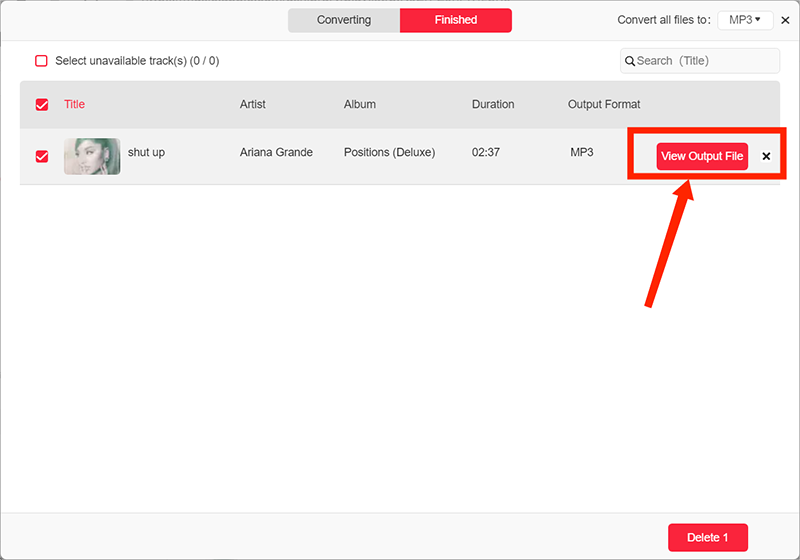
Part 3. How to Burn Apple Music Songs to CD?
Now that you already have the downloaded copies of the Apple Music tracks you’ve converted and made DRM-free using AMusicSoft Apple Music Converter, utilizing a CD burner is next. I have here below four methods that you may try and consider to use in burning Apple Music. To name them, you may choose from the Music app, Windows Media Player, iTunes and VLC Media Player.
Things to Prepare Before Burning on CD
Before proceeding with using a CD burner, there are things that must be prepared in advance to get done with the process smoothly. See the list below.
- Prepare a computer with a CD drive to read the disc that you’ll insert.
- A blank CD disc that has enough storage to accommodate the files to burn.
- A playlist containing all the tracks to burn.
- Your active and registered Apple ID and Apple Music subscription.
- Installed latest version of the iTunes application as well as the Music app.
Method 1: Burn Apple Music Using iTunes App
You can use the iTunes app on your computer as an Apple CD burner by following the procedure below.
- Launch the latest version of iTunes installed on your device.
- If you haven’t made a playlist yet, then you should first create one and insert all the tracks you’ve chosen for burning. To do that, click the File tab above, follow it with New and then Playlist button.
- After doing so, start adding all the tracks you’ve converted a while ago.
- Once done, get your prepared blank CD and insert it into the disc drive of your computer. Wait for a while until the disc is fully recognized by your device.
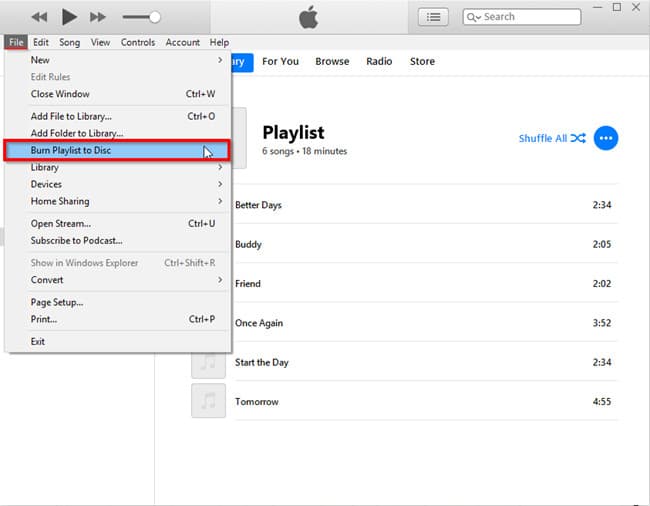
- Now, tap the File menu tab and then select Burn Playlist to Disc from the displayed menu options.
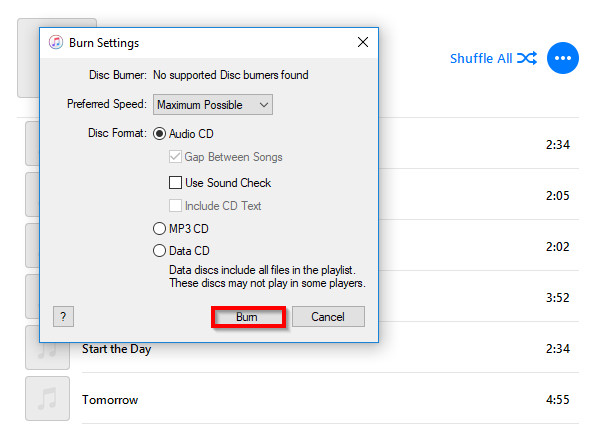
- Adjusting the burning settings of the process can be done right after the selection of the said option. For example, you may change the disc format or the burning speed if you want to.
- Lastly, tap the Burn button placed at the lower right corner of your screen to get started with the process. Wait for a while until CD burning is finished.
Method 2: Burn Apple Music Using Music App
- On your Mac computer, open the Music app and proceed with the creation of a playlist containing the converted tracks you had using AMusicSoft.
- In the application’s interface, select View as and then Songs to see the tracks you add in the playlist. To make sure that all these songs are to be included in the process, check if there is a mark right next to them.
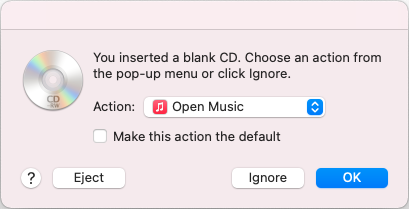
- Insert a blank CD-R disc into the drive and a dialog will pop up. Select "Open Music" in the action list to launch Music app, click OK button to apply.
- From the menu bar above, select the Playlists tab to see your created playlist. Click the playlist you made and then hit the File tab. Follow it with selecting the option of Burn Playlist to Disc.
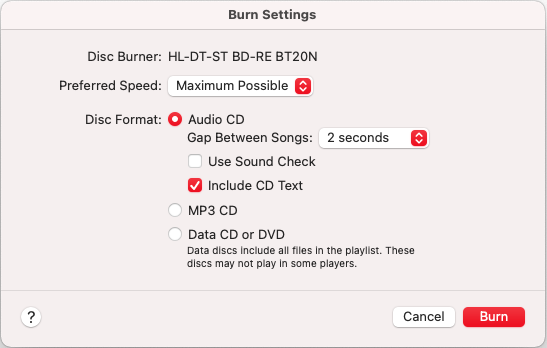
- The Burn Settings window will suddenly show up on your screen in which you can adjust all the settings included there. These include the Disc format, the preferred speed and more. Once done adjusting, click the Burn button.
Method 3: Burn Apple Music Using Windows Media Player
Here comes another Apple CD burner to utilize, the Windows Media Player.
- After opening the Windows Media Player, proceed immediately with creating a new playlist. to do this, tap the Playlist panel at the top and start adding all the converted tracks into Windows Media Player.
- To add the tracks, you may try the drag and drop method or the copy and paste method. Make sure that all the titles are imported before jumping into the next step.
- After importing, put the disc in the CD drive of your computer.
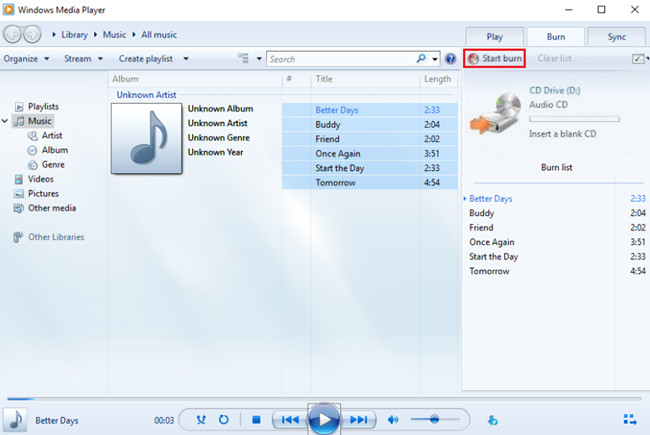
- As you can see on your screen, particularly at the upper right corner, there is the Burn button. Tap this button and then drag the playlist created into the space given under the Burn window. This Burn list dock is usually placed at the right side of the screen.
- Finally, click the Audio CD option and follow it with hitting the Start Burn button afterwards. The CD burner will automatically start the process upon the selection of the said button.
Method 4: Burn Apple Music Using VLC Media Player
If the only media player available on your computer is VLC, it is very fine as it can also work as an Apple CD burner. Check out the steps below.
- Begin with creating a playlist on VLC.
- On your screen, locate the playlist dock and then drag and drop the one you’ve created.
- After doing so, click the Media tab from the menu bar above and then hit Convert/Save.
- A few seconds after, the Open Media window will pop-up. From here, select the Disc option above.
- Insert the CD prepared onto the disc drive and tap on Audio CD option under the Disc selection section.
- Notice the Browse button next to the Disc device bar. Click this button next.
- Right after that, the Convert screen will be shown wherein you have to click the Browse button. By clicking this button, you will be allowed to import the playlist made for burning.
- After adding, initiate the burning process by hitting the Convert/Save button at the bottom.
Part 4. Final Words
That’s all about how to burn Apple Music playlists onto a CD with an apple cd burner. To get the results that you want, make sure to choose the method that you think is the most convenient to do. For the downloaded tracks, use AMusicSoft Apple Music Converter to get the best quality.
People Also Read
- Easiest Way On How To Add Music In GoPro Studio
- Why Is My Apple CarPlay Not working? Best Ways to Fix
- How To Easily Share Apple Music On Snapchat?
- How To Add Apple Music To WMP (Windows Media Player)
- Apple Music Streaming Tips: How To Play Media On PS4
- How To Listen To Podcasts On PS4 [Complete Guide]
- Guide To Streaming Drake’s More Life On Apple Music
- iTunes Not Syncing To iPhone? Easy Solutions To Fix It!
 About The Author
Robert Fabry is an ardent blogger, and an enthusiast who is keen about technology, and maybe he can contaminate you by sharing some tips. He also has a passion for music and has written for AMusicSoft on these subjects.