The Process On How To Add Spotify Music To Shuttle Music Player
The creation of Shuttle music player is such a blessing for all music enthusiasts that are fond of reading the lyrics while the songs are being played. Now, when it comes to the best music provider, it is definitely Spotify that is the greatest and number one. You would surely agree with me that it would be the best if there is a way on how to add Spotify music to Shuttle music player, right? The good news here is that there is a possible way on how to do so and that will be the main focus in this discussion.
Contents Guide Part 1. What Is Shuttle Music Player?Part 2. How To Convert and Add Spotify Music To Shuttle Music Player?Part 3. Conclusion
Part 1. What Is Shuttle Music Player?
As mentioned earlier in the introduction, our main focus is about the procedure on how to add Spotify music to Shuttle music player. But before we proceed with that, let me give you first a brief introduction about Shuttle music player.

A Shuttle music player is just like other streaming applications like Spotify and Apple Music. It is a notable audio player that is commonly used on Android devices. To name some of the services it offers, I have prepared a short list below.
With Shuttle music player, you can:
- Create your own music collection consisting of the tracks and playlists that you wish to stream most of the time.
- View lyrics of songs that you are playing.
- Save the artworks and covers of tracks.
- Manage the arrangement of tracks to shuffle.
- Edit tags of songs and browse different music folders.
- Browse and select from a large collection of themes and even customize your own layout.
- Decide what to do next or what to manage on your settings after the headphones are plugged in on your phone.
Shuttle music player also comes with a free and a Premium account. With a free account, you are allowed to access some of its services and with a Premium account, you can enjoy upgraded set of features compared to what a free account offers. One great advantage of the Shuttle music player free account is that you can enjoy streaming music that is free of advertisements. To add, it has also a feature of sleep-timer and music playback. The same features go with the Premium account, but with it, you can enjoy extra choices for theme selection, more tag editing settings to explore and an additional Chromecast support. In order to enjoy these upgraded features, you have to pay for a total of $2.49 amount.
Some of the audio formats that Shuttle music player supports include MP3, 3GPP, MPEG-4, MPEG-TS, FLAC, AAC, MIDI, GSM and more. So, if you are planning to add Spotify music to Shuttle music player, then the thing that you should get done first is the conversion of Spotify tracks into one of the audio formats mentioned.
Difference Between Shuttle Music Player And Spotify
I think that having a quick comparison between the sources of music is necessary before we continue tackling how to add Spotify music to Shuttle music player. Let us see why it is worth it to learn such procedure.
Appearance
To compare the two, Spotify has a normal design if you will notice. It has the commonly used features in creating backgrounds and covers, whereas in Shuttle music player, the design used is the most trending and updated Android UI creation.
Themes
With a paid Spotify Premium subscription, the users are not given the extra feature to choose their desired theme to be used on their Spotify accounts. With a paid subscription of Shuttle music player, the users are given more choices of themes to choose from.
Lyrics Display
If you will play a certain track in Spotify, especially if you are using it for free, you are not being displayed of lyrics while the song is playing unlike in Shuttle music player, wherein the lyrics are automatically shown if you play a song.
Audio Format Supported
The list of supported formats in Spotify music includes AAC, WAV and WMA. However, these formats are only applicable for the paid subscriptions. On the other hand, the formats supported in Shuttle music player are MP3, AAC, OGG and FLAC.
Price/Subscription Fee
When it comes to the subscription fee, the amount of money that you are to pay in availing a Premium subscription on Spotify amounts to about $9.99 every month while in Shuttle music player, it is only $2.49 in total. And take note, this $2.49 is for lifetime already. It is like a one-time purchase and you get to enjoy every special feature and services it offers.
With the simple comparison above, it is quite clear already why it is really worth it to add Spotify music to Shuttle music player. There are a lot of advantages and extra benefits that you will be enjoying for sure. Now let us see the process on how to add Spotify music to Shuttle music player through the help if a music converter.
Part 2. How To Convert and Add Spotify Music To Shuttle Music Player?
Spotify tracks are encoded in the format of OGG, which is also one of the output formats that are supported in Shuttle music player. This means that there is a possible way on how to directly add Spotify music to Shuttle music player by just copying the music files into the music player, however, OGG format is not always supported in every music player. That is why it is much better if you are to still consider converting these OGG-formatted Spotify tracks into plain formats like MP3, FLAC, WAV and more. Also, once the Spotify tracks are converted into a more accessible format, you can even have it transferred from one device to another and not just the music player mentioned. For example, you can even have the Spotify tracks played on Apple or Android TVs, on your car stereo and more. You can also have a back-up copy of the files which could be useful for you in the long run.
Now, in order to add Spotify music to Shuttle music player successfully, you need to make use of a music converter that is capable of transforming the Spotify tracks into the supported formats of Shuttle music player. The tool that I would recommend is AMusicSoft Spotify Music Converter. This music converter can remove the DRM copy protection from Spotify tracks which is the main responsible why a hard time is being experienced in converting files. After the DRM removal, the files could now be converted which is also one of the greatest features that AMusicSoft can do. It can convert files into MP3, WAV, AAC, FLAC, M4A and AC3 format. It will also assist you in downloading the converted files in your device and it can work in up to 5x faster speed of conversion. Even with this promising speed, it can still produce a hundred percent good quality of songs and can preserve as well the important details from Spotify tracks such as the ID tag and Metadata info.
What are the steps to follow in order to add Spotify music to Shuttle music player? The set of detailed steps enumerated below will explain to you the whole process on how to do it.
- First step is to open your web browser and start searching for the official website of AMusiSoft. From the main page, tap on the download button for Spotify Music Converter. After completely downloading the application, you may now start installing and then launching the application on your computer.
- Next step is the addition of files. In doing this, you have to click first the button of “Add Files”. After that, you may start dragging into the music converter each track, albums or playlists that you wish to convert. Another way is by directly going into your Spotify music library. From there, browse and select each song track to convert. After selecting, copy the song link and then paste it into the search bar that is to be found at the top part after clicking on the three-dot button located at the upper left part of the window. Once done, tap on the “Add” button.
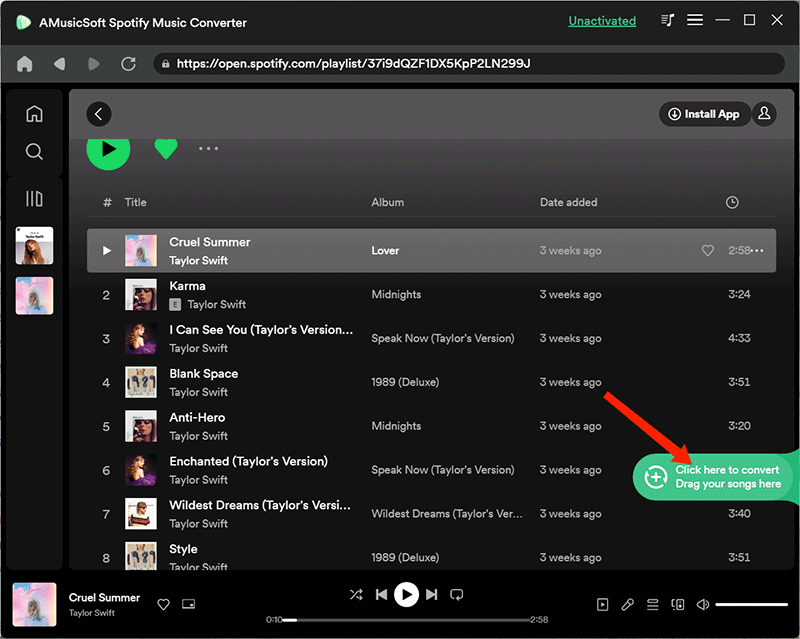
- Once the songs are added, proceed to the output format selection. If you will notice, at the upper right part, there is a section allotted for the selection of formats. You will notice the “Convert all tasks to”. Beside it, there is a drop-down menu where you can choose the format to use. Now, take a look at the bottom left corner and you will see the section for the output path selection. You may browse and select a certain folder to use as the storage of the converted files.
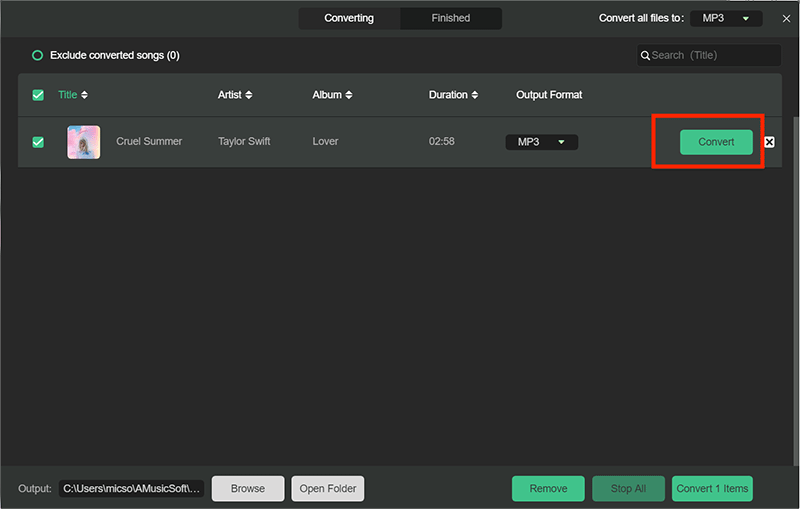
- Now that you are already done, tap on the Convert button and AMusicSoft will then automatically start the conversion process. All of the converted files will initially be seen under the Converted tab.
To add Spotify music to Shuttle music player, just copy and paste the locally saved converted Spotify tracks from your computer into the music player.
Part 3. Conclusion
There are a lot of benefits that you could get in using Shuttle music player. In order to add Spotify music to Shuttle music player, make sure to use the recommended tool AMusicSoft Spotify Music Converter. It is designed with features that are very useful especially in such procedures.
People Also Read
 About The Author
Robert Fabry is an ardent blogger, and an enthusiast who is keen about technology, and maybe he can contaminate you by sharing some tips. He also has a passion for music and has written for AMusicSoft on these subjects.