Spotify Hardware Acceleration: How to Set it
Spotify is one of the popular music streaming services that are available in the market. It offers a wide music catalog from different artists all over the world and also, have a variety of music genres. Spotify is also supported by many platforms and can be accessible to many devices such as smartphones, game consoles, smart speakers, and of course, computers which is definitely an advantage to other streaming services.
If you are one of those Spotify users who uses a computer to listen to music, then most probably you also heard of Spotify Hardware Acceleration, if not, then don’t worry because I will explain it further as we go along in this post.
Generally, hardware acceleration pertains to the computer’s hardware usage that is specially created to make other functions perform more effectively and efficiently on software like this can be an advantage if you want to improve and optimize the performance of software which can be applicable on Spotify that is installed on your computer.
In here, we will be going to talk about what is the function of Hardware acceleration in Spotify, why should you enable it or not, will it go to benefit you? And lastly, I also include here an additional tip that I think will benefit you while using Spotify. I’m so excited to discuss all of these, so what are we waiting for? Let’s get started.
Contents Guide Part 1. What Does Hardware Acceleration Do in Spotify?Part 2. Should I Turn on Spotify Hardware Acceleration?Part 3. Bonus: Download Spotify Songs for Offline Listening without PremiumPart 4. Conclusion
Part 1. What Does Hardware Acceleration Do in Spotify?
First things first so, what does this Hardware Acceleration in Spotify exactly? Spotify Hardware Acceleration is an advanced option available for both premium and free Spotify users who are using the Spotify app on their computers.
To discuss in detail, in every computer, there is this inch squared chip size called a CPU that is responsible to perform every task that you do while using your computer. Inside the CPU there is a complex design that allows you to do everything and anything including the playback and music decoding which is related to “software” playback.
By controlling this setting, one can control or optimize the music streaming performance of Spotify. For instance, if your Spotify music is relatively playing slowly perhaps your hardware acceleration is disabled, otherwise, if is it is moving or skipping faster as compared with the other songs, then your Hardware acceleration might be set as enable.
Part 2. Should I Turn on Spotify Hardware Acceleration?
To decide whether to enable or disable your Spotify Hardware Acceleration, will actually depend on the running speed or performance of your computer. If your computer can perform highly or as fast as the rocket and you are experiencing your music playing slowly then you can consider enabling the hardware acceleration otherwise, might consider switching it off. Now, let me guide you on how to enable or disable your Spotify Hardware Acceleration in includes 3 steps.
Step 1. Launch your Spotify App and select Settings
First, make sure that you have a Spotify app installed on your computer so you can enable Spotify Hardware Acceleration. Once you have installed it, launch the app. When it is already running, click on and select the Down-arrow button so you can go to the Settings.
Step 2. Go to Show Advanced Settings
Once you get in the Settings page, just keep scrolling down until you see the “Show Advanced Settings” and select it to be ready for disabling or enabling your Spotify hardware acceleration.

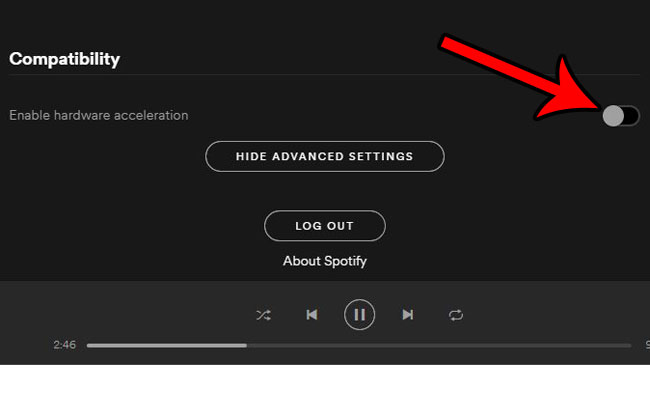
Step 3. Disabling or Enabling Sportify Hardware Acceleration
Next, keep scrolling down until you see the Compatibility option. In here, you can find the button in which you can adjust the enable and disable of your Spotify hardware acceleration. To set this, just click the enable to allow you to use the Hardware Acceleration and vice versa.
Part 3. Bonus: Download Spotify Songs for Offline Listening without Premium
As a bonus tip, do you know that you can download Spotify songs without premium for offline listening? Yes, you can! All you have to do is to have this amazing tool called AMusicSoft Spotify Music Converter.
To give you a brief description, AMusicSoft Spotify Music Converter is a converter that has the capacity to download songs from Spotify. One feature of this software is it can remove the encrypted DRM protection on each Spotify song which prevents users to download and listen to them offline. Once the songs are downloaded, you also have the option to choose the audio format output such as WAV, MP3, FLAC, etc.
Moreover, it has a conversion speed of x5 which won’t let you take so much time to wait. Also, even with such speed, it wouldn’t affect the quality of the songs that you’ve downloaded. It also keeps the ID3 tag of each song, as well as, the metadata which can maintain your tracks organized.
If you want to try how great this professional tool can be, just visit their official website to download its installer which is available for both Windows and Mac. You can also find there the step-by-step guide and additional information on how to use this program.
Part 4. Conclusion
Well, that’s everything you need to know about Spotify Hardware Acceleration. Isn’t easy, right? I hope that this post helped you to optimized the use of your Spotify app on your computer using the Hardware acceleration option. By enabling or disabling this function, you can adjust the quality of your music experience on your Spotify and I can say has a great effect while you listening to those tracks.
Moreover, I also hope that the bonus tip for downloading your Spotify tracks without a premium using AMusiscSoft Spotify Music Converter that I included here will benefit you so that you can enjoy and have fun listening to your favorite Spotify tracks even offline. So, That’s it for now, thank you for reading this post, and see you again!
People Also Read
- How to Transfer Music from Spotify to iTunes
- Virtual DJ Spotify: Things You Should Know
- How to Rip from Spotify: A Guide for You
- YouTube Red vs Spotify: Which Is A Better Choice
- Amazon Prime Music vs Spotify: Which Is Better
- How To Share A Spotify Playlist: Guides And Procedures
- Rainmeter Spotify: Things We Need To Know
- Spotify vs Pandora: Comparison Of Music Streaming Services
 About The Author
Robert Fabry is an ardent blogger, and an enthusiast who is keen about technology, and maybe he can contaminate you by sharing some tips. He also has a passion for music and has written for AMusicSoft on these subjects.