How To Burn CD From iTunes On Windows And Mac
Playing the songs anytime and on any device is most possible if the songs are converted and downloaded in a format that is accessible on almost all music devices. It is also much better if they are converted since it is easier to access and use them in a lot of processes. If the Apple Music tracks are downloaded in such formats, then it will surely be more convenient for you to burn CD from iTunes on both Windows and Mac.
In this discussion, we will be having the procedure on how to burn CD from iTunes. Make sure to read until the end to know the most recommended tool to use in removing the DRM from the songs and for downloading them as well.
Contents Guide Part 1. How To Burn CD From iTunes?Part 2. The Best Way To Burn CD From iTunesPart 3. Summary
Part 1. How To Burn CD From iTunes?
In order to burn CD from iTunes on both Windows and Mac, all you have to do is to follow the detailed steps listed below.
Burn CD From iTunes On Windows
If you have a Windows computer, below are the steps that you may use as your guide in order to burn CD from iTunes.
- Open your laptop or PC and then navigate to your iTunes application. Launch it once found.
- At the menu located at the left part of your window, see the Music tab and then select it after.
- Select View and then follow it with selecting View As.
- After doing so, click Songs.
- From there, you are capable to see all of the tracks available for burning. Put a mark before the songs if you wish to burn them.
- Now, get the empty CD that you prepared for the process of how to burn CD from iTunes. Insert it then into the CD port of your device.
- Then, click the Playlist menu.
- Follow it by tapping on the File menu.
- From the options, see and tap Burn Playlist to Disc.
- Now, choose the Disc format which could be either an Audio CD, MP3 CD, or Data CD.
- Once done, tap the Burn button.
Within a few minutes, the process of how to burn CD from iTunes will be done. Just check on the burned songs and see if the CD is working for playback.
Burn CD From iTunes On Mac
The steps below will show you the process of how to burn CD from iTunes on a Mac computer.
- Get your Mac and have it opened. After that select and launch the iTunes application.
- Then the next step is to create a new playlist.
- Tap on View and then View As.
- Select the Songs tab and then choose any song that you wish to burn.
- You have to mark them to indicate that they have been selected for the process on how to burn CD from iTunes.
- Now, get the CD that you prepared and have it inserted into the CD drive of your Mac.
- Next is to click on the Playlist tab and hit the File menu.
- Select the option Burn Playlist to Disc and then choose the Disc format to use.
- Finally, once you are already set with everything, tap on the Burn button to have the process started.
Part 2. The Best Way To Burn CD From iTunes
The process to burn CD from iTunes would not be possible if the tracks you are to burn were from Apple Music or Spotify Music. Why? Because the music files from such streaming applications are protected by DRM making them not accessible or downloadable on just any device. Also, even though you have the Apple Music subscription and you had the files downloaded on your library, these files are still cached files and still couldn’t be processed for such procedures. So, in order to make the process possible, you have to use an Apple Music Converter for DRM removal. Until then, you can proceed with the process. Now, to give you a recommendation, you may use AMusicSoft Apple Music Converter.
AMusicSoft Apple Music Converter is very useful, especially in the DRM removal process. It can also download and convert the tracks into output formats such as MP3, WAV, AAC, FLAC, AC3, and M4A. All of these formats could be accessed by almost all music players around you. The entire process by AMusicSoft could be finished in just a few minutes because it is capable of working up to 16x faster than the usual speed of conversion. In addition to this, AMusicSoft Apple Music Converter can also preserve details like Metadata info and ID3 tags which are needed for the identification of songs. It can also make sure that the songs are at their hundred percent quality.
Now, if the tracks are already downloaded on your computer with the help of AMusicSoft Apple Music Converter, you can now have them dragged and dropped into the new playlist that you are to create on your iTunes application. For now, let us see the steps to follow on how to download Apple Music tracks into accessible format through the help of AMusicSoft Apple Music Converter.
- First of all, download the application from the AMusicSoft site. Click the Apple Music Converter and then tap on the Download button. After that, launch and install the app on your computer.
- Now, start selecting all the songs that you wish to download. Go to your music collection and then mark the song title that you have chosen.

- After that, select the output format and adjust the output settings as well. You may also start choosing the output folder for the storage of the converted files.
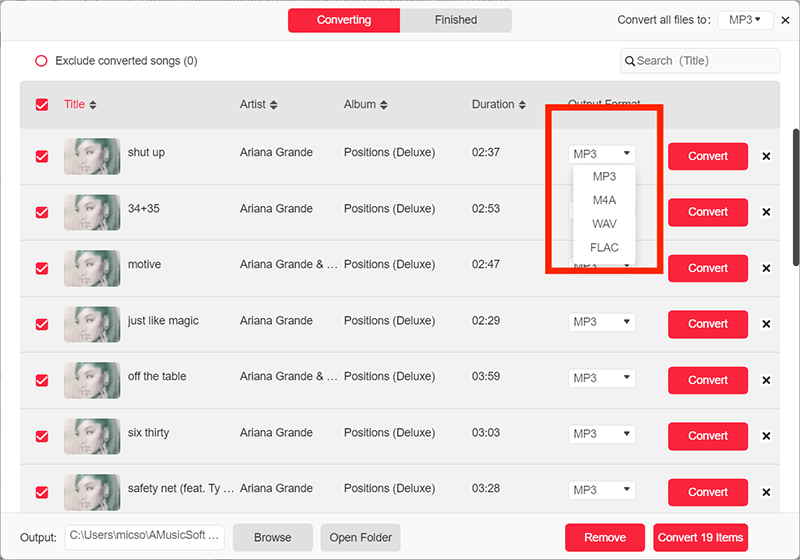
- Right after that, click the Convert button that is located at the lower right corner of your window.
- Tap the Converted tab that is placed above and see all the successfully converted tracks.
Once you already have the converted and downloaded songs with you, just follow all the detailed steps that were explained above about how to burn CD from iTunes, depending on whichever type of device to use between Mac and Windows.
Part 3. Summary
Now that everything was discussed already, I hope that you have learned about the easy steps on how to burn CD from iTunes. Just make sure to follow the steps that I listed above in order to proceed with the main process. Also, it is recommendable to use the professional tool AMusicSoft Apple Music Converter in removing the DRM from the music tracks.
People Also Read
- The Steps On How To Burn Songs From iTunes To CD On PC
- The Easy Way On How To Burn CD On iTunes
- How To Burn Itunes Audiobooks To CD?
- How to Burn CD from Spotify: A Guide for You
- How To Export MP3 From iTunes Music/Playlists?
- How To Remove DRM From iTunes Music
- The Steps To Follow In Doing iTunes Export MP3 Process
 About The Author
Robert Fabry is an ardent blogger, and an enthusiast who is keen about technology, and maybe he can contaminate you by sharing some tips. He also has a passion for music and has written for AMusicSoft on these subjects.