How To Burn CD On iTunes/Windows/Mac? [3 Easy Ways]
If you want to know how to back up your favorite Apple Music tracks, you'll like the guide on how to burn CD on iTunes, Windows, or Mac. When it comes to famous media players, iTunes is one of the most useful software programs. It can be also used to burn songs to CDs. CD burning is very advantageous in many aspects, such as backing up your favorite music with original audio quality and sharing music with friends or families freely. Here this article will teach you how to burn Apple Music songs to CDs.
Contents Guide Part 1. Can you Still Burn CDs on iTunes?Part 2. Download Apple Music to MP3 Before Burning CDsPart 3. Burn Music to CD with iTunes (Windows & Mac)Part 4. Burn Music to CD with Windows Media Player (Windows)Part 5. Burn Music to CD with VLC Media Player (Mac)Conclusion
Part 1. Can you Still Burn CDs on iTunes?
iTunes is a free software program that lets you buy, manage, and stream music, TV shows, movies, and other media content, running on Mac and Windows. Apart from these features, you can also burn music to CD/DVD with audio and video from your iTunes library. However, you can't burn the following content to CDs or DVDs:
- Movies and TV shows purchased from the iTunes Store.
- Songs or music videos downloaded from Apple Music.
In this case, how to burn CD on iTunes with songs downloaded from Apple Music. You can download music from Apple Music as CD-compatible MP3 files, and then you can easily get a burned CD with the help of iTunes. However, media content from Apple Music uses digital rights management (DRM) technology, allowing only authorized devices to play the content. So it is impossible to convert them to MP3. No worries. Jump to the next part to learn what you need before burning CDs.
Part 2. Download Apple Music to MP3 Before Burning CDs
To burn Apple Music songs to CD, you should convert them to MP3 first. AMusicSoft Apple Music Converter is the best choice you can try to download MP3 songs from Apple Music because it can remove DRM from Apple Music and iTunes protected files. The converter preserves the audio quality during the conversion process, ensuring that the original sound of the Apple Music tracks is retained. With these DRM-free songs, you can back up them on any device and play with any media player you want. Even if songs disappeared from Apple Music, you can restore them immediately. AMusicSoft Apple Music Converter is also able to convert and download files into accessible formats like MP3, WAV, AAC, FLAC, AC3, and M4A at a very fast speed of 5x faster. The important details of the songs such as the ID tags and Metadata info are also preserved even after the conversion process.
Step 1. First thing’s first. You need to download the AMusicSoft Apple Music Converter. This will only take a couple of seconds. The installation will automatically follow. Make sure to launch the AMusicSoft Apple Music Converter so that you can start using it.
Step 2. Once the AMusicSoft Apple Music Converter has been downloaded on your computer, it’s automatically configured to show your iTunes music. You just have to navigate to the left side of the program and click on the Music tab. By doing so, all your iTunes songs will appear. Select the ones you want to burn to CD.

Step 3. After you have selected all your old iTunes files that are still protected, choose a DRM-free file format like MP3 and then you can convert iTunes protected files to unprotected. As you will see, the AMusicSoft Apple Music Converter provides various settings for you to adjust the audio quality.

Step 4. Select the “Convert’ button to be able to continue with the conversion of your files. It will just take you a few good minutes to be able to finish the whole process.
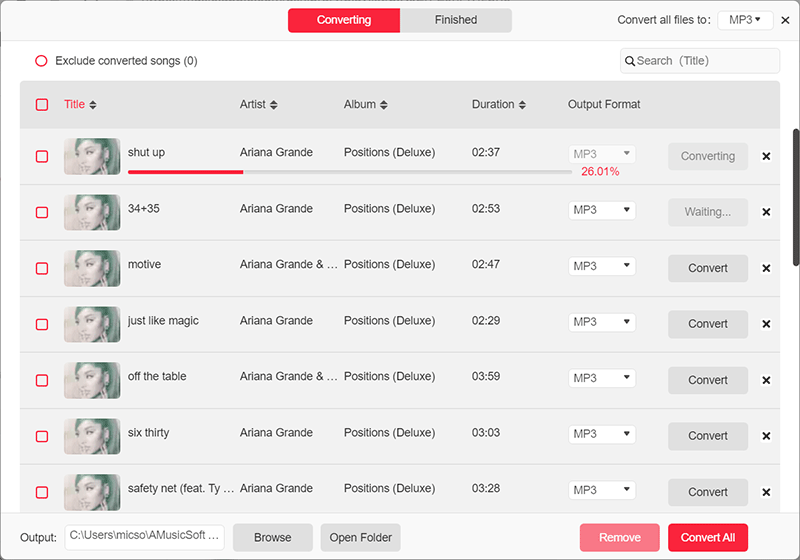
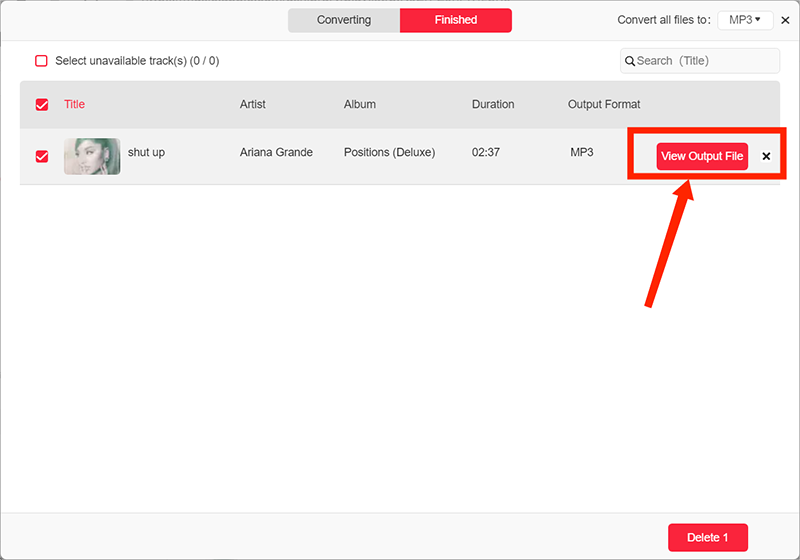
Step 5. Wait for a while until the process is done. To save the results, access the Finished section and check for tracks available for download. Now your songs are DRM free which means that you can use Apple Music songs to burn to CD.
Part 3. Burn Music to CD with iTunes (Windows & Mac)
Once you finish converting Apple Music songs to MP3 without DRM on your computer, the next step is to burn Apple Music to CD using CD burners. In this part, we will share how to burn CD on iTunes directly!
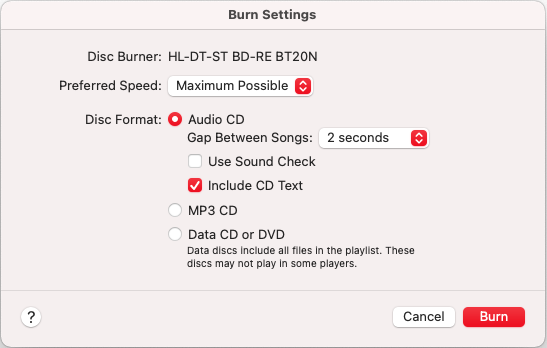
Step 1. Open iTunes on your Windows or older Mac. Then click File > New > Playlist. You can name it and then drag and drop these converted MP3 Apple Music songs to this playlist.
Step 2. Insert a blank CD disc into the disc drive. The storage space of the disc is also important. The number of songs a disc can hold depends on the format of the song files and the capacity of the disc. Then a pop-up window will say “You've inserted a CD or DVD”. Click OK.
Step 3. Right-click the new playlist you have created before and select File > Burn Playlist to Disc.
Step 4. Choose Audio CD so that you can play this disc on any standard CD player. Then, click Burn. Then iTunes will start burning all the Apple Music songs in the playlist to the CD.

This method works with the iTunes 12 version only. For Mac users, you can use the Apple Music app to burn CDs. The steps are similar to Windows.
Part 4. Burn Music to CD with Windows Media Player (Windows)
As we all know, Apple is killing off iTunes, and it will be replaced with three separate apps. If iTunes on your Windows can't get updates to the latest version, you can try Windows Media Player. It is a default media player on Windows computers, so you don't have to install other software anymore. How to burn CD on iTunes using WMP? As the software will not be difficult to use, and it is completely free of cost, you can open it and just start burning music to CD from Apple immediately. Now, read the steps and see how to do it.
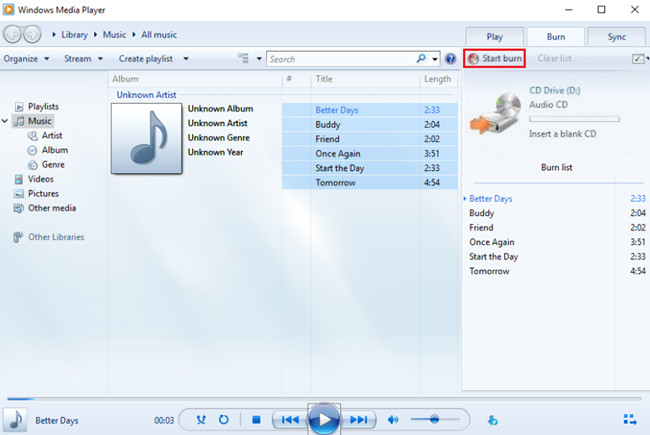
Step 1. Insert the blank CD into your Windows computer. Then launch Windows Media Player.
Step 2. Click the Burn tab. Open the music folder that stores Apple Music songs converted by AMusicSoft Apple Music Converter, then drag and drop them to the burning list on the right side.
Step 3. Click the “√” icon to open a drop-down list where you can make sure Audio CD is selected. Click Start Burn. Once the burning process is finished, Apple Music songs will be stored in the CD.
You may be interested: How To Add Apple Music To WMP
Part 5. Burn Music to CD with VLC Media Player (Mac)
For Mac users, the VLC media player is your choice to burn Apple Music songs to CD for free. Its user-friendly interface and additional CD-burning features make it a handy all-in-one solution for media playback and CD burning. If you do not know how to use this feature, read on to find out how to burn CDs on iTunes using VLC
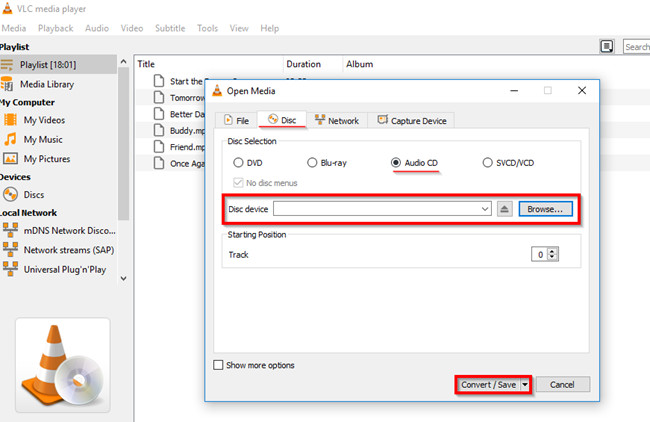
Step 1. Open VLC and insert your CD into the computer’s disk drive. Now go to the Media menu and open Convert/Save option.
Step 2. Select the Disk tab at the top and click on Open Media. Keep the audio CD disk box ticked. You can select the tracks you want to Convert from the CD. Click Convert/Save.
Step 3. On the next window, click the tool icon to choose MP3 as the desired format and click Save. Now just click on start button to Convert the audio cd. You can track the progress on main interface.
You may be interested: How To Play Apple Music On VLC
Conclusion
How to burn CD on iTunes for free? That’s all we have for how to burn music to CD using iTunes, Windows Media Player, and VLC Media Player. Which, as you probably already learned, is really not all that hard. But you have to convert music to MP3 using AMusicSoft Apple Music Converter. Plus, keep in mind that you should prepare a CD with a big storage space to keep more music.
People Also Read
- How To Backup Your Playlists Via Apple CD Burner
- Easy Steps For How To Burn A DVD On An iMac
- How To Burn Itunes Audiobooks To CD?
- How To Export MP3 From iTunes Music/Playlists?
- Downloading And Burning Music To CD Via Multiple Methods
- How To Remove DRM From iTunes Music
- The Steps To Follow In Doing iTunes Export MP3 Process
 About The Author
Robert Fabry is an ardent blogger, and an enthusiast who is keen about technology, and maybe he can contaminate you by sharing some tips. He also has a passion for music and has written for AMusicSoft on these subjects.