How To Download iTunes Purchases On Authorized And Unauthorized Devices
There are a lot of benefits that you can get if you download iTunes purchases on your device. One benefit is offline streaming or watching. If you wish to experience the same, you have to know the steps on how to do this. Even without an internet connection, you can still be able to access the downloaded content.
If you don’t know the procedure yet, the following discussion will explain to you the complete process.
Contents Guide Part 1. How To Download iTunes Purchases?Part 2. How To Remove DRM From Your iTunes Purchased Music?Part 3. Summary
Part 1. How To Download iTunes Purchases?
iTunes has a lot of products where people can choose from. You may choose from availing movies, tracks, albums, audiobooks, TV shows, season passes, or movies. Now that you have purchased these products already, how are you going to download iTunes purchases on your device? The procedure to download iTunes purchases differs based on what type of device you use. Below, I have prepared the process on how to download iTunes purchases both on iOS devices and Mac computers. Make sure to learn both in case you are to download iTunes purchases on both devices.
Steps To Download iTunes Purchases On iOS Devices
- Get your iOS device and have the iTunes app opened in it.
- At the bottom part of the window, you will see an icon or button for “More”. Clicking on that will give you another set of options wherein you have to click on “Purchased”.
- From the Purchased window, tap on any iTunes purchased an item that you wish to download on your device. It could be a movie, TV show, or song. Just make sure to click on the corresponding option. On the other hand, to download iTunes purchases on a Family Sharing account, click on the icon of “My Purchase” or tap on any member to have you shown all the items that they have purchased from iTunes.
- For the last step, you are now free to choose and select any item that you wish to purchase. After clicking on a specific item, just click on the download icon that is placed right next to the item.
After that, you just have to wait for a few minutes until the download was done. If it is finished already, you can now enjoy unlimited streaming and playing of the downloaded purchased items on your iOS device.
Steps To Download iTunes Purchases On iOS Devices
To download iTunes purchases on your Mac or Windows computer, you have to authorize the mentioned device first. In order to proceed with the process, click on the icon of “Account” which is to be followed by “Authorize This Computer”. After clicking on this, you will then be required to input both your Apple ID and passcode. Once you are done with this part, you may now proceed with the steps on how to download iTunes purchases on your Mac or Windows.
- Open your device then open the iTunes app next. To proceed, you have to log in using your existing Apple ID.
- Now, take a look at the upper part of the window and then hit on the “Account” button, and then tap on the “Purchased” icon. If you happen to be utilizing a Family Sharing plan, instead of clicking on “Purchased”, proceed to click on “Family Purchases”.
- Once you have clicked on it, you will see all the items that were purchased from the iTunes store. Click on any of the options from Movies, TV shows, Audiobooks, or Music. These options are to be found at the upper right core of the window.
- To download iTunes purchases on your Mac or Windows computer, the location of the download icon might be different from where it is located on iOS devices. On Mac and Windows, you will locate the download icon at the upper right part of your selected movie. Click on it to proceed with downloading.
Again, you only have to wait again for a few minutes until the process was finished. After the items are downloaded, you may now be able to enjoy them on your Mac or Windows computer. You can also have them listened to and watched on any authorized device.
Now, what if you are to try on streaming or watching the items on unauthorized devices? You definitely have to first remove the copy protection from the contents. In case you didn’t know, iTunes contents and other Apple contents are encrypted with DRM protection. To have them played in other types of devices aside from Apple devices, you have to make sure to remove this DRM from them first. To know more about it, let us see the coming section of this post.
Part 2. How To Remove DRM From Your iTunes Purchased Music?
As said before, one of the factors why iTunes contents could not be accessed in other devices aside from Apple is the DRM copy-protection encrypted with the songs. So, if you wish to play these items outside of Apple, you have to make sure to break or remove this DRM copy protection from them. In order to freely and unlimitedly enjoy the contents after doing the procedure to download iTunes purchases, you have to make use of a professional tool that is capable of doing the said task.
The tool that you can use is AMusicSoft Apple Music Converter. This tool is not only able to remove the DRM protection from songs, but it can also convert the contents such as iTunes M4P tracks and audiobooks into MP3, AAC, M4A, FLAC, AC3, and WAV. It can also give you a hundred percent original quality of the converted and downloaded items once the process was done. AMusicSoft Apple Music Converter can as well keep all the important details from the contents such as ID3 tags even after the conversion process was done. And lastly, all of these things could be done in just a couple of minutes because AMusicSoft can work at up to 16x faster conversion speed.
Let us now see the steps on how to remove DRM from iTunes content and be able to download iTunes purchases freely. The procedure below can be applied in all iTunes purchases including audiobooks, videos, or music.
Step No. 1: Get AMusicsoft Apple Music Converter And Launch It In Your Device
The first thing to do is to get the AMusicSoft application downloaded to your used device. After finally getting the application, have it running on your computer. To get the application, you may try on visiting the official website of AMusicSoft and download the application from there.
Step No. 2: Add Apple Music Songs
For the next step, you have to add all of your selected Apple Music songs into the music converter. You may only proceed with the uploading of songs once your Apple music library has been completely scanned by AMusicSoft. This will be done rightfully after the converter was installed and launched on your device. After that, start selecting each song by simply ticking on the box beside each song.
You have to take note as well that your waiting time until your library has been successfully read, will depend on how much you have saved in it. If you have an extensive music library, expect that you will be waiting a few more times than the original scanning time.

Step No. 3: Select The Output Format To Be Used
If you are already done with the selection of songs, you may now proceed with the output format selection. You are free to choose your needed song format available in AMusicSoft. After that, you can also modify the settings of the conversion such as the output path or the location where the converted files are to be saved after the conversion process, the bitrate rating in kbps, and the sample rate.
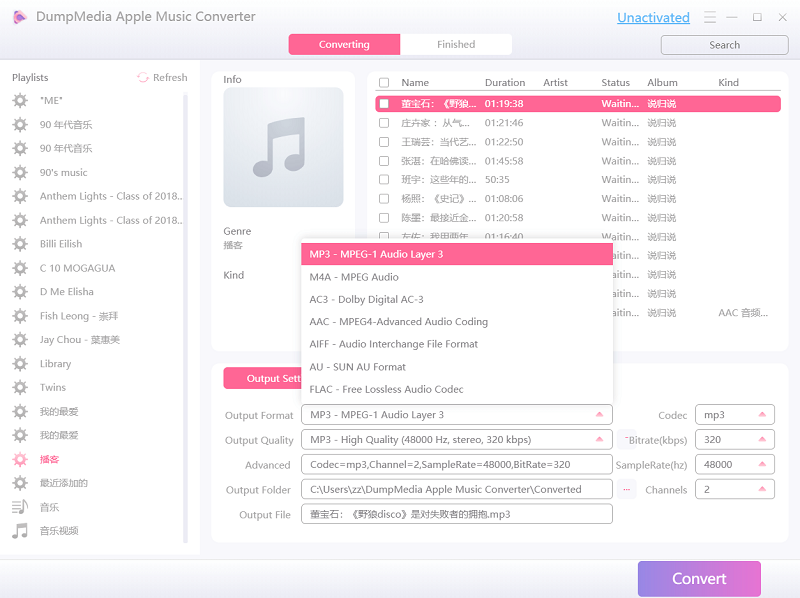
Step No. 4: Start The Conversion By Hitting The “Convert” Button
Now that everything was already set, starting from the uploading of songs up to the selection of the end format, below the settings that can be adjusted by the user is the Convert button which needed to be clicked to start the conversion. As mentioned, tap on the Convert button and wait for a few minutes until the conversion process was done. AMusicSoft has also allowed the users to know the progress and status of the process, you just have to take a look at the main interface of the application.
As you can see, at the upper part of the tracks list, there is a tab for Convert and Converted. When you were converting the tracks, notice that you are in the Converting tab but when the process of conversion is already done, you can click on the Converted tab and see all of the Apple Music songs that have been converted. Using AMusicSoft Apple Music Converter is the other reliable way that you can use to download iTunes purchases on your device and be able to play them on some other devices, such as non-Apple devices.

Part 3. Summary
The procedure about AMusicSoft discussed above is the application’s way to remove DRM from iTunes items. If you wish to enjoy your downloaded iTunes items without any restrictions or limitations to consider, you may use the AMusicSoft Apple Music Converter to download iTunes purchases. On the other hand, if you are just to access them on authorized devices, just follow the set of steps on how to download iTunes purchases on both iOS devices and Mac.
People Also Read
 About The Author
Robert Fabry is an ardent blogger, and an enthusiast who is keen about technology, and maybe he can contaminate you by sharing some tips. He also has a passion for music and has written for AMusicSoft on these subjects.