How to Put Music on a Kindle Fire in 2026?
If you're a proud owner of Amazon's versatile tablet and eager to enhance your entertainment experience, you've come to the right place. This article aims to provide you with a comprehensive step-by-step tutorial on how to put music on a Kindle Fire as well as equipping you with the knowledge and tools necessary to seamlessly add your favorite tunes to your Kindle Fire. Whether you're a music enthusiast, an audiophile, or simply looking to create a personalized soundtrack for your device, our purpose is to guide you through the process, making it easy and enjoyable. So let's dive in and unlock the full musical potential of your Kindle Fire!
Contents Guide Part 1. Can You Play Apple Music on Kindle Fire?Part 2. How to Download Apple Music to Kindle Fire?Part 3. Ways to Transfer Apple Music to Kindle FirePart 4. Conclusion
Part 1. Can You Play Apple Music on Kindle Fire?
How to put music on a Kindle Fire? Is is possible? No, it is not possible to directly utilize Apple Music on a Kindle Fire device. Apple Music is a music streaming service that requires a subscription and was created by Apple primarily for use on their own devices such as iPhones, iPads, Macs, and Apple Watches. On the other hand, the Kindle Fire is an Amazon product that operates on a customized version of the Android operating system.
It should be noted that Kindle Fire devices do not have official support for Apple Music, and there is no specific app for Apple Music available in the Amazon Appstore. However, there are alternative music streaming services that you can use on your Kindle Fire to listen to music. Additionally, you have the option of transferring your personal music collection from your computer to the Kindle Fire in order to enjoy your own music on the device.
Part 2. How to Download Apple Music to Kindle Fire?
How to put music on a Kindle Fire? When it comes to downloading and transferring Apple Music to Kindle Fire, AMusicSoft Apple Music Converter has proven to be a reliable solution. This powerful software allows you to legally and effortlessly convert Apple Music songs, albums, and playlists into compatible formats like MP3, WAV, FLAC, AAC, AC3 and M4A. You can now easily share and transfer music files from any of your devices any time of the day. Even if Apple Music songs are greyed out, you can restore them from local folder immediately.
AMusicSoft is also known for its simple user interface that everyone finds convenient to use. You will see a more detailed explanation of the steps below. Continue reading to learn more about how to download music using AMusicSoft Apple Music Converter.
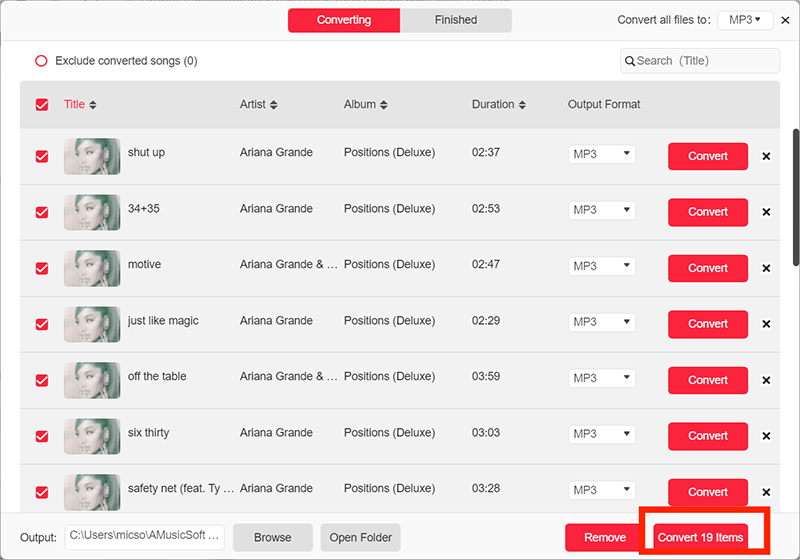
Step 1. Open any browser on your computer and go to AMusicSoft website to download the Apple Music Converter application. Select the Products tab and click the converter. Hit the Download button next and install it on your device right after.
Step 2. After launching, you can enter the built-in Apple Music web player to log into your account. When you access the music library, browse and find any music you wish to download. AMusicSoft also supports batch conversion, you can also add a whole playlist or album in one go, letting you save your energy and time as well.

Step 3. From the supported formats, choose one. Make sure to select a format that is also supported on Kindle Fire. Assign the output folder for the results.

Step 4. When all the settings are done, now start downloading the selected songs by pressing the Convert button.
By carefully following these steps and making use of AMusicSoft Apple Music Converter, you can effortlessly and seamlessly transfer your favorite Apple Music songs to your Kindle Fire, allowing you to enjoy your music collection on your Kindle Fire anytime and anywhere.
Part 3. Ways to Transfer Apple Music to Kindle Fire
How to put music on a Kindle Fire? Knowing the ways to transfer music to Kindle Fire is important as it allows users to enhance their music experience on the device. By transferring music files, users can access their favorite songs, albums, and playlists directly on their Kindle Fire, eliminating the need for separate music devices. This enables a seamless and personalized music experience, providing convenience and flexibility.
Additionally, it allows users to expand their music collection, customize their listening preferences, and enjoy their preferred music anytime, anywhere, using a single device. There are two common methods to transfer music to a Kindle Fire: uploading music to Amazon Music as well as indeed transferring music via USB. Let's explore each method and the steps involved:
Method 1. Uploading Music to Amazon Music:
When you choose to upload your music to Amazon Music, you will benefit from the added convenience of being able to access your entire music library directly through the dedicated Amazon Music application on your Kindle Fire device. To initiate the process of uploading your music, simply follow the following set of instructions carefully and sequentially:
- Start by using your computer to access the Amazon Music website. Then, proceed to log in to your Amazon account by entering your Amazon account credentials.
- In case you don't already have the Amazon Music app installed on your computer, you need to download and install it before proceeding.
- After successfully installing the Amazon Music app, launch it. Next, locate the section labeled "Settings" or "Preferences" within the app's interface.
- Within the settings section, carefully choose the option that allows you to upload music. Follow the prompts that appear on the screen closely, ensuring that you don't miss any steps.
- Once you have entered the upload music mode, you can select the specific music files or folders that you wish to upload from your computer. Indicate your preferences regarding which items you want to upload.
- After the upload process completes, it's time to grab your Kindle Fire device. Open the Amazon Music app on your Kindle Fire.
- Sign in to the app using the same Amazon account credentials that you used for uploading the music from your computer.
- Congratulations! Your uploaded music collection is now readily available for streaming or downloading on your Kindle Fire. This feature allows you to enjoy a seamless and personalized music experience.
Method 2. Transferring Music to Kindle Fire via USB:
How to put music on a Kindle Fire? To successfully transfer music using a USB connection, you need to follow a series of steps that involve connecting your Kindle Fire device to your computer as well as manually copying the desired music files to the storage of your Kindle Fire. By performing the following instructions, you can ensure a seamless transfer of music from your computer to your Kindle Fire:
- Connect your Kindle Fire to your computer using a USB cable, ensuring both devices are securely connected.
- On your Kindle Fire, you have to swipe down from the top of the screen to access the notification panel.
- After which, you must then locate the USB notification as well as you have to indeed tap on it to open the USB options menu.
- Choose the option that allows for file transfer or enables file transfer mode.
- On your computer, you must then open up the File Explorer if you're using Windows or perhaps the Finder if you're using a Mac.
- Navigate to the location on your computer where your desired music files are stored.
- After doing so, you have to select the specific music files you want to transfer to your Kindle Fire.
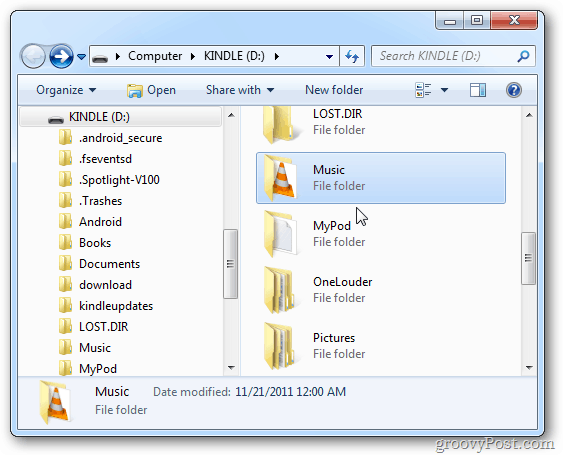
- You can make use of the drag and drop method for you to point out the selected music files from your computer's storage onto the "Music" folder on your Kindle Fire. Alternatively, you can copy and paste the files into the desired location on your Kindle Fire.
- Wait for the transfer process to complete. Ensure that all files have been successfully copied.
- Safely eject your Kindle Fire from your computer to prevent data loss or corruption.
- On your Kindle Fire, navigate to the music player app or any other media player app you prefer.
- Launch the music player app to access and play the music files you transferred from your computer.
- Following these detailed steps will enable you to effectively transfer music from your computer to your Kindle Fire via USB, allowing you to enjoy your favorite tunes on your device's music player at any time.
By following these methods and steps, you can easily transfer your music collection to your Kindle Fire. Whether you prefer uploading music to Amazon Music for streaming or manually copying files via USB for offline playback, you'll be able to enjoy your favorite tunes on your Kindle Fire with ease.
Part 4. Conclusion
By learning how to put music on a Kindle Fire, you've unlocked a world of entertainment possibilities. Whether you choose to upload music to Amazon Music for seamless streaming or transfer files via USB for offline playback, you now have the tools and knowledge to curate a personalized soundtrack on your Kindle Fire. Remember, music adds a delightful dimension to your device, enhancing your overall experience such as using AMusicSoft Apple Music Converter. So, go ahead and enjoy the harmonious fusion of technology and music on your Kindle Fire. Happy listening!
People Also Read
- Top 9 Solutions To Fix Apple Music Won’t Download Songs
- How To Turn On And Off Apple Music Explicit Content?
- How To Share Lyrics On Apple Music Using iPhone/iPad
- How To Play Apple Music On PS5? Stream Music On Game Consoles!
- How To Fix Apple Music Autoplay Not Working Error?
- How To Turn On Crossfade On Apple Music On iOS/Android/Windows/Mac
- How Do You Find Your Apple Music Replay And Download Offline?
- How to Make Apple Music Louder on Any Device?
 About The Author
Robert Fabry is an ardent blogger, and an enthusiast who is keen about technology, and maybe he can contaminate you by sharing some tips. He also has a passion for music and has written for AMusicSoft on these subjects.