How To Use, Enable And Get iCloud Music Library
Do you love saving a lot of music on your phone or computer? If you do, then you are surely having issues on handling them because of too much space being taken up from your storage. If you are after the ease and convenience of accessing them anytime you want, you have to take advantage of the Apple Cloud Music library.
With the help of the iCloud Music library, users can upload all of their existing tracks into the server, and all devices with access can download it for streaming. And as mentioned, this is a very good way of backing up your collection to avoid losing them in case of an unexpected scenario. The way how Sync Library feature works will be discussed below as well as how to enable it and how to properly use it. Keep on reading and get insights on how to manage your library right.
Contents Guide Part 1. How Does Cloud Music Library Works Once Enabled?Part 2. How to Get Apple Cloud Music Library?Part 3. How to Turn on Sync Library on All of Your Devices?Part 4. Bonus: How to Save Apple Music Without Any Subscription?Part 5. Conclusion
Part 1. How Does Cloud Music Library Works Once Enabled?
iCloud Music Library, also calls Sync Library or Cloud Music Library, is Apple's term for all the music you've stored in iCloud. Once the Sync Library feature is enabled, with the use of its improved technology related to metadata identification, your existing library will be scanned and checked if there are tracks similar to what’s already saved on the iTunes catalog. If there is a match detected, you'll get the iTunes Music Store version (a DRM-free, 256kbps-quality AAC file), rather than your original file. On the contrary, if there is no match found, the track will be added to the server in its original form and every device could have access to it.
Part 2. How to Get Apple Cloud Music Library?
One advantage of Apple Music subscribers is that they automatically get the privilege of using the iCloud Music Library once their subscription is processed. For only $10.99, you can already enjoy non-stop music streaming plus useful music storage. You can also subscribe to a service called iTunes Match ($24.99 per year), but you only have access to your Cloud Music Library.
Before getting the Sync Library feature, I'd advise you to learn about some important things.
- Every user is allowed to use up to 10 different devices in streaming the tracks inside the Cloud Music Library.
- The limit of the tracks that can be saved is up to 100,000 in total. This limit does not include the items that you bought from the iTunes Store. These files are automatically available on multiple devices with and without subscription.
- Unmatched songs will not be uploaded in the library, including those of lower quality, tracks that are bought using another user’s account and those that will exceed the 200 MB limit. The same goes, too, for all items with a long duration.
- Although Sync Library feature makes it a good tool to back-up your files, this is still not an official back-up service.
- Once the Sync Library feature is enabled, your current collection will be switched to what you have on your iCloud.
Part 3. How to Turn on Sync Library on All of Your Devices?
If you are already subscribed to Apple Music or iTunes Match, you may proceed now on activating the iCloud Music library on iTunes and Music app. Here is how to do it.
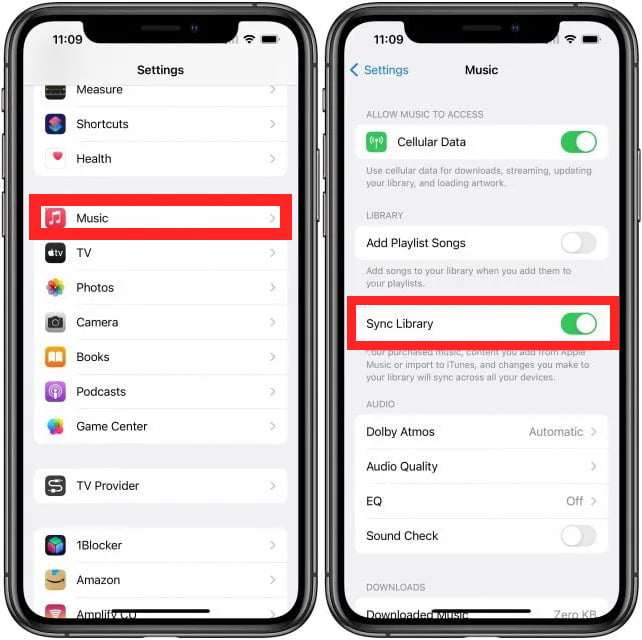
On iOS devices
- Go to the Settings app and select the Music option from the shown window.
- In the new window, tap on the switch button next to the Sync Library option. If it turns green, it means that the feature is already enabled.
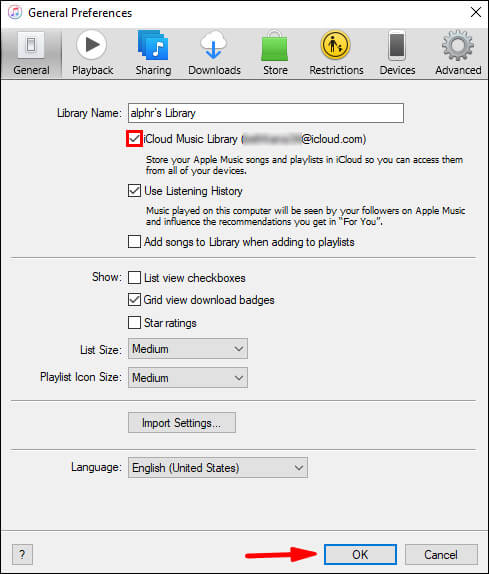
On Windows
- Launch the iTunes app on your computer.
- Tap the Edit tab at the menu bar above and select the Preferences option next.
- Click on General, find the iCloud Music Library feature and then mark the check box located next to it to turn it on.
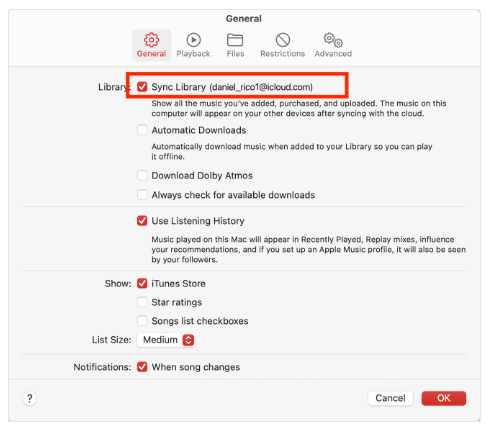
On Mac
- On your Mac, navigate to the Music app.
- Notice the Music tab right next to the Apple icon. Hit on this and then choose Preferences.
- Access the General tab and locate the Sync Library option below.
- Place a checkmark inside the mini box before the option of Sync Library.
- To finish, make sure to click the OK button.
Part 4. Bonus: How to Save Apple Music Without Any Subscription?
As discussed earlier, iCloud Music library might not be an official way introduced to back up music files, but it is definitely reliable when it comes to such a purpose. Apart from using this, there is an alternative free way to secure the backup copies of the music and that would be through the help of a professional tool. In this way, you can even have the music saved on external hard drives and USB flash drive without any subscription.
AMusicSoft Apple Music Converter is the best tool to consider if you wish to get copies of the tracks without any issues or errors to come on your way. It is designed with so many features including conversion, download and DRM removal. It can also produce multiple audio formats that you can access on more than one type of device. You can have MP3, FLAC, WAV, AAC, M4A and AAC. So you can enjoy Apple Music songs on PS4, Alexa, Roku TV, Xbox One, and more media devices.
With the aid of its 16x faster speed of conversion, the results will surely come out in just a couple of minutes. Note as well that this tool has a very user-friendly interface which users can easily follow and understand. All the results that it can produce are all with good quality and can be streamed at their highest.
The steps below should be followed while using AMusicSoft Apple Music Converter in downloading Apple Music files and converting them to any format.
- Download the application from the AMusicSoft website and then launch it on your computer.
- Wait for a few minutes until AMusicSoft Apple Music Converter has completely read your Apple Music collection. Once done, load your library and start selecting each title you wish to download.
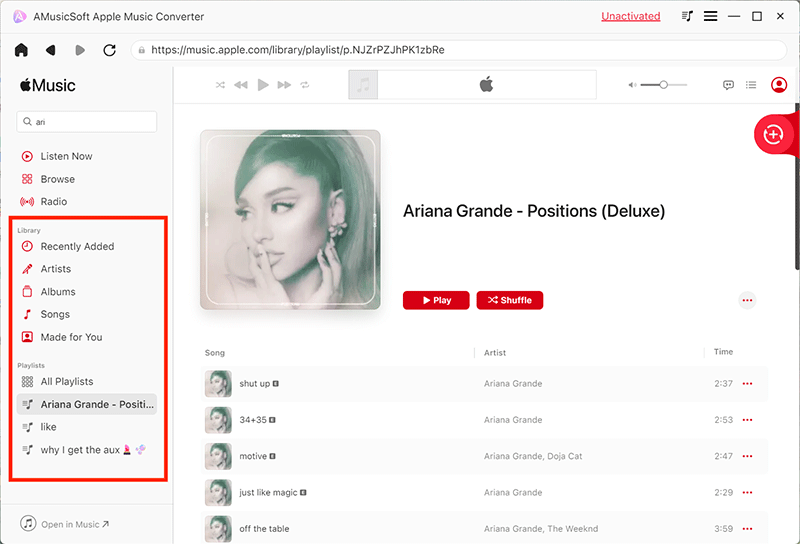
- Now, choose the output format you want and then modify the initially set settings based on the final result you wish to have. Allot an output folder, too.

- Convert the songs by tapping on the Convert button.

- Select the Converted tab and then see all of your music files.
Part 5. Conclusion
The iCloud Music library can totally give so many benefits to users that is why it is very recommended to use. This will even assure you that the tracks are safe on its storing location. But since they are only accessible on authorized devices that are linked to the library, other players won’t be able to play them because of DRM protection. Fortunately, with the help of AMusicSoft Apple Music Converter, you can easily get the supported results in no time. Just go to your browser, search for the AMusicSoft website and then download the Apple Music Converter app.
People Also Read
- Multiple Ways To Transfer Music To Pixel [Updated]
- Guide On Playing Music Through Bluetooth On iPhone
- Why Apple Music Deleted Songs And How To Recover?
- Best Music Player For iPhone With Equalizer
- FULL GUIDE: How To Download iTunes Library To New Computer
- How To Play Music While Streaming On PS4: A User Guide
- iTunes Not Syncing To iPhone? Easy Solutions To Fix It!
- How To Purchase Songs From iTunes Store
 About The Author
Robert Fabry is an ardent blogger, and an enthusiast who is keen about technology, and maybe he can contaminate you by sharing some tips. He also has a passion for music and has written for AMusicSoft on these subjects.