How To Transfer iTunes Purchases To Another Account And To Another Device
The number of devices that an Apple user can use in a single account is limited to only 5 devices in total. What if you wish to use more than the said number, how are you going to transfer iTunes purchases to another account? It would surely be a headache if you won’t have the purchases transferred into other accounts, right? So, learn more about the procedure that you have to follow in order to transfer iTunes purchases to another account.
Contents Guide Part 1. How To Transfer iTunes Purchases To Another Account?Part 2. How To Transfer Your iTunes Purchased Music To Any Device?Part 3. Summary
Part 1. How To Transfer iTunes Purchases To Another Account?
Let us start with having a concrete answer to the question, “is it possible to transfer iTunes purchases to another account?” Well generally, as of now, Apple is yet to release a feature that lets its users transfer iTunes purchases to another account directly. But, the process to transfer the files is still possible. The process is reliable but does not expect it to be that easy to execute.
Since Apple is still looking for ways to launch such a feature, the detailed steps below will help you in the meantime. Make sure to pay attention in doing each step for you to successfully transfer iTunes purchases to another account.
- For the first step, you have to transfer all of your iTunes purchases into another location, a public location to be particular. This will help the other users to play and access your moved iTunes files. In order to do this, just click on the Music tab and then select iTunes next. After clicking on that, click on “iTunes Media folder”. This procedure is for those who are using a Mac computer. If you happen to use Windows, go to Users and then click on My Music. After doing so, choose iTunes and then select “iTunes Media folder”.
For this step, you have to make sure that the folder that you clicked is correct, which is the iTunes Media folder and not any other folder like “iTunes folder” or “iTunes library.xml”. These two mentioned folders are supposed to stay in their current location.
- Now for the next step, the selected iTunes Media folder should be dragged or moved into a public location. It could be a shared folder as well. Dragging the files will enable other users to access them.
- Once the files are already moved, proceed to open your iTunes application. From there, click on the Edit tab at the top part of the window. After that, click on “Preferences” and then “Advanced”. Now, select the button for “Change” to proceed with changing the location of your iTunes Media folder. After clicking on Change, select “Change Music Folder Location” next. After choosing the end place, click “OK” and have the changes made saved.
After doing the steps above, other users will now be able to access these items. In order to complete the process to transfer iTunes purchases to another account, there are more steps that need to be followed.
- Proceed to open the iTunes app. From there, click on the Edit tab and then select “Preferences”. From the next set of options shown, click on “Advanced”
- Now, try to make a quick checking of the window shown particularly if the option of “Copy files to iTunes Media folder when adding to library file” has been selected or not. You have to double-check this option and have it unselected.
- The next step is to click on the File tab, which is along with the Edit tab’s location. From the displayed options, click “Add to Library”.
- Head into the new location where the iTunes Media folder is relocated. Start browsing and choosing all the items that you wish to be streamed using another account. After choosing, make sure to click on the “Open” button to have it added to your library.
If the steps discussed are followed, other users of other accounts will now be capable of playing the same items you had in your account. This procedure is effective if you are willing to share your purchased iTunes items or you wish to stream some users’ shared iTunes tracks.
Let us say that you have successfully done the process on how to transfer iTunes purchases to another account and you had the results that you are expecting, what if some of the users haven’t made it successful? There must be some reasons behind it. I have here below the most possible reason why other users have failed to do the process on how to transfer iTunes purchases to another account.
DRM Copy Protection
The DRM copy protection of the contents is the most possible reason that you must think of behind the failure of doing the procedure. This copy protection is being encrypted into the items to avoid them from being copied or transferred into any other unauthorized devices. The contents before are encoded in a format like M4A, which is totally accessible on a lot of devices and will surely not limit you in any procedure you want to do with them. If you happen to still have the mentioned items, then you are free to share them without any restrictions to think of.
However, iTunes contents now are encoded in formats including M4V for videos, M4B for audiobooks, and M4P for songs. All of these formats are strictly protected by DRM which makes it impossible for you to just do any procedure as you like.
Part 2. How To Transfer Your iTunes Purchased Music To Any Device?
As was discussed in the previous section, the unsuccessful process to transfer iTunes purchases to another account is possible because of DRM. So, in order to proceed, you have to think of a method to perfectly get rid of this problem. The most reliable way that you could do this is to make use of a tool named AMusicSoft Apple Music Converter.
AMusicSoft, as mentioned, is capable of breaking the DRM protection from Apple contents. It can also assist you in converting these contents, including Apple Music, iTunes M4P Music, and audiobook files into plain output formats like MP3, FLAC, AAC, WAV, M4A, and AC3. The great thing about this is that these formats can all be easily accessed in some other device type. You have to consider as well the rated conversion speed of AMusicSoft Apple Music Converter. For your information, it can work at a 16x faster speed of conversion. Plus, even though the contents have undergone conversion, all significant details such as ID tags and Metadata information are saved and kept. Expect as well the best streaming quality of the converted contents.
Lastly, AMusicSoft can assist you in downloading the contents that you want to keep on your device. With this feature, you will be able to play them on unauthorized devices even without an internet connection or even more, if you had your subscription canceled. In order to transfer iTunes purchases to another account and into other devices, see the list of detailed steps below.
Step No. 1: Have AMusicSoft Apple Music Converter Downloaded And Installed In Your Device
Of course, you couldn’t have the process started if you do not have the application yet. The first thing to do is to get the AMusicSoft application. If you cannot find it in the Apple Music store, try on getting it from its official website. Just open your browser and type the AMusicSoft website. From the page, look for the Download button and click it once found. Finally, after the successful download of the app, make sure to install and run it on your used device.
Step No. 2: Upload The Tracks Into AMusicSoft Apple Music Converter
After the installation of the app, it will automatically read your Apple music library. The scanning time that will be consumed by the application will normally depend on your library itself. If you have a lot of tracks or albums in your music library, except that the scanning process will take a little more time.
Once the reading process was done, you may now start selecting and adding the tracks. At the upper part of the window, there are two tabs namely Converted and Converting. Click on the Converting tab to see all the tracks in your library. Beside each song is a box that needs to be ticked if a certain song was selected.

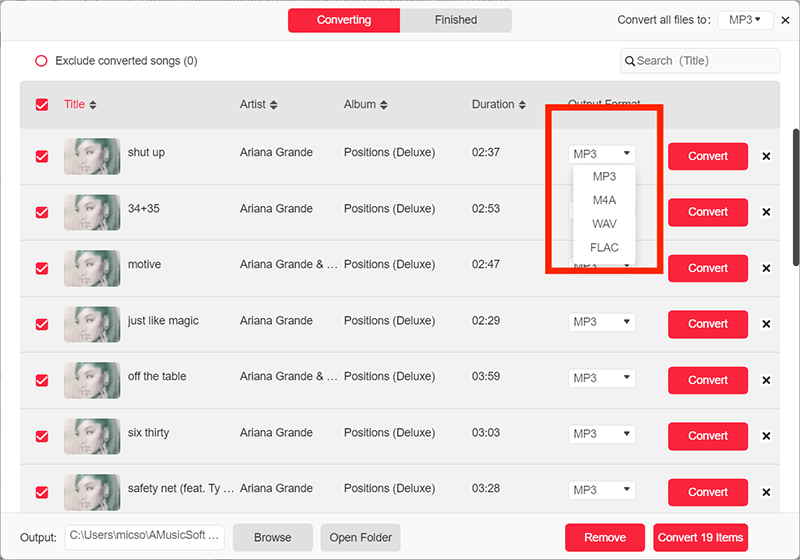
Step No. 3: Choose The Output Format Of Songs
After the tracks are selected, you may now choose the output format. You can also change the settings of conversion to achieve your target results. Below the Converting tab, choose your desired output path, bitrate, and sample rate setting.
Step No. 4: Hit The Convert Button
Finally, after modifying the conversion settings, you may now click the Convert button. After tapping on it, wait for a few minutes until the conversion process was done.

If the process is already done, click on the Converted tab that is beside the Converting tab. This is where you will see all the completely converted contents. Select and download the songs to your device. In this way, you will now be able to transfer iTunes purchases to another account.
Part 3. Summary
The process to transfer iTunes purchases to another account has never been easy since there is no direct function that allows the users to easily do the procedure. To have the files transferred, use the steps above as your guide to do so. On the other hand, you may use AMusicSoft Apple Music Converter if you wish to transfer iTunes purchases to another account of another device type.
People Also Read
- How to Transfer Music from iTunes to SanDisk Sansa Clip
- How to Transfer Music from Computer to iPhone XR
- How to Transfer Music to FitBit Versa From iTunes
- How to Transfer iTunes Playlist to Android
- The Easy Procedure On How To Authorize Computer For Apple Music
- Easy Methods: How To Get All Your Music Back On Apple Music
 About The Author
Robert Fabry is an ardent blogger, and an enthusiast who is keen about technology, and maybe he can contaminate you by sharing some tips. He also has a passion for music and has written for AMusicSoft on these subjects.