The Easy Procedure On How To Authorize Computer For Apple Music
Learning the proper procedure on how to authorize computers for Apple Music and iTunes is very much beneficial especially if you are planning to use more than one computer in playing music. If this is exactly what you are trying to study now, this post will definitely be of help to you.
In order to stream Apple Music and be able as well to play items from iTunes, it is very much needed to have your computer authorized first. This goes the same with the Apple ID that you have used in registering your iTunes account. To possibly have this, you need to learn about how to authorize a computer for Apple Music. The step-by-step guide to doing this will be tackled below.
Contents Guide Part 1. Why Is Apple Music Saying My Computer Is Not Authorized?Part 2. How To Authorize And Deauthorize A Computer?Part 3. Check Your List Of Authorized DevicesPart 4. Extra Tips: What To Do If I Run Out Of Authorizations?Part 5. Conclusion
Part 1. Why Is Apple Music Saying My Computer Is Not Authorized?
For some users, as they attempt to play a certain song from the library, a message will show saying that the device has not been authorized and that you cannot proceed with playing the music. This error could possibly be caused by several factors and the major ones are listed below.
Incorrect Login Details
When signing in to iTunes, it is actually possible to input the wrong Apple ID. You might have been confused while typing it, so, it is best to check if you are using the Apple ID that is associated with your iTunes and Apple Music membership.
Expired Apple Music Membership
There are some cases where it is just about your membership. Gradually check if your subscription is still active or not. After confirming that it is still active, try to sign out and sign in again and see if the same problem is occurring again.
Unfinished Or Wrong Method Of Device Authorization
Make sure that your computer has been authorized correctly and successfully or else, you really won’t be able to continue streaming music.
After learning about these factors, for those who do not have the idea yet, I would recommend to study the procedure on how to authorize computers for Apple Music properly which is to be tackled in the upcoming sections.
Part 2. How To Authorize And Deauthorize A Computer?
Before you proceed, you have to remember that you cannot add another device if you have already reached a total of 5 computers.
How To Authorize A Computer
- On your computer, launch the iTunes app.
- For those who are using Windows for the process of how to authorize computer for Apple Music, as you open the application, from its menu bar at the top, select the Account tab and follow it with Authorizations. After doing so, a new menu will show up containing the option for Authorize This Computer. Click on this option next.
Whereas on Mac, just click on the Store tab at the top and then select Authorize This Computer next.
- After a few seconds, you will then be asked to fill in the necessary details such as your Apple ID and password. Once you are done with this, just tap on Authorize button.

How To Deauthorize A Computer
The procedure on how to deauthorize the computer is just pretty the same as how to authorize a computer for Apple Music. As you will notice, as you click on the Store tab on Mac and the Authorizations tab on windows, right below the option of Authorize This Computer is Deauthorize This Computer. Just click on this option instead and type your Apple ID and password when prompted.
Know The Total Number Of Computers Authorized
For you to know if you already have run out of the number of computers that can be authorized, you may use the procedure below as your guide to know it quickly.
- Look for the iTunes app on your computer and tap it.
- Make sure to have yourself signed in via the Apple ID that you have used since the beginning.
- Upon entering your account, select your account name. This will result in another menu showing up on your screen. From there, look for the Account Info option and click it.
- Here, you will be asked to fill in your password to proceed. Right after that, you will now be able to see the total number of computers that you have authorized so far.
Part 3. Check Your List Of Authorized Devices
Upon knowing how to authorize computer for Apple Music, it is good to learn that apart from computers, there are still more devices that can be used for streaming Apple Music. Actually, there is a wide range of devices to use but that does not mean that every model for one device type is automatically authorized. Check out the list below and be well equipped with the devices that should or shouldn’t be used in playing Apple Music.
iPhone
As of today, there are already a lot of iPhone models released in the market. The only iPhone models that you can directly use in utilizing Apple Music include iPhone 6S and the models released after it. This is because at the time they were released, there is already an Apple Music app designed in their system. If you have any of the devices mentioned, all you have to do is to get a subscription to Apple Music in order to enjoy its music library.
If by chance the iPhone model that you have is one of the following, iPhone 4, 3G, and earlier versions, sadly, Apple Music is not supported on these devices. But if you have iPhone 4S, 5, 5C, 5S, 6, and 6 Plus, to have your device usable for streaming, you will just have to upgrade its system to iOS 8.4 or higher version. Once done, you will now be capable of downloading the application from the App Store. Just proceed with getting your own subscription and then you are already good to go.
iPad
iPad is the best option for you to use in streaming Apple Music. All versions of the iPad are allowed to be upgraded into iOS 8.4 and higher, so, after having them upgraded, the only worry left for you is just about getting your subscription.
iPod Touch
All older versions of the iPod Touch 5 will not allow you to stream Apple Music. But all models starting from iPod Touch 5 and newer, can be upgraded into iOS 8.4 and later, in order to download the Apple Music app.
If you have an iPod Touch 6th generation, you do not have any problem using it for Apple Music since it is initially set to 8.4 and could still be upgraded to iOS 12. So, obviously, direct playing of music through this device is definitely allowable.
Android Devices
Via Google Play Store, you may get the official application of Apple Music and then start your subscription. However, you have to remind yourself that Apple Music is only supported on mobile phones and not on tablets or TVs. In addition to that, your phone must be running Android 4.3 and higher.
Part 4. Extra Tips: What To Do If I Run Out Of Authorizations?
The question is, what should you do if you suddenly run out of authorizations and have not been able to add all of your devices?
In the previous sections, you have learned about how to authorize computer for Apple Music as well as how to deauthorize them. This is actually the first reliable solution on how to fix your problem of running short on authorizations. You may then start deauthorizing those computers you think are the least important and are alright to be removed.
The second option for you is to utilize AMusicSoft Apple Music Converter, which can help you use multiple devices in playing your favorite music without limit. This means that you do not have to know how to authorize computer for Apple Music anymore because any device will do. To make it possible through AMusicSoft, the protected songs must be made DRM-free first to make them convertible to accessible formats. After that, download them all on your device and be free on transferring them from one device to another. This whole process could be done by AMusicSoft in just a few minutes because of its working speed of 16x faster. With this speed, it was still capable to produce the best quality of sound to listen to.
Follow these steps to get your favorite Apple Music files.
- Download AMusicSoft Apple Music Converter and launch it then on your computer.
- Mark the box of each chosen song for conversion and download.

- If you wish to do some changes to the resulting music, the section below will allow you to do that. After doing so, select an output format from MP3, WAV, AAC, M4A, AC3, and FLAC.
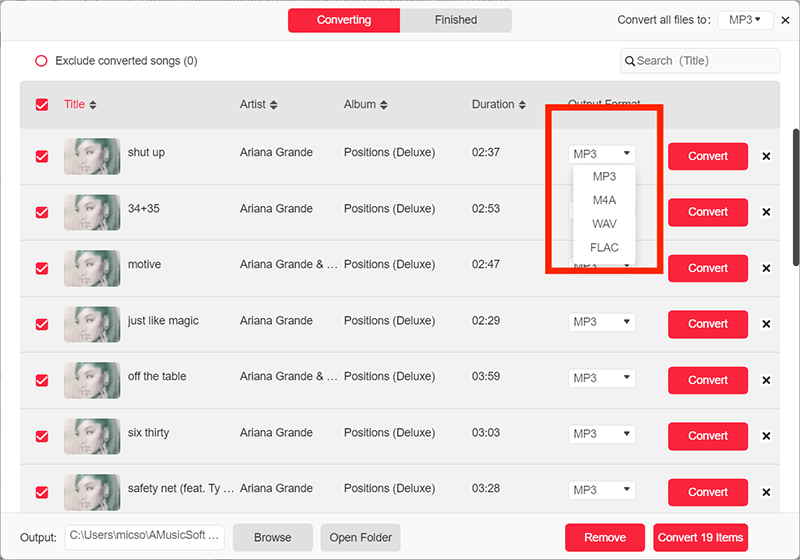
- Select the Convert button located below and then see the converted files by clicking on the Converted menu at the top.

Part 5. Conclusion
With the discussion above about how to authorize computer for Apple Music, I hope that you have managed to fix whatever problem that is occurring in your app. To get the best music streaming experience through Apple Music, the best option for you to use is no other than AMusicSoft Apple Music Converter.
People Also Read
 About The Author
Robert Fabry is an ardent blogger, and an enthusiast who is keen about technology, and maybe he can contaminate you by sharing some tips. He also has a passion for music and has written for AMusicSoft on these subjects.