Set An Apple Music Sleep Timer On iPhone, Windows, And Mac
For some people, music plays a big role in getting some rest and relaxation, especially when going to sleep. But since leaving the songs playing continuously while sleeping is kind of not a good idea, let us learn the procedure on how to set an Apple Music sleep timer on your respective devices.
An Apple Music sleep timer is a function that will enable your device or your music player to turn off or stop automatically once your set time was reached. This will help you avoid the situation of waking up in a low battery device that is caused by the non-stop playing of songs. However, most of the users are not fully aware that this is possible. So, to help you with that below is a discussion of the procedures to follow on how to set an Apple Music sleep timer on iPhone, Mac, and Windows computers.
Contents Guide Part 1. How Do You Put A Sleep Timer On Apple Music On iPhone?Part 2. How To Set A Sleep Timer For Apple Music On A Mac?Part 3. How To Set A Sleep Timer For Apple Music On Windows?Part 4. How To Convert Apple Music To Plain MP3 FormatPart 5. Summary
Part 1. How Do You Put A Sleep Timer On Apple Music On iPhone?
When it comes to setting up alarms, you could see the difference between Apple podcasts and the Music app. It is because, in podcasts, you can set alarms since it was a built-in feature. But on the Music app, you do not have one, so, it would be bothersome for you to wake up in the middle of your sleep only to turn off the music that is playing. So, the question now is it possible to have an Apple Music sleep timer? How to set up an Apple Music sleep timer?
In setting up an Apple Music sleep timer, you may choose from using two methods. Just make sure to select the more convenient and the more effective for you. To know the easy steps on how to set up an Apple Music sleep timer, see the discussion below.
Via Clock App
The first method that you may try in setting up an Apple Music sleep timer is using the Clock application. In this app, you may utilize the timer service to set a specific timeframe in which the song will stop once the set time was reached. Follow the steps below.
- Open your iPhone and then tap on the icon of your Clock application.
- At the bottom part, select the Timer.
- The next step is to decide for how long you will set the timer. You may start with 30 minutes but you can always change it based on your sleeping pattern. Once done setting, tap then the option of “When Timer Ends”.
- After doing so, continue scrolling until you reach the bottom part, and then click on “Stop Playing”. After that, click the Set button.
- You will then be directed back to the timer section. From there, just click on the Start button.
- Now, you may choose the Apple Music songs that you wish to play. When the time or duration you have set is finally done, the music will automatically stop as well.
Via Automated Sleep Timer
Another way to set an Apple Music sleep timer is through the use of an automated sleep timer that is working by utilizing automation routines on your mobile phone. This will let you're currently playing Apple Music to stop if the fixed alarm time was reached. However, you have to be reminded that this method does not work for those who have an irregular sleeping routine because here, you will have to set only one alarm time which is to be used every day. So, if you are someone who is really not good at getting a constant sleeping pattern, I would not recommend this method then.
Check out the steps below to learn how to use an automated sleep timer method.
- Start with getting and installing the application of Shortcuts on your iPhone. Once done with that, open the app.
- Take a look at the bottom part in order to see the Automation tab.
- For those who are just doing the automation process for the first time ever, locate and select the button Create Personal Automation. Alternatively, you can just click the plus icon that is placed in the upper right corner and then choose the option of “Create Personal Automation”.
- After doing so, hit the Time of the Day button to proceed with the selection of time when you exactly plan to stop the music from playing. Then after that, click Next and then click Add Action button.
- The next step is to utilize the search bar that you are seeing and then type “Play or Pause” and then select Pause.
- Right after that, select the Next button and then make sure that you are inactivating the “Ask Before Running” option.
Part 2. How To Set A Sleep Timer For Apple Music On A Mac?
Setting up an Apple Music sleep timer on Mac could be made through the following steps.
- Tap on the Apple icon at the upper left part of your screen in order to see the Apple menu.
- From the menu, select System Preferences.
- After that, click the Battery icon.
- Then tap on the Schedule button. This is located in the lower menu tab.
- Upon doing so, a new menu will be shown in which you have to select the box placed before the Sleep icon. To see other menus aside from Sleep, just tap on Sleep. After that, you will be able to see the Shut Down option as well. Click on this instead if you want to directly proceed with turning off your Mac computer.
- Now, start setting the specific time and the days when you will be using the alarm. Once done, click OK.
If you have correctly followed the steps above, you may now choose and set the Apple Music songs to play before you sleep, and then your Mac will automatically be put into its Sleeping mode once your set alarm was reached.
Part 3. How To Set A Sleep Timer For Apple Music On Windows?
Let us now tackle the procedure on how to set up an Apple Music sleep timer on a Windows computer. Check out the step below.
- For the first step, click on the Windows key plus the R button on your keyboard.
- In the window shown, type on Cmd and then hit the Enter button next.
- Now, type “shutdown -s -t 3600”. In here, 3600 is actually the total number of seconds your Windows computer is initially set to shut down once this was reached. If you plan on setting another time, you can always change that into another number.
- After having it set, click the Return option.
Since this was used to have your Windows get turned off after the set time, the Apple Music song that is currently playing on your computer will automatically stop then from playing.
Part 4. How To Convert Apple Music To Plain MP3 Format
After learning about the different ways how to set an Apple Music sleep timer on different devices including Mac, Windows, and iPhone, let us now discuss more Apple Music. From what we know about Apple Music, its contents are DRM protected and couldn’t just be accessed on any device you want. The songs from Apple Music are encoded in an output format that is only playable on selected devices. So, in order to play them unlimitedly without any restriction, you will have to convert them into a plain output format that could be accessed on most devices.
To possibly do the process, you will have to use a professional tool named AMusicSoft Apple Music Converter. AMusicSoft can do both conversion and download processes without losing the original audio quality of the music. And after the conversion is successful, you can listen to apple music without the network. In addition to that, it can keep the important details of the songs such as the ID tags and Metadata info which are both significant in identifying the songs. The formats that can be used in AMusicSoft include the formats MP3, AAC, WAV, AC3, M4A, and FLAC. To convert the Apple Music songs into one of these formats, kindly follow the list of steps below.
- Navigate to the official website of AMusicSoft and then officially download the Apple Music Converter application.
- After doing so, from the list of Apple Music songs saved in your collection, mark all the songs that you plan on converting by checking the box before every song title is selected.
- Then now, choose an output format to use. Start with choosing the MP3 format for the conversion process and then select an output folder as well.
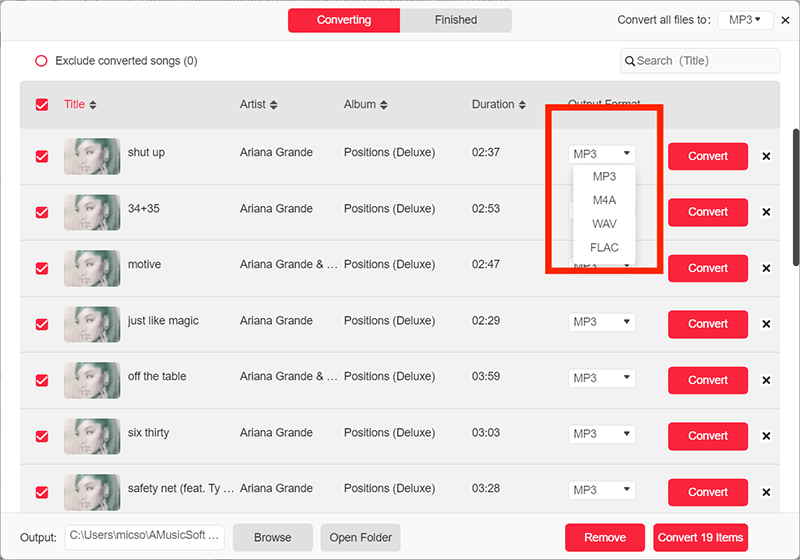
- Right after that, click the Convert button to start the conversion.

- To see the results, just tap on the Converted menu located at the top of the song list.
Part 5. Summary
Though the Apple Music app does not have a built-in function for alarms, setting an Apple Music sleep timer will be quite easy if you will just follow the procedures that are discussed above. On the other hand, try on using AMusicSoft Apple Music Converter in converting and downloading the songs into plain output formats including MP3. This will surely help you play the songs on as many devices of your choice.
People Also Read
 About The Author
Robert Fabry is an ardent blogger, and an enthusiast who is keen about technology, and maybe he can contaminate you by sharing some tips. He also has a passion for music and has written for AMusicSoft on these subjects.