How To Import Music From Spotify To Windows Media Player
One of the most common and most used media players is the Windows Media Player. It is a media library application that you can use to play audio files, movies, or even view images using personal computers. Here, we will talk about how to import music from Spotify to Windows Media Player. This media player has actually a lot of good things in store for its users one of the reasons why it is so in demand.
There are surely a lot of online music streaming sites today and most people prefer it as it is more convenient and easier to use. However, as most old people say, nothing beats the classic. There are a couple of advantages that you should know about using Windows Media Player. We will be talking about these advantages as we go along the article. So if you are interested to know how to import music from Spotify to Windows Media player, let us hop into more details about it.
Contents Guide Part 1. Can You Import Music From Spotify To Windows Media Player?Part 2. How Do You Import Music From Spotify To Windows Media Player?Part 3. To Summarize It All
Part 1. Can You Import Music From Spotify To Windows Media Player?
So the main question is can you import music from Spotify to Windows Media Player? The answer is yes, it is possible if you are going to do it using the right tools and applications. If you are using Spotify you can be able to download the songs you like if you are subscribed to the Premium version of Spotify. You can also be able to directly transfer it to Windows Media Player but only European users can do it as of today.
On the other hand, Windows Media Player is a type of library manager and media player that is well known and well used by many people. You can be able to enjoy and play a lot of digital files using it. One of the many reasons why many people use it is because you can be able to use it to organize your files well and properly. It offers a lot of organizational tools that are also easy to use. You can also be able to easily share your files with your friends and family through the use of other DLNA compatible devices that are present in your network.
Also before fully engaging with the process on how to import music from Spotify to Windows Media Player, you should also know that file formats such as M4A, WAV, MP3, FLAC, and AAC are supported by Windows Media Player. In relation to this, we all know that the type of file format of songs from Spotify is Ogg Vorbis which is not one of the file formats that is supported by the said media player. However, there are tools that we can use on how to import music from Spotify to Windows Media Player, and we will discuss it further in the next part of the article.
Part 2. How Do You Import Music From Spotify To Windows Media Player?
Now, that we are already aware of the file formats that can be directly transferred to Windows Media Player, the next thing that we might want to discover is how to import music from Spotify to Windows Media Player since its file format is Ogg Vorbis?
There is a perfect tool that we know; this one will ultimately solve your entire dilemma to directly play your most wanted songs using your Windows Media Player. The tool that we are talking about is a type of professional converter, the AMusicSoft Spotify Music Converter.
This professional converter can convert your song files to more versatile file types which can be directly played and transferred to Windows Media Player. Yes, you can be able to download all the songs that you like from Spotify even though you are not subscribed to the premium version of the said music streaming site. There are other good things that you should know about AMusicSoft Spotify Music Converter, let us go into the said details one by one.
- AMusicSoft Spotify Music Converter can be able to let you save a lot of your time. This professional converter can convert your files in just a matter of a few minutes. You can even choose a whole album or a whole playlist and have them converted as soon as possible. So, if you are one of those who value time this professional converter will ultimately help you with all your conversion needs.
- Another good thing that you can be able to do with AMusicSoft Spotify Music Converter is to save some money that you can use to buy some other necessary things you need. Since you no longer need to subscribe to the premium version of the online music streaming site, it also means that you no longer have to pay monthly payments just to keep the subscription.
- If you are also worried that you cannot easily transfer the files that you have converted using the AMusicSoft Spotify Music Converter, well you will be amazed to know that this professional converter also elicits Digital Rights Management or DRM which means that you can now be able to transfer your files to any device that you want to use.
- This professional converter will guarantee the quality of the song files that you have converted even if it will only take you a few minutes to witness the whole process of conversion. So, you can still expect the best quality of songs even after the process of conversion, it is lossless songs all the way.
- Another good thing about this professional converter is it has a very easy-to-use and deal-with interface. All the basic things that you need are easily accessible.
This professional converter is proof that our technology is improving. One of the other things that you must consider about this professional converter is it is really very easy to understand and use. as what we have talked about it has a very simple and easy to understand interface, aside from it you only need to follow three simple steps to be able to get your files converted and ready for transfer or listening.
So, how to import music from Spotify to Windows Media Player using this professional converter?
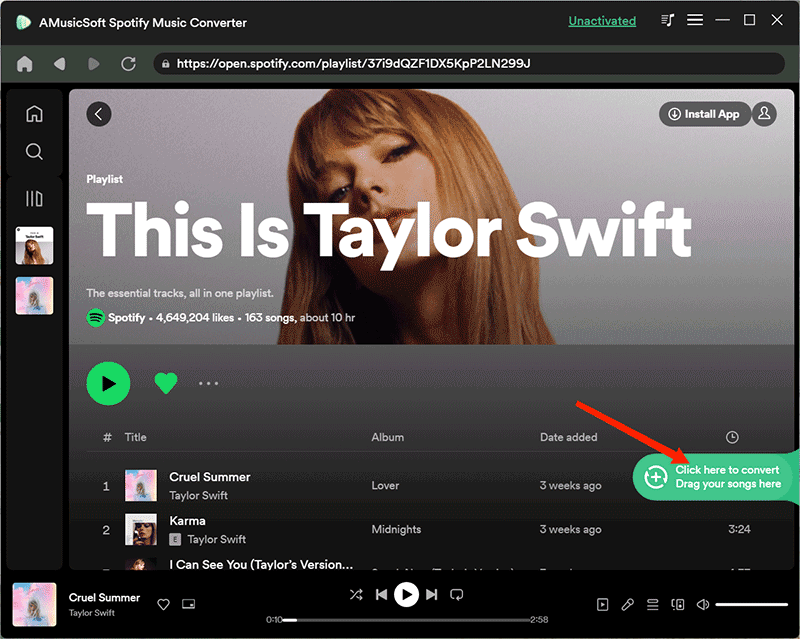
Step 1. Launch The Professional Converter
The initial thing that you must do is to download and install the application. Once you are finished you can start launching it. You can now also start pre-selecting all the song files that you want to convert. You can choose a whole album or a whole playlist if you want.
Step 2. Make An Output Folder
The next thing that you have to do is to make a folder that will serve as the storage of the files that you have converted. You can directly save all the converted songs to this folder, and you can also copy and paste the files. To be able to easily identify the storage of the songs that you have converted, you can name the folder based on your own personal choices or you can choose to use the default information like the title of the album, the title of the song, the name of the singer, or the genre of the songs that you have converted.
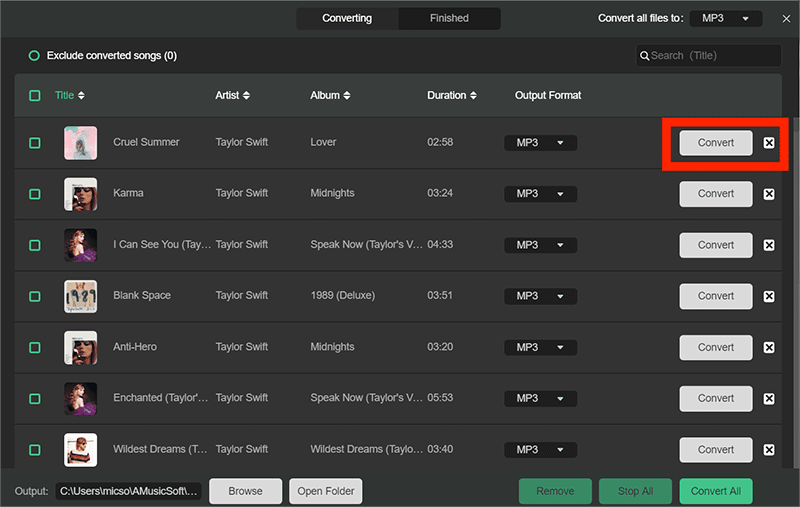
Step 3. Tap The Convert Tab
The final step is to click “Convert”, and you just have to wait for a few minutes to have all the files that you want to be converted.
There are actually other tools that you can use on how to import music from Spotify to Windows Media Player; one of these is the use of the AMusicSoft Spotify Music Converter. There are a lot of good things about these professional converters and we are so lucky to finally enjoy them and thankful that they can be able to provide a way that we can meet convenience while enjoying what we love to do.
How To Transfer Spotify Songs To Windows Media Player

Now that we have already converted the songs that we have carefully selected it is now time to learn how to import music from Spotify to Windows Media Player. Before you can be able to start importing the music files to Windows Media Player you have to make sure that your media player is of the latest version. Here are the steps that you should follow on how to import music from Spotify to Windows Media Player.
- Open your personal computer and launch the Windows Media Player application.
- You will see “Organize” on the list of Menu, click it. Then you have to select “Manage Libraries”, and then click “Music”.
- You then have to select “Add” then a pop-up window will appear to be able to start browsing all the converted music files, the adding of files will take up a few minutes.
- Then you have to select a folder where you have to save all the music files that you have converted. Then all the music files will be added to your Windows Media Player, and you can now play all the songs that you have converted in the Windows Media Player even though you are offline.
Why Is It Best To Use Windows Media Player?
There are many ways that we can be able to listen to songs from Spotify even though we are offline, however, one of the main requirements is to remain subscribed to the premium version of the application which means that we have to pay monthly dues to continuously enjoy listening to songs we love.
One of the several ways that you can be able to listen to music from Spotify even when you are offline is through the use of media players like the Windows Media Player, here you can be able to listen to songs you love even when you are not subscribed to the premium version of Spotify. Here are some of the things why Windows Media Player is the best to use when it comes to the playing of all your most wanted music.
- You can be able to keep the songs that you like on Windows Media Player.
- There are a lot of devices that are supported by the Windows Media Player.
- You can be able to easily manage and organize all the songs that you like.
- You can also burn a CD from the music from Spotify using the Windows Media Player.
- You can listen to all the songs that you love on any device that you want using the Windows Media Player even though you are offline or not subscribed to the premium version of Spotify.
Part 3. To Summarize It All
We all want good quality songs every day. It is a dose of good vibes and happiness that we all need. May it be a celebration or a gloomy day, music always saves the day. That is why there are a lot of music lovers who are searching for a way that they can be able to listen to songs they love conveniently. And even though there are a lot of restrictions there are also a lot of ways to overcome them.
The use of professional converters like the AMusicSoft Spotify Music Converter is really a huge help to convert the songs that we love for us to be able to enjoy them even without subscribing to the premium version of Spotify. We hope that you have learned how to import music from Spotify to Windows Media Player. You can now listen to your favorite songs using one of the most popular media players that we have today.
People Also Read
- Can I Play Spotify Music On Other Players: Get It Here
- How Do We Export Spotify Playlist To CSV
- What is The Best Spotify Album Downloader
- How to Use Spotify Abroad Without the Restriction of 14 Days
- Rainmeter Spotify: Things We Need To Know
- How to Work With A Collaborative Playlist Spotify
- The Most Played Song On Spotify: Somethings You Need to Know
 About The Author
Robert Fabry is an ardent blogger, and an enthusiast who is keen about technology, and maybe he can contaminate you by sharing some tips. He also has a passion for music and has written for AMusicSoft on these subjects.