How To Get Spotify High Quality Streaming For Better Sound
If you’re paying $11.99 USD or more a month for a Spotify Premium subscription, you want to make sure you’re getting the best bang for your buck. Spotify Premium has many features for discovering, listening to, and experiencing music that you can use to elevate your streaming service experience. In this article, we will explore how to get Spotify high quality streaming at the best possible audio quality, covering everything from the settings and equipment. Whether you’re a casual listener or an audiophile, this guide will help you get the most out of your Spotify streaming experience with or without Spotify Premium.
Contents Guide Part 1. What Audio Quality Is Spotify Streaming At?Part 2. Increase Spotify Music Quality by Changing Audio QualityPart 3. Increase Spotify Music Quality by Using EqualizerPart 4. Increase Spotify Music Quality Without PremiumPart 5. Conclusion
Part 1. What Audio Quality Is Spotify Streaming At?
Unlike Apple Music and Tidal, Spotify does not offer a hi-res lossless music streaming option. Spotify announced in 2021 that they will be launching a HiFi lossless streaming service in the future, but as of 2024, it’s not yet available. However, to enjoy lossless audio, you will need a fast internet connection and equipment that can support high-resolution audio. If you are not an audiophile with high-end audio gear, Spotify’s sound quality is decent.
What are the Spotify high quality streaming settings? Spotify comes with five audio quality settings on its desktop and mobile app:
- Automatic (Dependent on your network connection)
- Low (24 kbit/s)
- Normal (96 kbit/s)
- High (160 kbit/s)
- Very High (320 kbit/s, Premium subscribers only)
Spotify uses the Ogg Vorbis codec on most devices. Keep in mind the 320 kbps setting is exclusive to Premium subscribers. To ensure the best quality on all the devices you can stream Spotify on, you can upgrade to Spotify Premium.
If you always play Spotify from the web player, well, you don’t have much of a choice on sound quality. If you have Spotify Premium, music will play back at 256kbps. If you have free Spotify, it’ll play at 128kbps. 256 kbps may sound like a big downgrade from 320kbps, but you shouldn’t worry too much. Spotify’s web player uses the AAC codec which is actually a little more efficient than the Ogg codec used in the desktop and mobile apps. For another, a 256 kbps compression is already pushing the limits of what people can distinguish from lossless for most audio formats, let alone one of the more efficient ones like AAC.
Part 2. Increase Spotify Music Quality by Changing Audio Quality
How to get Spotify high quality streaming experience? Increasing the audio quality on Spotify allows you to enjoy a clearer and more pleasurable audio experience while letting you hear the finer details and tunes of the music. How do you change the audio quality on Spotify? Here are the steps that you must follow:
On the mobile app:
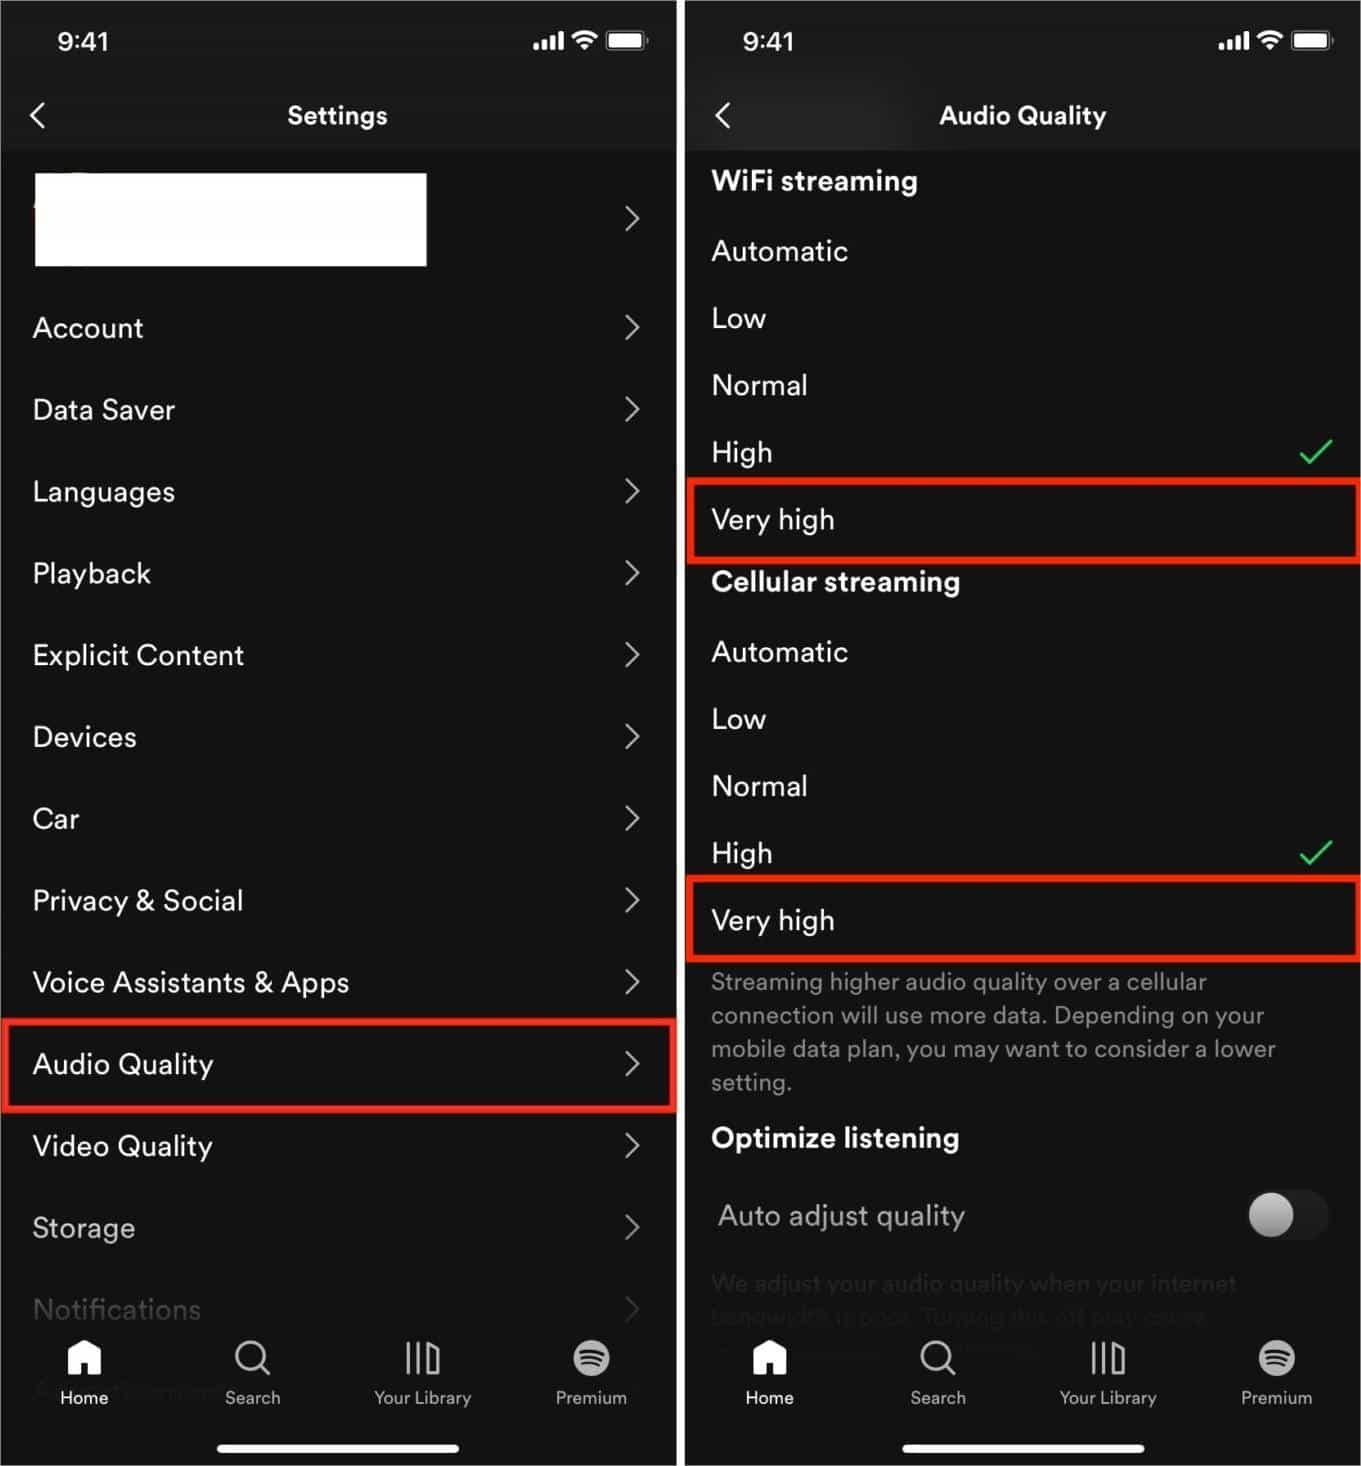
- Open the Spotify mobile app and log into your Spotify account.
- Swipe left or tap your profile picture.
- Tap Settings and privacy. Select Audio Quality from the list.
- Spotify Premium subscribers can choose Very high for Wi-Fi streaming, Cellular streaming and Download.
If you choose to stream music with Wi-Fi or cellular connection, you need to ensure that they are fast. Otherwise, you may face abrupt music pauses and longer wait times. Additionally, it’s important to know that your cellular data usage increases significantly when you play Spotify high quality streaming audio. So you might want to be wary of doing so for the cellular option if you have a data cap on your mobile device. Similarly, downloading hundreds of tracks at the highest quality might not be ideal if you’re running low on device storage.
📝 Dig deeper: If high quality Spotify downloads take up a lot of memory in your storage, you can remove downloaded songs from Spotify to free up your device, especially mobile phones with low-space storage.
On the desktop app:
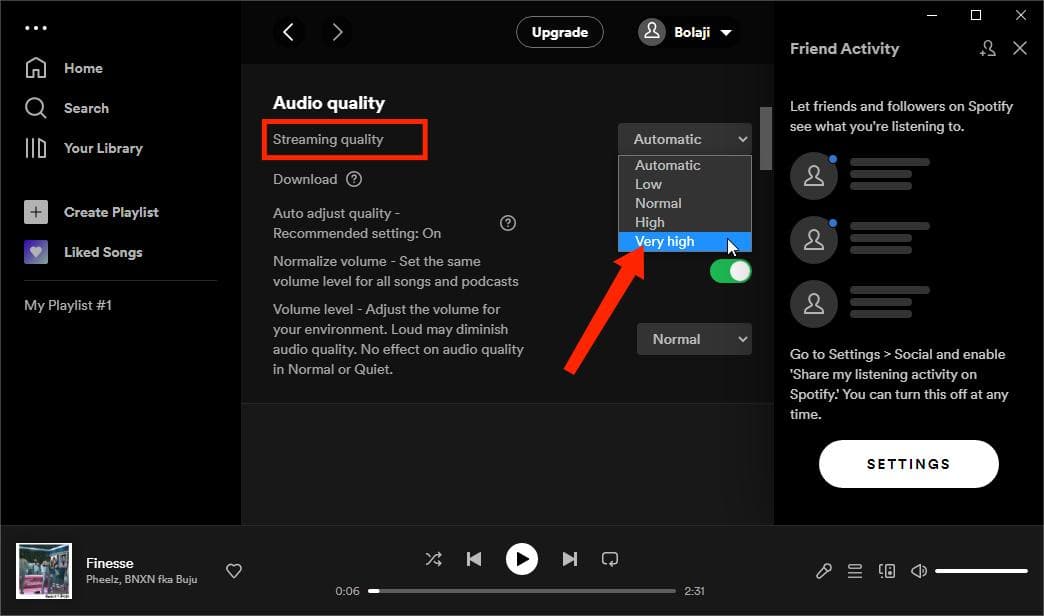
- Open the Spotify app on your Windows or Mac computer.
- Click your profile picture and choose Settings.
- Scroll down to the Audio quality section, click the drop-down menu next to the Streaming quality option, and select Very high.
Part 3. Increase Spotify Music Quality by Using Equalizer
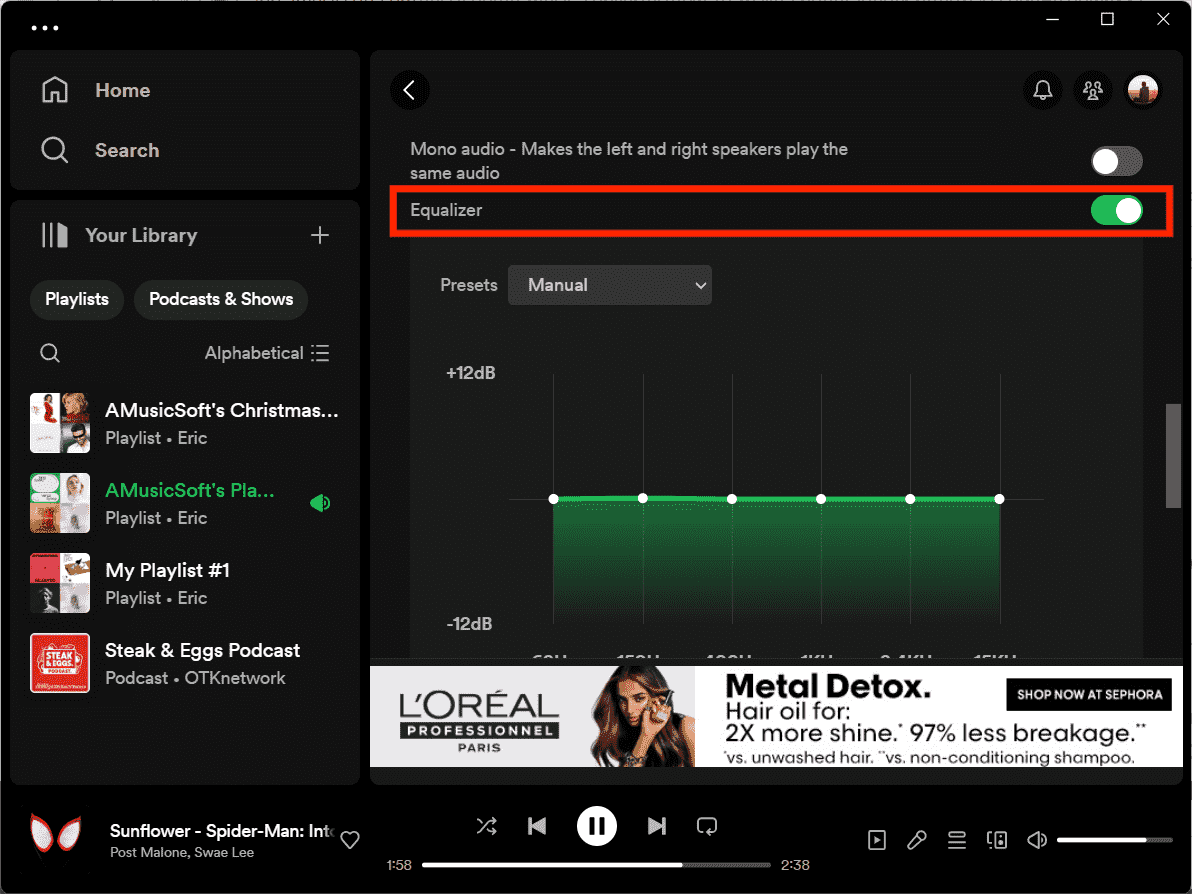
One of the exciting features Spotify users enjoy is its built-in equalizer. This built-in equalizer can greatly improve how you hear your favorite songs and podcasts, enabling you a better Spotify high quality streaming experience. If you are unfamiliar with how to use this equalizer, Spotify allows you to select from a number of presets (60Hz, 150Hz, 400Hz, 1Khz, 2.4KHz, and 15KHz), it should be enough for most. You can also adjust it manually. Better yet, all free and Premium users can turn it on. Here's how to access the equalizer on Spotify:
On the mobile app:
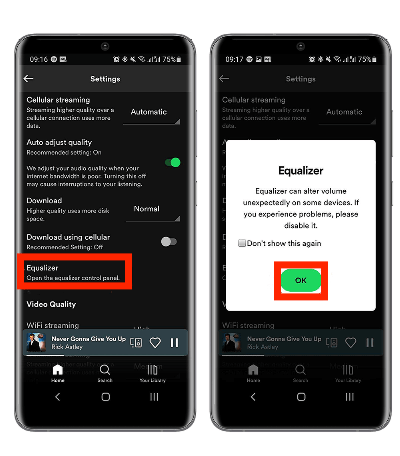
- Open the Spotify mobile app and find Settings and privacy.
- Select Playback (iOS)/Audio Quality (Android). Then tap on Equalizer.
- Enable the equalizer feature and choose your preferred setting.
📝 Related Topics: Best Free Equalizer App For iPhone Spotify
On the desktop app:
- Open the Spotify app on your Windows or Mac computer.
- Click your profile picture and choose Settings.
- Scroll until you get to the Playback section to see the Equalizer setting. After enabling the Equalizer, you can then select from one of the many presets or manually adjust it by clicking one of the band dots and then dragging it up or down.
Part 4. Increase Spotify Music Quality Without Premium
As we talked about above, the very high audio quality option is only available on Spotify Premium, including WiFi streaming, data streaming, and offline download. Can you download music with Spotify high quality streaming without Premium? To download high-quality audio from Spotify for free, you have to use a professional music downloader tool, such as AMusicSoft Spotify Music Converter.
AMusicSoft Spotify Music Converter can download songs, albums, playlists, and podcasts from Spotify to frequently-used audio formats with 320 kbps high quality without Spotify Premium. AMusicSoft can remove DRM from Spotify. It allows you to quickly download and convert any songs to MP3, M4A, FLAC, WAV, AAC, and ALAC. In this way, you can enjoy your favorite songs across all devices and keep Spotify downloads forever even after you cancel Spotify Premium.
The tool has a conversion speed that’s five times faster than the average. Plus, the original quality of the tracks is kept. In addition, it helps to keep your library organized, because metadata information and ID3 tags are kept. Here let's check how to use this tool to download high-quality Spotify songs without Premium!
Step 1. Simply click on the "Free Download" button to download and install this powerful software on your Windows or Mac computer! Now AMusicSoft offers a free trial.
Step 2. Launch the AMusicSoft Spotify Music Converter. Click on the "Three-line" button on the top right corner, and choose "Preference." Then, move to the "Advanced" tag. From here, you can choose the Bitrate from 128kbps to 320kbps and SampleRate from 22050hz to 48000hz.

Step 3. Open the built-in web player, search for the song, albums and playlist you want to download. Simply by dragging them to the "+" button, the software will fetch data from Spotify.
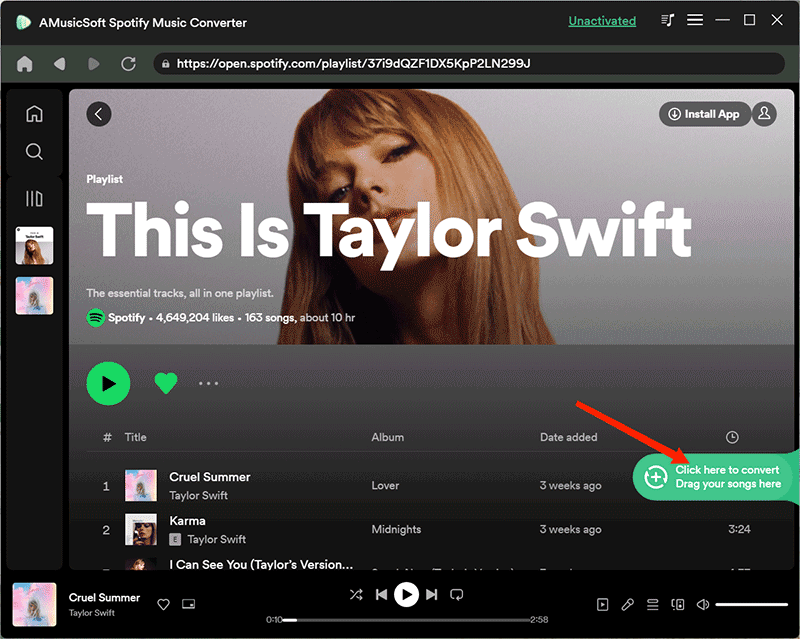
Step 4. Choose the format of the file that you wanted or needed to have. Once the format type is chosen, proceed in creating a folder where the files will be saved once the process of conversion is finally completed.
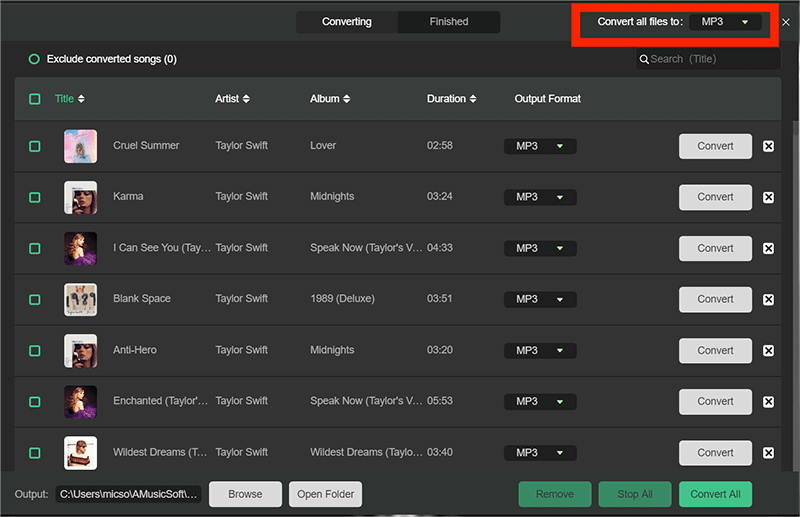
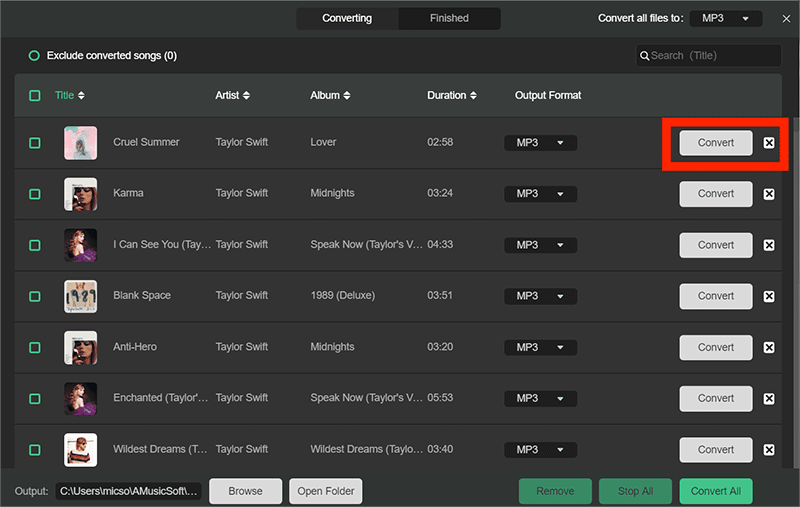
Step 5. For the last step, click the “Convert” button and wait for a few minutes to have all your music files converted.
Part 5. Conclusion
Through the years, Spotify has given us increasingly better ways to enjoy our music. Not only is there an endless variety of entertainment to choose from, but there are also so many ways to experience them better. Don’t miss out. Make sure that you adjust your settings for the best Spotify high quality streaming experience possible. If you're an audiophile (or audiophile-adjacent), you'll appreciate the improved audio you'll get from these options. If you want to have a better listening experience for free, AMusicSoft Spotify Music Converter could always be the best choice. Don’t hesitate, and go to download and install it to try. If you have any issues while using these tools, you can leave your problem in our comment section below.
People Also Read
- How To Enhance Spotify Bitrate And Stream High Quality Music?
- What Codec Does Spotify Use And Device Supported?
- How To Stream Spotify Music At The Best Audio Quality
- Equalify Spotify Free App: Equalizer for Your Spotify
- How To Use Spotify Equalizer Mac/Windows/iOS/Android
- How To Set The Best Equalizer Setting Spotify
- How To Change Bass On Spotify PC/iPhone/Android
 About The Author
Robert Fabry is an ardent blogger, and an enthusiast who is keen about technology, and maybe he can contaminate you by sharing some tips. He also has a passion for music and has written for AMusicSoft on these subjects.