How to Backup iTunes Library in 2025?
To back up the iTunes library in its entirety, you have to check this guide. We’ll teach you how to back your whole library up. Learn how with our article.
Your iTunes Library is actually a database that contains music and even media files that you add to your iTunes software. As such, iTunes is a popular Apple-developed tool to organize media in a single interface.
As such, if you have a lot of content within the said software, you may want to backup iTunes library to ensure you have another copy. Or, this may be handy when you want to transfer media files into another computer.
This guide will teach you how to backup iTunes library easily through third-party apps or through iTunes itself. We will teach you how to do it on both Mac computers and Windows PCs. Let’s start backing up your iTunes library now!
Contents Guide Part 1: How Do I Back up My iTunes Library?Part 2: How to Backup iTunes Library With AMusicSoft Apple Music ConverterPart 3: How to Backup iTunes Library on macOSPart 4: How to Back up Your iTunes Library on WindowsPart 5: Conclusion
Part 1. How Do I Back up My iTunes Library?
To backup iTunes library is important as it allows you to be prepared in case of hardware failure or crashes. Your backup copy is essential, especially if you consider that you have invested a lot of time, money, and effort into putting up an entire iTunes library. Thus, when your computer becomes damaged, you can easily get your back up and restore your library without having to do it from scratch.
To back up your iTunes library, you can use a third-party application which we will be discussing in the later sections of this article. These third-party apps can help you back up with a few simple clicks and keyboard presses.
However, if you want to do it the hard way, you can also an external form of storage for Windows PCs. Of course, you must have a storage device that can handle a large amount of data you will be putting into it.
For macOS computers, you simply have to back up with the Time Machine. To backup iTunes library, Time Machine is enough as it will save a copy of it as well. We will discuss this in the following sections as well.
Part 2. How to Backup iTunes Library With AMusicSoft Apple Music Converter
To backup iTunes library “with ease”, you must use a third-party tool that allows you to remove the protection from the media content and convert it to your device. For this, we recommend that you use AMusicSoft Apple Music Converter.
The said tool enables users to convert thousands of songs and audiobooks within Apple Music and the iTunes library. Thus, you are able to keep all your songs from Apple Music even if you have canceled the subscription.
You can keep the original ID3 tags from the songs so you can keep them organized after you have converted them. Conversion processes are fast and have multiple output formats. You can even customize output song profile settings and the format of the filename.
Here’s how to use AMusicSoft Apple Music Converter to backup iTunes library:
Step 1: Download, Install and Launch AMusicSoft Apple Music Converter
The initial step would be to download the software from its official website on the Internet. Make sure you download the right version for your computer. It is made available by the company in both Windows and Mac computers. Then, it is necessary to install it on your Windows PC or macOS computer. After that, open the software on your computer.
Step 2: Preview And Select Tracks Or Entire Library
An interface will be displayed and this contains the tracks from Apple Music and iTunes. From the tool’s main interface, you can preview the various Apple Music and iTunes songs. Now, once you are able to see these, choose the ones you want to remove the DRM protection for and convert them for listening offline. You can choose everything to back up your entire iTunes library.
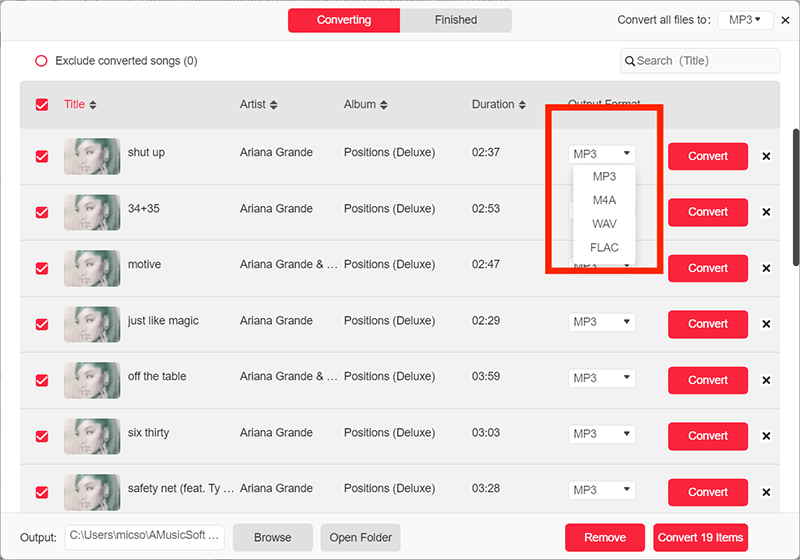
Step 3: Modify Settings And Choose Destination Folder
The third step involves selecting the output format that you want for your backup. If you’re converting songs, it is recommended that you choose MP3. Modifying other settings is possible as well. After that, choose your desired destination folder within the computer. This is where the newly-converted tracks of your entire library will be placed after conversion.
Step 4: Convert And Wait For Process Completion
The final step would have to convert the selected files by clicking the “Convert” button at the lower right corner of the interface. Once the DRM removal and conversion processes are complete, you will be able to see the files in the destination folder you have chosen in the previous step. By this time, you can transfer them to any device you like for offline listening.

Part 3. How to Backup iTunes Library on macOS
To back up the iTunes library on your macOS computer, you will need to use Time Machine. The said tool allows you to create a backup of different files within your Mac computer including applications, music, photos, videos, documents, emails, and even system files.
Once Time Machine is activated, it automatically puts your files into storage and makes a backup depending on the frequency you have chosen. In order to use it, you need to have an external storage device. For instance, you can use an external hard disk drive (HDD).
So, here are the steps to backup iTunes library with Time Machine:
- Connect your external storage device to your Mac computer.
- In the Apple Menu, you should click the icon for Apple. It is located in the upper left part of the screen.
- Choose “System Preferences” and press the icon for “Time Machine”. The Time Machine icon would look like a clock with a curved arrow. Once you click this option, the preferences of the Time Machine will be displayed.
- Choose “Select Backup Disk”. Then, choose the drive you will utilize as the backup for Time Machine. Click “Use Disk” for this to be chosen as the backup disk.
- Check the box that says “Back Up Automatically” and the process of backing up your files including your iTunes library will be done.
As you can see, it is easy to backup the iTunes library on your macOS. You just have to create a backup along with other files you wish to put into storage. It is important to note that you can also “manually” back up your files and iTunes library on macOS if you wish. Selecting which files to back up and which ones to exclude are possible as well.
Part 4. How to Back up Your iTunes Library on Windows
How do I backup iTunes on my computer? The process to back up your iTunes library on Windows is more complex compared to that of the iOS. However, we will still make it easy for you to understand. Similar to macOS computers, you will need an external storage device. Check out the steps below:
- First, you have to consolidate your iTunes library. To do this, go to iTunes and select “File”. Then, choose “Library” and then click the option for “Organize Library”.
- Choose the option to “Consolidate Files” in the window that pops up. In this way, all your files in the iTunes library will be moved to one location only.
- If it is present, you can check the box that allows you to “Reorganize Files”. After that, click “OK”. iTunes will now organize and consolidate your entire library.
- Connect your external hard disk drive to the computer. Make sure it is formatted properly for use in Windows PCs.
- Now, close your iTunes application. Then, locate the iTunes folder where all the files are placed.
- Drag your iTunes folder towards the external hard disk drive folder in order to copy the entire library to the physical storage device. The speed of transfer will be dependent on the drive’s specifications and the size of the entire library.
How to Restore Your iTunes Library from A Backup (Windows):
It’s easy to restore your iTunes library from a backup file. Here are the steps on how to do it:
- Close iTunes first. Then, connect your external storage device to the computer. Go to “This Computer” and click the option for your external storage device.
- Choose your iTunes folder and copy it to your computer by pressing CTRL + C.
- Now, go to a folder within your computer where you want your iTunes library to be placed. Click CTRL + V to paste the entire library.
- Now open iTunes but hold the key for SHIFT while doing so. It will show a window prompting you to choose a library.
- Click “Choose Library” and then find the location where you pasted the library previously.
- Click “Open” and then choose the file named “iTunes Library.itl” within it.
Part 5. Conclusion
To back up the iTunes library on macOS, you have to use Time Machine. On Windows, you need to simply copy and paste the entire library. This needs an external storage device where the backup files will be placed.
The best way to back up your iTunes library is through AMusicSoft Apple Music Converter. This is because the DRM protection of these media files will be removed allowing you to make multiple copies of the data.
Thus, you are able to transfer and use it on any device without having to pay for subscriptions. If you want to get AMusicSoft Apple Music Converter, you can do so easily. Experience media entertainment at its best with this tool!
People Also Read
- How to Put Music on a Kindle Fire in 2026?
- How to Loop a Song on Apple Music? [2026 Easy Guide]
- Youtube Music Vs Apple Music: Which Is The Best For You?
- How Much is Apple Music Family Plan
- Tidal vs Apple Music: Which One Is the Best in 2026?
- Step-by-Step Guide: How to Add iTunes Music to iMovie 2026
- How to Play Music and Games on PS4?
- How to Unsubscribe from Apple Music on All Your Devices?
 About The Author
Robert Fabry is an ardent blogger, and an enthusiast who is keen about technology, and maybe he can contaminate you by sharing some tips. He also has a passion for music and has written for AMusicSoft on these subjects.