Complete Guide On How To Create Ringtones In iTunes Free
iTunes ringtones that are free from DRM can be directly converted into an iTunes ringtone format to use it as your iPhone ringtone. Deciding to make some modifications on your ringtone is very understandable as the repeating sound that was used for several years can really be tiring for your ears. So, to create ringtones in iTunes free, check out the guide below. Know as well about the tool that can help you keep your downloaded Apple Music ringtones forever and allow you to change it anytime you want.
Contents Guide Part 1. How to Create iTunes Ringtones for Free?Part 2. How to Save and Keep Protected Tracks As Ringtones on Your Device?Part 3. Conclusion
Part 1. How to Create iTunes Ringtones for Free?
Before you begin with the process to create ringtones in iTunes free, make sure that you have all the materials listed below.
- iPhone or any iOS device
- Compatible USB cable for your iOS device
- A Mac or Windows computer
If you already have these resources prepared, proceed with doing the steps given below.
Step 1. Adjust the Length of the Ringtone
To create ringtones in iTunes free, get started with choosing the song to convert into ringtone. This can be done by launching your iTunes app and selecting a song from your music library. Do a right click on the track chosen to reveal the hidden menu list or just simply tap the three-dot icon placed next to the song title. In the showing menu options, hit the Song Info option.
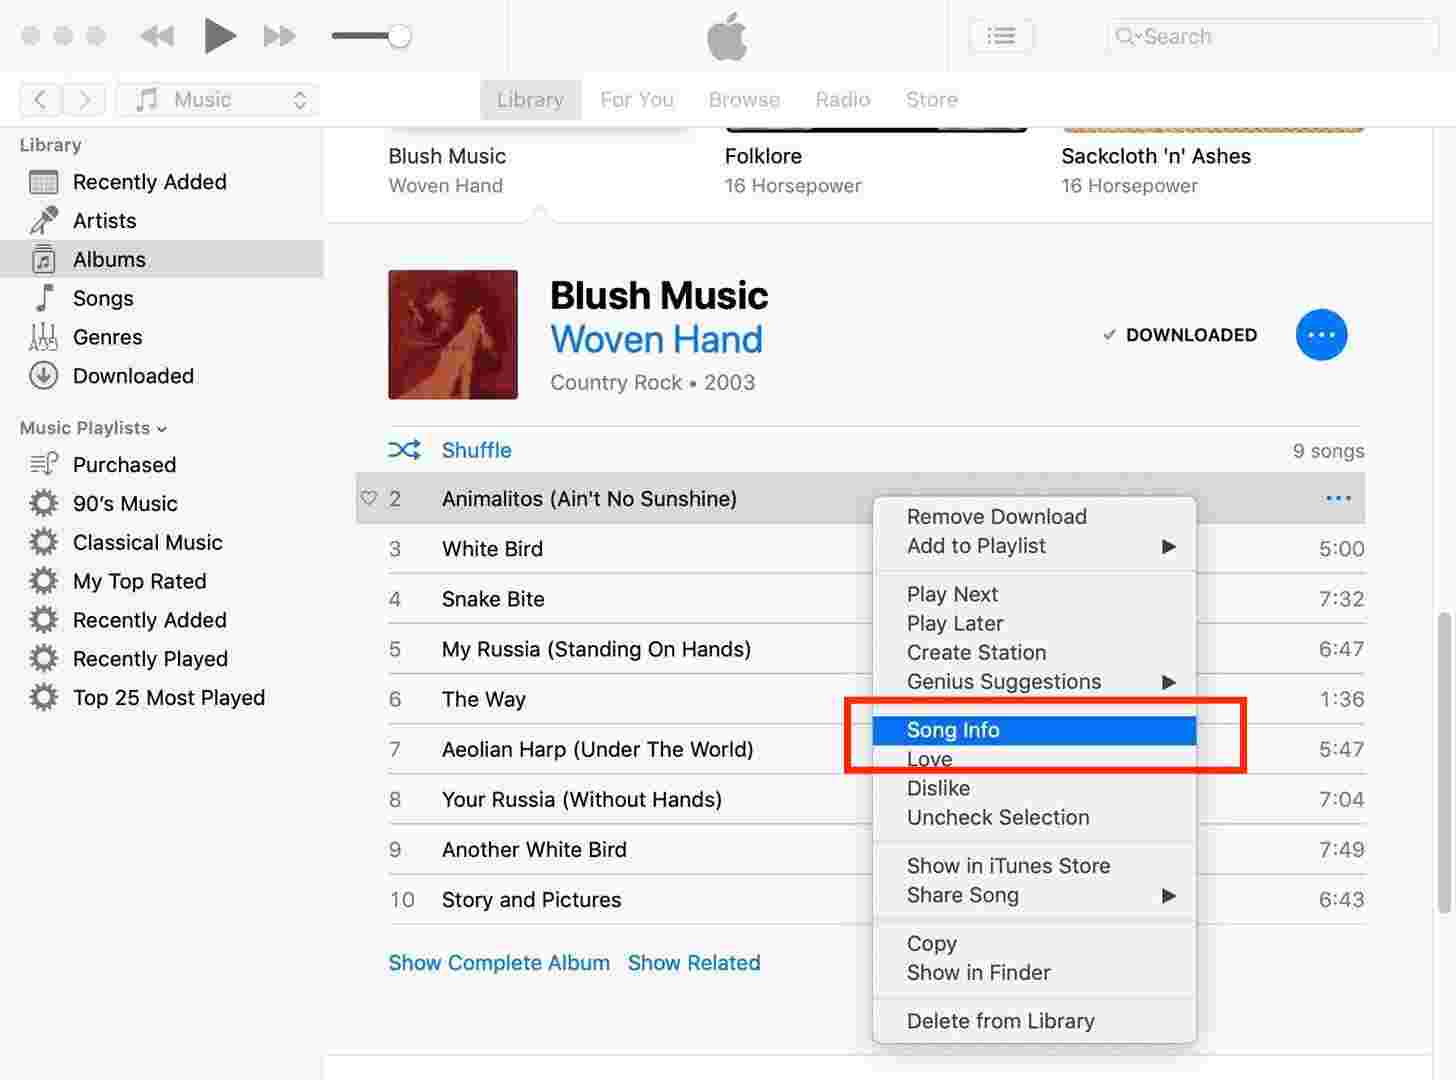
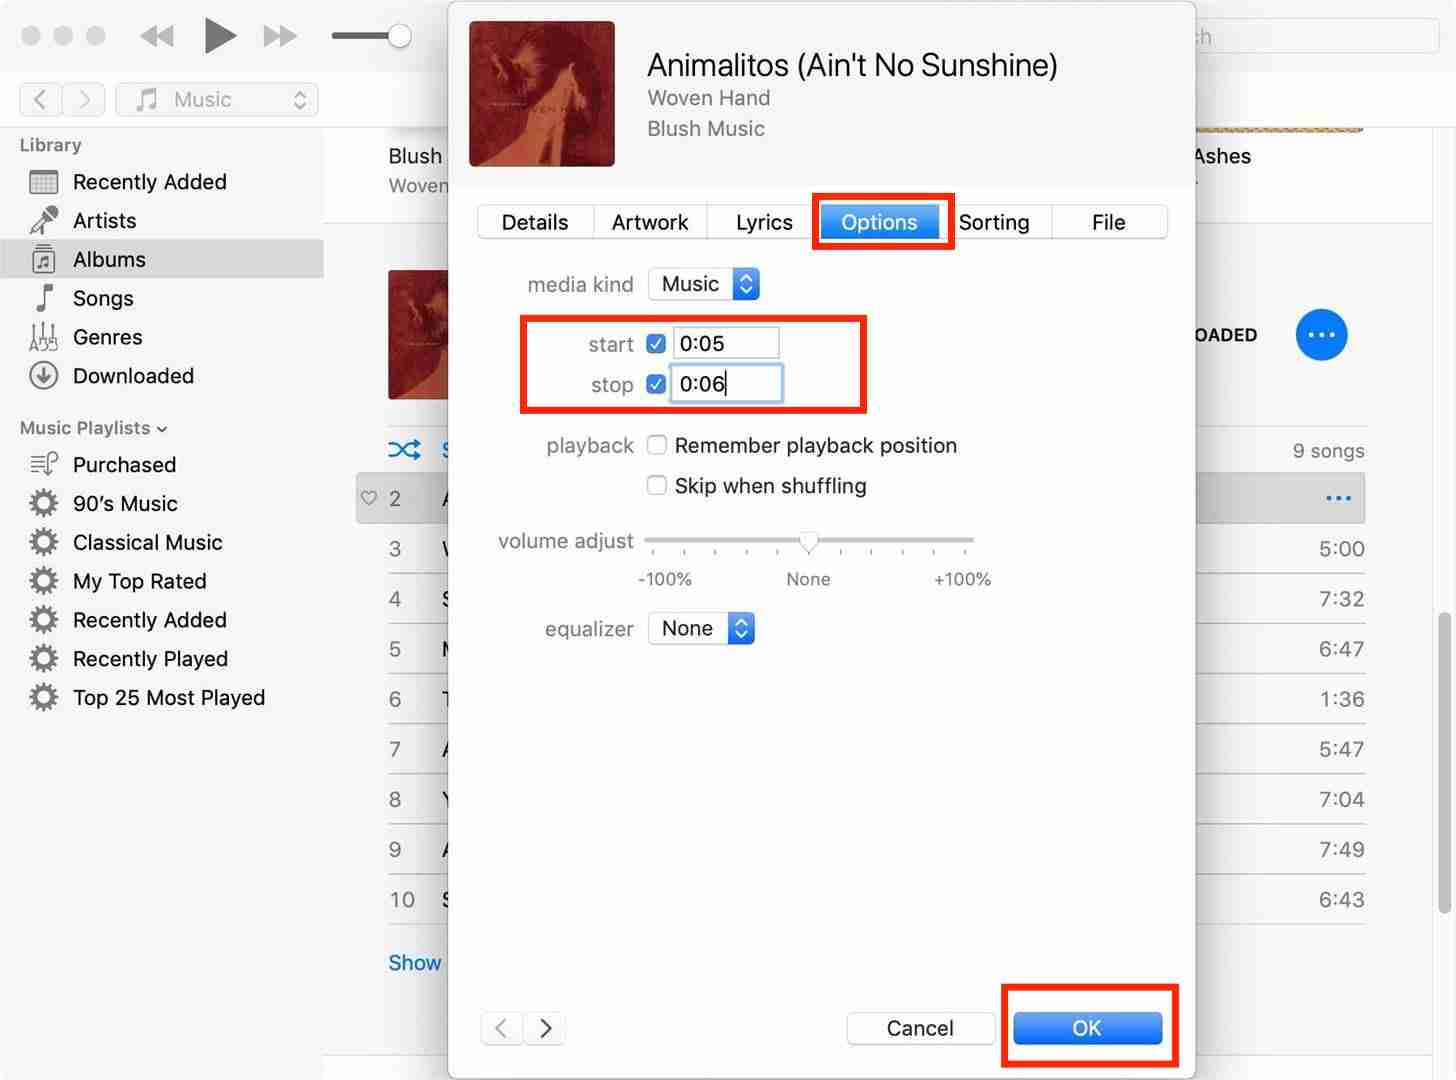
A few seconds after, the Song Info window will pop-up in which you have to select the Options tab. Then notice the Start and Stop options wherein you can adjust the time when the ringtone will start and when it will stop. Simply said, it is about the duration of the ringtone to be generated. To save the changes made, just click the OK button located at the lower part of the window.
Step 2: Convert the Selected Song into AAC Audio Format
In the iTunes window, go to the Edit tab and then select the Preferences option in the menu list displayed. After a while, the General Preferences window will open. From the page, tap the General tab and click the Import Settings button next. From the Import Settings window, select the Import Using section and choose AAC Encoder. Do not forget to select the OK button.
Now, on your music list, choose the track that you wish to convert and select it. After that, click the File tab from the menu bar and then select the Convert option. Then, select Create AAC version. Wait for a while until the song is converted into AAC completely.
Step 3: Change the File Extension of the Generated iTunes Ringtone
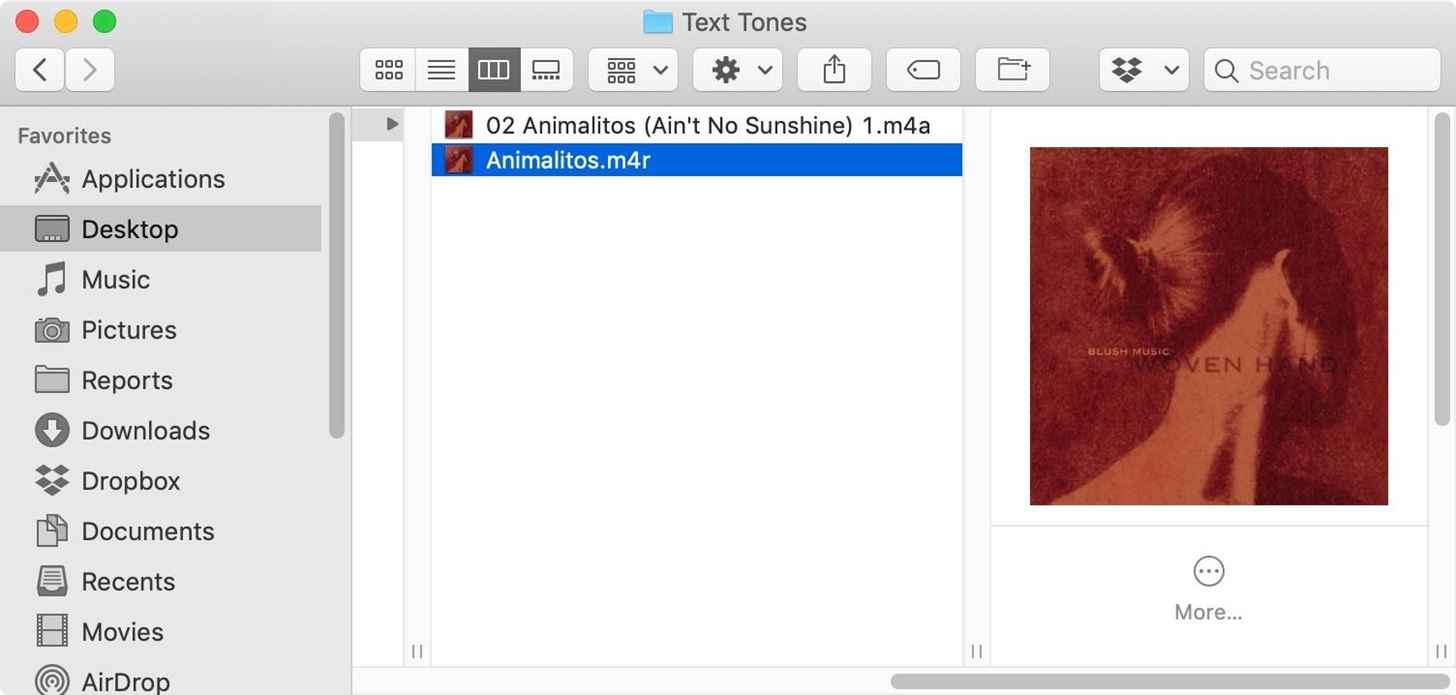
Seconds after the conversion process, notice that the generated file will be saved on the playlist as well. Select the music track, right-click on it and then tap the option of Show in Finder (or Show in Windows Explorer). Keep in mind that the converted song is much shorter than the original audio in order to avoid confusion when selecting the song. This is because the two files share the same file name. Once you are in the folder already, right-click again on the .m4a file and then change it to .m4r. Confirm the change on the popup, if one appears.
Step 4: Remove the Converted Song from Your iTunes Library
For the next step in relation to the process on how to create ringtones in iTunes free, make sure to remove the new song from your official music playlist. To do that, you may just right click on the song and choose Delete from Library option. This can also be revealed after hitting on the three-dot icon next to the song.
Before proceeding, a pop-up window will show up asking to Delete the Song or cancel it. Hit the Delete Song button. Another question is whether you will keep the song on iTunes folder or put it to the Recycle Bin. Choose the Keep File button.
Step 5: Move the Generated Ringtone to Your iPhone
Finally, to create ringtones in iTunes free, the last thing to do is to transfer the file into your iPhone. Return to the music folder on your Windows or Mac and then do a double click on the .m4r file. Upon the selection of the track, the created ringtone will then be moved to the iTunes Tone library a few seconds after.
Get your prepared a Lightning to USB cable and use it to connect your iPhone and iTunes with each other. After that, navigate to the Tones tab which is just under the iPhone section. Then, click the Sync All Tones button and follow it with the Sync button. To easily find this, just look at the lower part of your screen. Wait for a while until the syncing process is finally complete. Once it is done, go to your iPhone’s Settings app to see your created ringtone.
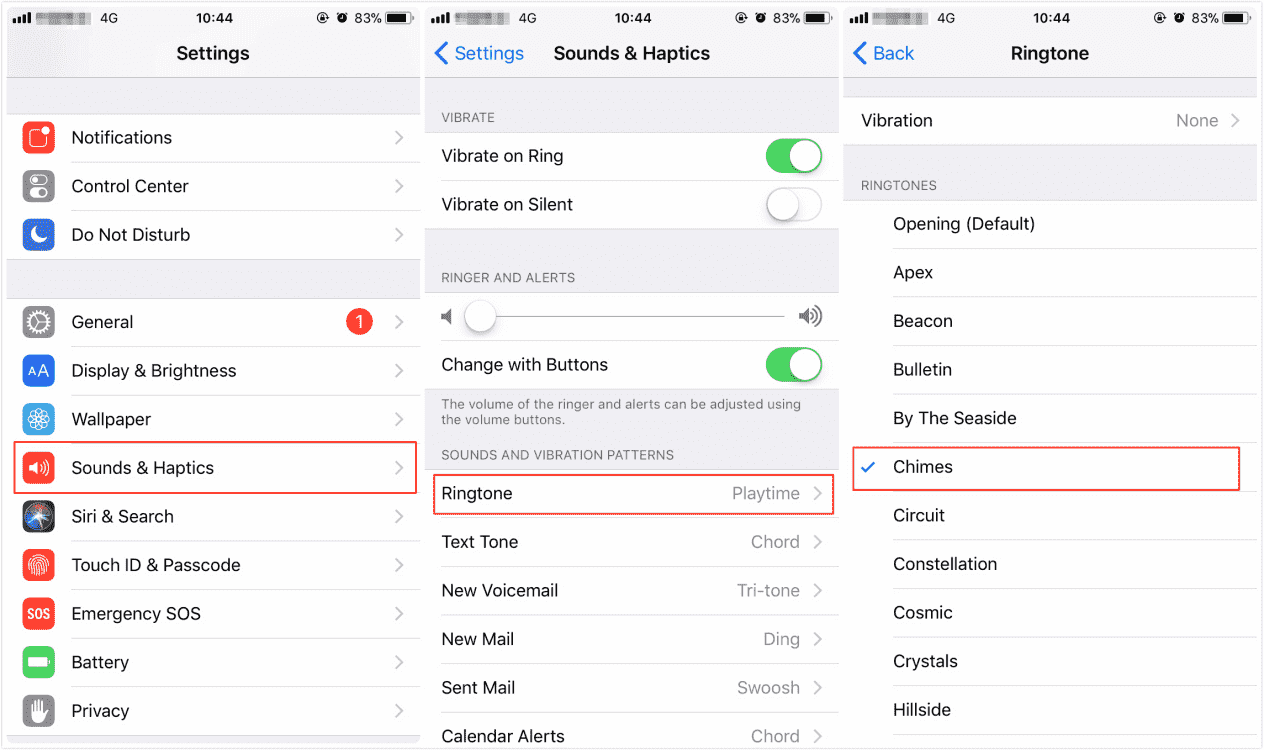
To set it as your alarm, in the Settings app, click the Sounds & Haptics option and then Ringtone. From here, choose your created ringtone and it will then be set as your official tone.
Part 2. How to Save and Keep Protected Tracks As Ringtones on Your Device?
Since not all music tracks are DRM free, there is no other way to download and keep them except if a professional converter is utilized to remove this protection. In the previous discussion, the complete step by step guide to create ringtones in iTunes free was tackled, so, let me share with you now the best tool that can help you save any ringtone that you want both from iTunes and Apple Music.
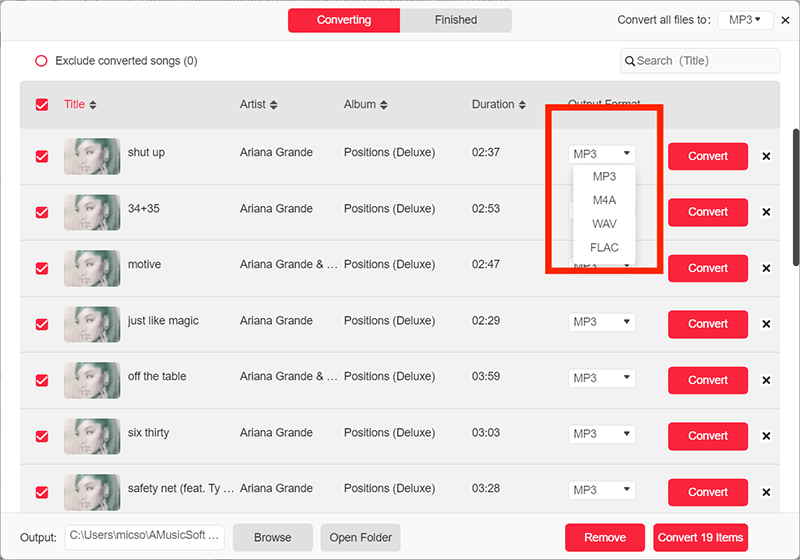
The best tool that you can use is AMusicSoft Apple Music Converter. AMusicSoft Apple Music Converter has a lot of good features. Included in its features are the skills to convert and download Apple Music songs into accessible audio formats. Naming the formats it can support, you may choose from MP3, WAV, FLAC, AAC, M4A, and AC3. Most especially, it can help you to forever keep the converted tracks as local files on your device. All of these formats could be accessed on multiple devices so, choosing whichever to use in playing them will not add up to your worries. iTunes DRM removal is also one of its specialties.
This tool can support a smooth and quick conversion process with the help of its 16x faster working speed. It is also worthy to mention that in AMusicSoft Apple Music Converter, the procedure to follow is only simple.
Step 1: On your computer, open the available browser and then head to AMusicSoft official page. From here, hit the Download button seen near the Apple Music Converter and wait until the download is complete.
Step 2: Now, after the application is downloaded, install and launch it on your device. Then start adding the songs by selecting the box before each song title you want.

Step 3: Then adjust the settings of conversion after choosing the output format. Make sure that a destination folder is ready once the conversion process is done.
Step 4: Tap the Convert button and wait for the process to end until you’re able to download the resulting files.

Part 3. Conclusion
Changing the default ringtone on your device has been made possible by iTunes. By simply following the guide above about how to create ringtones in iTunes free, you can quickly have the results in no time. But if what you want is to keep these ringtones, share them and change them every single time, AMusicSoft Apple Music Converter is indeed the best tool to utilize.
People Also Read
- How To Get Lossless Apple Music Stream Quality Settings
- How To Set Custom Ringtone On iPhone Using Your Music
- Easy Ways To Get An Apple Music Student Discount
- How To Move SoundCloud Songs To Apple Music And Vice Versa
- Two Ways On How To Add Synced Lyrics To Apple Music
- Why Does Apple Music Keep Deleting My Downloads?(Fixed)
- Learning How To Add Music To Capcut (A Complete Guide)
- Play iTunes On TV: Things That You Have To Know
 About The Author
Robert Fabry is an ardent blogger, and an enthusiast who is keen about technology, and maybe he can contaminate you by sharing some tips. He also has a passion for music and has written for AMusicSoft on these subjects.