Learning How To Add Music To Capcut (A Complete Guide)
These days, there are a lot of ways to make sure that your video will always make it to the top. And to make sure that you always give your best to your video it is best that you have ideas on how to add music to CapCut. A good presenter would always want to make sure that all the elements needed in order to make a good video are summed up into one. And who would not want to share a video that would make people appreciate things that you are able of doing?
In this article, we are going to discuss methods on how to add your music to CapCut, and make your breakthrough with the use of a very outstanding video. We are also going to make sure that all the music files that you will add to your video are free of copyright protection, so let us start.
Contents Guide Part 1. How Do You Add Music to CapCut?Part 2. How to Add Apple Music Songs to CapCut?Part 3. To Summarize It All
Part 1. How Do You Add Music to CapCut?
To start learning how to add music to CapCut, we have listed some methods or ways that we can all try to execute. These methods are also accompanied by the specified steps that we have to follow to finally have the songs that we love added to our awesome videos.
Add Music to CapCut
The first part of this method is learning how to add music to CapCut given that the music is free, and the music that will be added will serve as background to your video.
- To start, click the option that says “Create a new project” in the application of CapCut that you have downloaded on your phone.
- Then start adding the image or video which will be backed up by the music that you wanted to add.
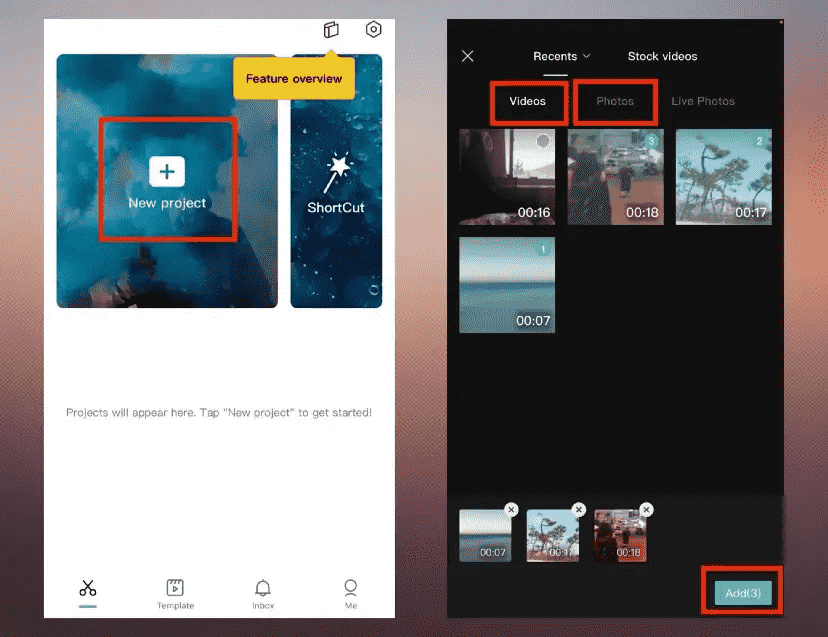
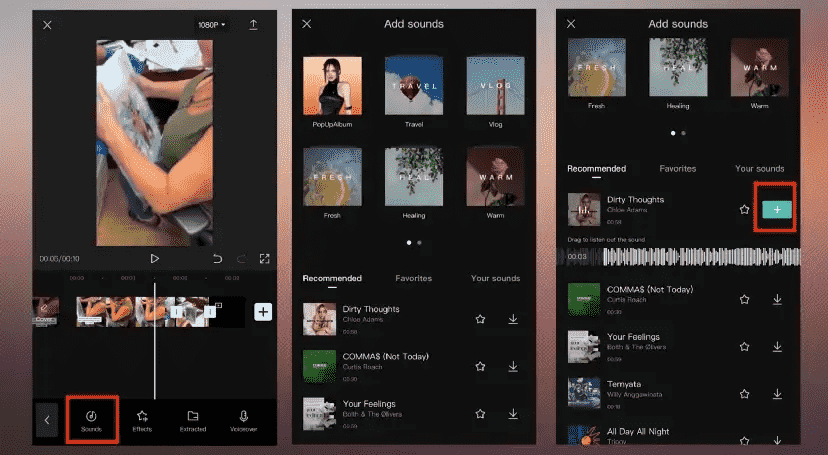
- Then tap the menu that says “Audio”. You then have to tap Sounds.
- Then you have to select a specific song from CapCut music that you wanted to use, and then tick the download icon that you will see next to it.
- Then the button for download will turn into a plus sign once you are finished downloading the song. You have to tap this button to start adding music to your video and have it as a background song.
Search and Upload Music to CapCut
It is also possible to add your own music to your device and use it as background music for your video, here are the steps on how you can do it.
- You have to make sure that you have already included a video or image to which you will be adding your music into.
- Tap Add Audio below the video track or Audio on the toolbar. Then choose Sounds.
- Go to the Your Sounds menu, and then choose the option From Device.
- Then choose the song or music that you have prepared from your device, and then tap the plus sign-like button next to it, and then you can now proceed to upload it to Capcut.
Extract Audio in CapCut
It is also possible to get the sounds from the videos that you have so you can use them in the future, here are the steps that you have to do in order to proceed.
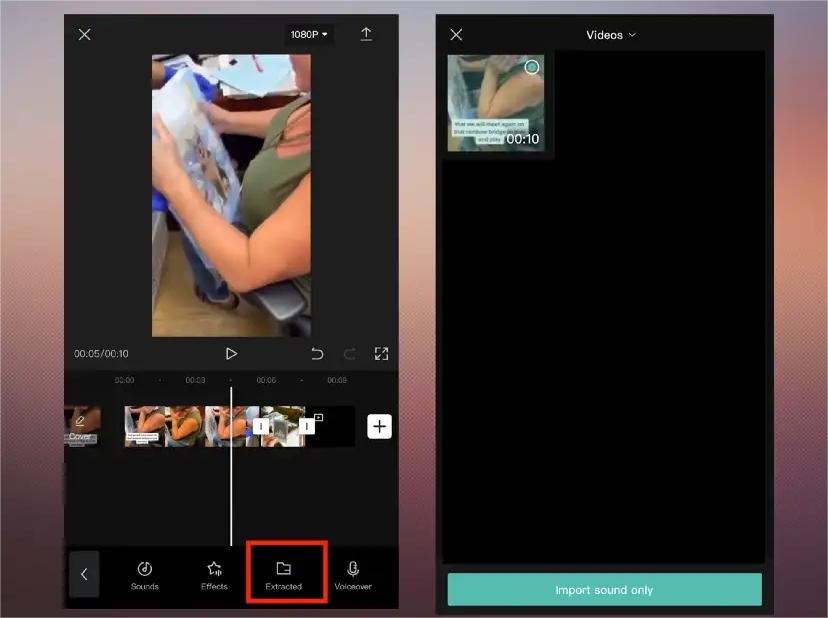
- At the bottom part of the interface, launch the Audio menu.
- Then select the option that says Extracted.
- You then need to go find the video from which the sound that you wanted to extract will come.
- Then choose the option that says Import Sound Only.
Add Voice Records in CapCut
And if you wanted to keep it a little personal by adding voiceovers to your videos you can also do it, here are the easy steps on how you can do it.
- Go and launch the Audio menu.
- Then hover your mouse and tap the Voiceover option.
- Now, you can start recording your voice. To do it, tap and then hold the recorder key, you have to press Allow in the pop-up screen in order to start the voiceover immediately.
- You can now start speaking while you hold the recording button down. Once you are done speaking, you can press the record button once more.
Part 2. How to Add Apple Music Songs to CapCut?
There are a lot of ways how to add music to CapCut, there are even ways to make personal approaches to your videos in cases when you have to use them for personal purposes such as videos made for special occasions. In this part of the article, we are going to share with you a tool that would make your adding of music easier than ever.
It is never a secret to many that songs from Apple Music, in case you are using your iPhone to add music to your videos, are protected by Digital Rights Management or DRM. This is why it is so hard to put music into videos and publish it online without being copyrighted. We have a way to get rid of these protections given that you will be using the videos for personal purposes only. This could be possible through the help of the tool called AMusicSoft Apple Music Converter. And to be able to help you add new and latest songs to your video, here are the other things that you have to know about the AMusicSoft Apple Music Converter.
- You can download the songs from Apple Music and convert these songs to file types that are more versatile. By this, you would not have any difficulty saving these songs to any device that you have.
- Remove the DRM of the songs from Apple Music alongside the process of conversion. You do not have to worry anymore about any type of restriction when you wanted to transfer any song that you want to any device that you have.
- The AMusicSoft Apple Music Converter offers a lot of file types where you can convert your songs into MP3, FLAC, WAV, AAC, and M4A. Then you can save them to any device and backup Apple Music songs easily.
- Save a lot of your time, effort, and energy through the use of the AMusicSoft Apple Music Converter. This professional converter converts your files 16 times faster than the basic converters in the world.
- The AMusicSoft Apple Music Converter will make sure that the quality of your converted songs will not be compromised. ID tags as well as the other original details will also be kept the same as the original ones.
Let us now discuss the steps on how to use the AMusicSoft Apple Music Converter. We have listed the steps below, so we can have an idea of how to add music to CapCut through the help of the AMusicSoft Apple Music Converter.
Step 1. To start everything, make sure that you have downloaded and installed the AMusicSoft Apple Music Converter on your personal computer. Once the tool was installed, open it, and then start choosing the songs that you wanted to add to your videos.

Step 2. Then start creating the folder where you will be saving all the songs that you have converted. You can rename the folder based on the genre or types of songs that you will be saving. It is to easily guide the user when looking for the folder to use.

Step 3. The final step is to tap the Convert option. The AMusicSoft Apple Music Converter will start converting your files in a few minutes only. You can see the status of the conversion process in the menu of the tool.

Part 3. To Summarize It All
We hope that we have shared with you ways how to add music to CapCut through the use of the methods and steps discussed in the different parts of the article above. Also, it is always good to have one of the best companions in making our tasks easier such as this one, with the help of tools like AMusicSoft Apple Music Converter.
People Also Read
- Importing Songs To GarageBand -The Proper Way To Do
- Ultimate Guide To Import iTunes Library To MediaMonkey
- Why Is Your Song Not On iTunes And How To Fix It
- What Are The DJ Software That Works With Apple Music
- All About Apple Music Unidays
- Can I Reset Apple Music ‘For You’ Suggestions?
- How To Switch From Individual To Family Apple Music
- Top 3 Ways On How To Enjoy Apple Music Android TV
 About The Author
Robert Fabry is an ardent blogger, and an enthusiast who is keen about technology, and maybe he can contaminate you by sharing some tips. He also has a passion for music and has written for AMusicSoft on these subjects.