How to Convert iTunes Protected Files to MP3 [Latest Updated]
Have you tried to transfer music from iTunes or Apple Music to non-Apple devices for streaming? It is difficult and complex to download iTunes and Apple Music songs to your device because of FairPlay technology developed by Apple, a digital rights management. How to convert Apple Music or iTunes protected files to MP3? Many people are looking for available ways on the internet. How do I unprotect an iTunes song? Keep on reading this article to learn how to convert protected iTunes and Apple Music files to unprotected ones.
Contents Guide Part 1. Are Songs Copy Protected in iTunes/Apple Music?Part 2. Convert Protected iTunes/Apple Music AAC Audio File to MP3Part 3. Convert Purchased iTunes AAC Audio File to MP3FAQs About Protected AAC Audio Files in iTunes/Apple MusicConclusion
Part 1. Are Songs Copy Protected in iTunes/Apple Music?
Are songs on iTunes or Apple Music protected by copyright? Sure. FairPlay is a family of digital rights management (DRM) technologies developed by the Apple team for protecting videos, books, apps, and music, which mainly limits device compatibility. It means that you can't play and use iTunes protected files provided by Apple company on unauthorized devices or platforms. FairPlay-protected files are regular MP4 container files with an encrypted AAC audio layer. Here are some of the most common kinds of files found in iTunes and Apple Music, check to understand their difference.
Most Common File Types in iTunes/Apple Music
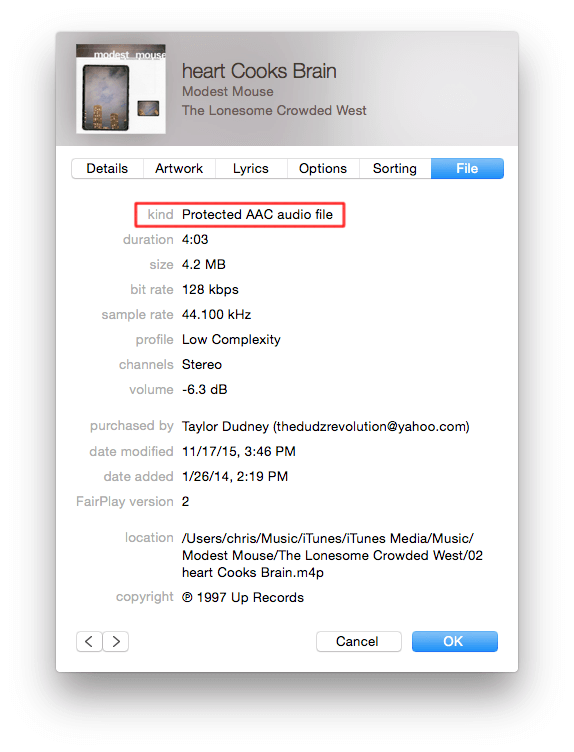
- Protected AAC Audio File: If you have purchased music from the iTunes Store before 2009, the music files are protected by DRM. You can only sign in to the authorized device with the Apple ID used to buy the song for playing them.
- Purchased AAC Audio File: Apple introduced the entire iTunes Store music catalog without FairPlay or any other DRM in April 2009. A Purchased AAC file is what a Protected AAC file becomes when it's been upgraded to the iTunes Plus format.
- Apple Music AAC Audio File: Apple launched a subscription-based music streaming service called Apple Music in 2015, which may replace iTunes in the future. The content on Apple Music is still protected by the DRM technology.
Part 2. Convert Protected iTunes/Apple Music AAC Audio File to MP3
To play music on the device you want, the best way is to convert it to MP3, a popular and common audio format. How to convert Apple Music or iTunes protected files to to MP3? The easiest way to do it is by using the AMusicSoft Apple Music Converter. This is a powerful program that can remove DRM protection of the protected iTunes files and convert them. Talking more about AMusicSoft Apple Music Converter, as mentioned, it can convert files, it can download music at 5X faster speeds and remove the DRM protection from iTunes or Apple Music tracks while keeping lossless audio quality. The formats that you can get from AMusicSoft include MP3, FLAC, WAV, AAC, AC3 and M4A. All of these formats can easily be accessed and kept on any device, so playing them anytime and anywhere you want wouldn’t be that much concern. Even if songs disappeared from Apple Music, you can restore them immediately.
You will see a more detailed explanation of the steps below. Continue reading to learn more about using AMusicSoft Apple Music Converter to convert Apple Music and iTunes protected files to MP3.
Step 1. Download the AMusicSoft Apple Music Converter
First thing’s first. You need to download the AMusicSoft Apple Music Converter. This will only take a couple of seconds. The installation will automatically follow. Make sure to launch the AMusicSoft Apple Music Converter so that you can start using it.
Step 2. Add Old iTunes Files
There’s no need for you to launch iTunes to add your old audio files. Once the AMusicSoft Apple Music Converter has been downloaded on your computer, it’s automatically configured to show your iTunes music. You just have to navigate to the left side of the program and click on the Music tab. By doing so, all your iTunes songs will appear. Select the ones you want to convert.

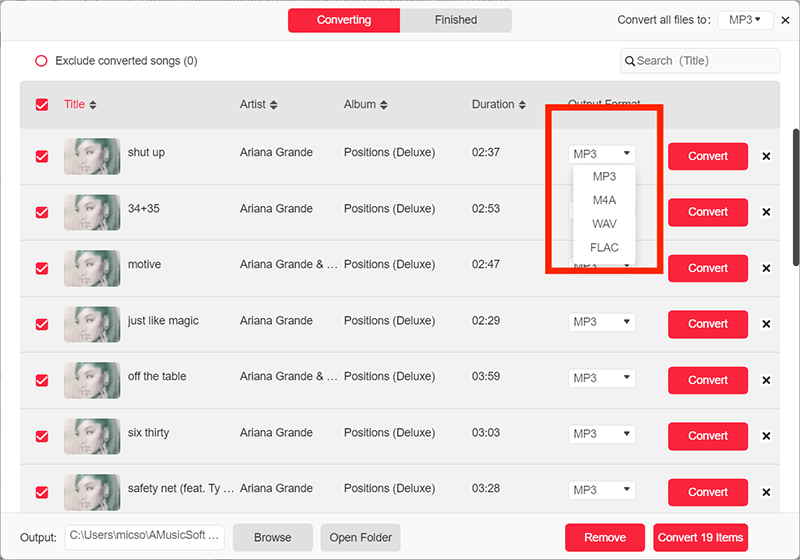
Step 3. Convert into a DRM-Free File Format
After you have selected all your old iTunes files that are still protected, choose a DRM-free file format like MP3 and then you can convert iTunes protected files to unprotected. As you will see, the AMusicSoft Apple Music Converter provides various settings for you to adjust the audio quality.
Step 4. Download DRM-free Music Files
Believe it or not but at this point, you can now download your unprotected iTunes files. That is how easy it is to strip the layer of copyright protection from your old iTunes files.

Part 3. Convert Purchased iTunes AAC Audio File to MP3
We have shared how to convert Apple Music and iTunes protected files to unprotected ones, what if you stored AAC audio files purchased from the iTunes Store after 2009? You can use iTunes to convert music to MP3. Take a look at the steps below to see how it’s done.
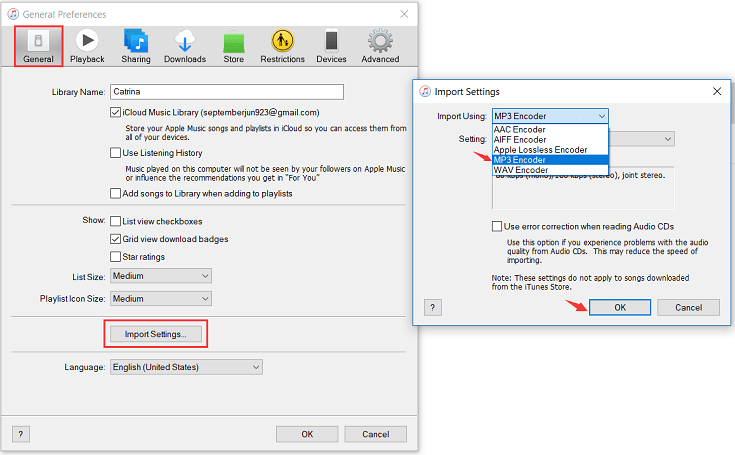
Step 1. Choose Your Conversion Settings on iTunes
The first thing you have to do is to choose your conversion settings. On Mac, go to iTunes > Preferences > General > Import Settings > select MP3 Encoder. On Windows, go to Edit > Preferences > General > Import Settings, and choose MP3 Encoder for the Import Using option. Then select OK, and then OK again to return to your library.
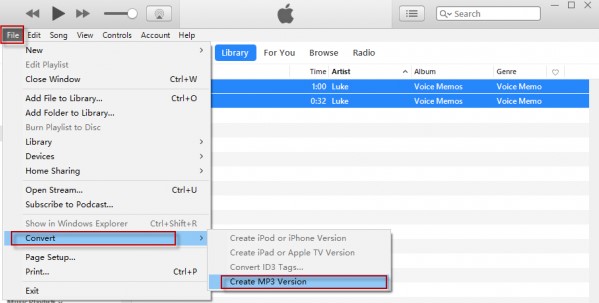
Step 2. Create MP3 Version
Find the song you want to convert to MP3 in iTunes and single-click it. When the songs you want to convert are highlighted, click the File menu in iTunes. Click Convert (in some older versions of iTunes, look for Create New Version instead). Click Create MP3 Version.
Wait for all songs to convert to MP3. New song files appear in your library next to the original files.
FAQs About Protected AAC Audio Files in iTunes/Apple Music
Q1: Why are duplicate songs on my iTunes?
If you've converted purchased iTunes AAC files to MP3 files using iTunes, you may find that it has two versions of songs in your library, the MP3 and AAC versions. If you don't want the AAC version of the song taking up space on your hard drive, you can delete duplicate songs in iTunes to make the cleaning-up process easier.
Q2: MP3 vs AAC, which is the better audio format?
AAC and MP3 are both a lossy file format. Whereas MP3 audio can be played on just about any computer or media player, AAC files are associated with Apple operating systems. AAC files have a higher quality than MP3. However, AAC versus MP3 sound capabilities don't vary considerably. To enjoy more high-quality sound, you can try Apple Lossless Audio Codec (ALAC).
You may be interested: Apple Lossless VS AAC: Which One Is Better
Q3: Is it illegal to convert protected music to MP3?
Sure. It is legal to convert protected iTunes or Apple Music songs to MP3 for personal usage only. If someone used converted music files for commercial purposes, then this move is illegal and he will receive some related penalties
Q4: Are there DRM removal tools to remove DRM from iTunes/Apple Music?
Yes. Today you can use a professional iTunes DRM removal like AMusicSoft Apple Music Converter to get DRM-free music. To know more tools, view our guide: Best iTunes FairPlay DRM Removal Software
Conclusion
We discussed here the method of how to convert iTunes protected files to MP3. As time way, more and more ways are no longer effective. However, removing FairPlay DRM protection from Apple Music songs is still as easy as a breeze if you use AMusicSoft Apple Music Converter. I hope reading this post helped you gain knowledge and insight on how to remove the DRM so you can fully enjoy listening to or watching the one you bought on any device for your personal use.
People Also Read
- How To Export MP3 From iTunes Music/Playlists?
- 6 Best MP3 Converter To iTunes
- Apple Lossless vs FLAC: Which is better?
- Top Sites To Download Background Music For Presentation
- How to Download Apple Music for Offline Playback
- [Free Apple Music] How to Get Apple Music Free Forever
- The Ultimate Paid And Free Apple Music Converter List
 About The Author
Robert Fabry is an ardent blogger, and an enthusiast who is keen about technology, and maybe he can contaminate you by sharing some tips. He also has a passion for music and has written for AMusicSoft on these subjects.