How To Burn Music From iTunes To A CD On PC?
It is very convenient to have all your tracks stored on a CD/DVD, you can be able to access them anywhere you are. Whether you are in the car or just lying down in your home, it would be easy to get a hold of all the songs that you love stored in one circle-like CD which is playable anytime.
However, we all know that files or songs from iTunes or Apple Music are protected by Digital Rights Management (DRM), which is why we are having difficulties in transferring or sharing our files on any hardware or even devices that we have. The direct saving of music files to a CD is included in this situation. In case you have encountered some problems in burning your music files, this article will talk about how to burn music from iTunes to a CD.
Contents Guide Part 1. What Do I Need to Burn iTunes Music to A CD?Part 2. How to Burn Music to CD Using iTunes?Part 3. How to Burn Music to CD Using Windows Media Player?Part 4. Best Way to Burn Apple Music Songs to a CDTo Summarize It All
Part 1. What Do I Need to Burn iTunes Music to A CD?
Firstly, we need to know the things that we need to be able to start the process of how to burn music from iTunes to a CD. When you have identified these things it would be easier for you to transfer any song that you want to a CD. So, what are these things?
- You can add up to 80 minutes of music to a playlist.
- Initially, you need a blank CD for you to start burning music from Apple Music or iTunes.
- Then, you must also have a CD or DVD burner, or your computer must have a disc drive that accompanies CD burning. In case you do not have one or your computer does not have one, you can buy an external burner and connect it to your computer using your USB cable.
- And lastly, you must also have iTunes or the Windows Media Player which will serve as the disc-burning software that will burn your converted MP3 songs to a CD.
And now that we are already aware of the software, tools, and things that we must have on how to burn music from iTunes to a CD, the next thing that we have to figure out is the way on how do we use these things to facilitate the burning of files.
Part 2. How to Burn Music to CD Using iTunes?
Apple added the ability to burn CDs in the iTunes app. On the other hand, Apple introduced a selection of the entire music catalog without DRM in 2009. It means that no limited devices capable of playing iTunes files. Now that you are able to prepare all the things that you need, the next thing that we have to figure out is how to burn music from iTunes to a CD.
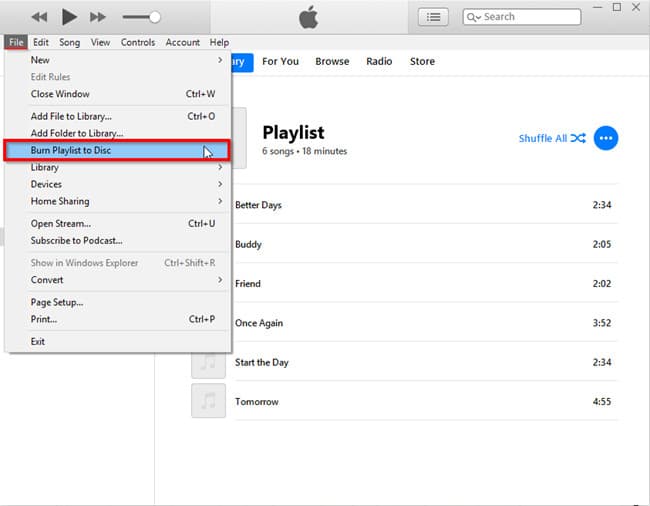
- Launch iTunes, then create a playlist, you can do it by tapping File > New > Playlist, you can also create a name for the playlist, and then start adding songs.
- Then, you will now use your blank CD, insert it into your burning material, and wait until the disc is recognized or detected.
- Then go to your playlist, the one which you just made, and then right-click “Burn Playlist to Disc”.
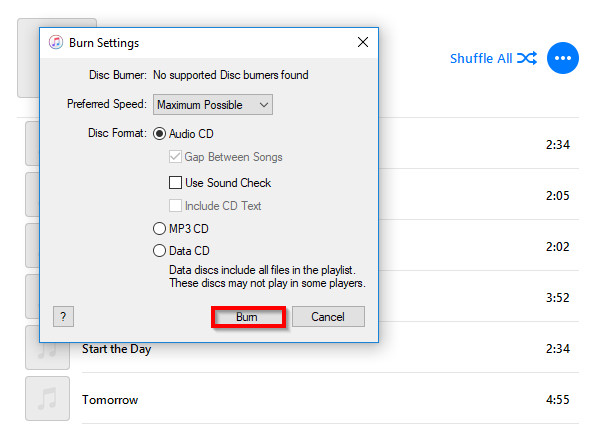
- After the previous step, the Burn Settings window will pop into your screen. This is where you’ll be able to make a couple of decisions as far as how you want your CD to burn, such as Preferred Speed and Disc Format.
- Then to finalize, you have to tap “Burn”. This will trigger the burning of your music from iTunes to a CD.
Once iTunes has successfully burned your playlist to disc, it will automatically eject the CD, if it doesn't, you will see the CD and the name you gave it (which is the name of the playlist), in the left pane. If this is the case, simply click on the Eject button.
Part 3. How to Burn Music to CD Using Windows Media Player?
Windows Media Player also allows computers with built-in CD and/or DVD burners to create and copy audio CDs for playback in car stereos and other CD players incredibly simple. Once you have downloaded the DRM-free iTunes music, you can follow the below steps on how to burn music from iTunes to a CD.
- Get your blank disc ready and insert it into the DVD drive of the computer that you will be using. You have to check the drive and verify if it is either DVD-RW or CD-RW, and remember that “W” means “writeable”, it is an indication that you can use the disc to burn music from iTunes to a CD.
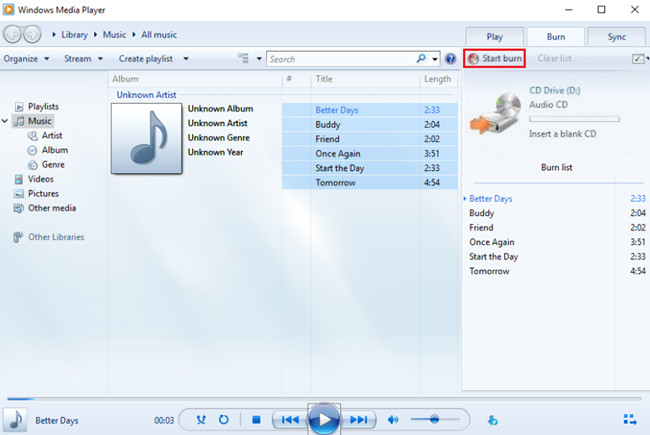
- Then, open your Windows Media Player, and then once you see the “Burn” tab tap it. It is located on the right part of the interface. Once you have clicked it, an empty burn list will appear.
- Now, go to the folder of the music files that you have converted using the AMusicSoft Apple Music Converter and start dragging all of them to the empty burn list. Then tap “Menu” that you will see in the “Burn” panel. With all the options displayed, tap “Audio CD”.
- Once you are done with all the steps from 1 to 3, you can now tap “Start Burn”. This will trigger the burning process and your Windows Media Player will do the burning of music files to the CD that you have inserted. You will notice that after the completion of the process, the disc will be automatically ejected and you just have to try it to be able to see if the processes you have done are effective.
Part 4. Best Way to Burn Apple Music Songs to a CD
However, iTunes has been replaced by separate apps now. You have to switch to the Apple Music app to enjoy music. Songs from Apple Music still use DRM technology, allowing only authorized devices to play the content. In this case, how to burn music from iTunes to a CD or burn Apple Music songs?
Digital Rights Management or DRM also brings you problems when it comes to the compatibility of the files you have with respect to a device that you will be using. But, your problem can now be solved as we are going to introduce to you one of the best Apple Music Converters. This is the AMusicSoft Apple Music Converter, your official partner on how to burn music to a CD. All the headaches that were brought to you by DRM will automatically be cured due to all the amazing features of this professional converter. Aside from DRM removal, conversion and download are also included in its offered services. So, you can play iTunes on Alexa, Google Play, MP3 players, and more.
- Convert your files as fast as you have ever imagined. With the use of AMusicSoft Apple Music Converter, it will only take you a few minutes to have all your files converted.
- Save not just your precious time, but also lots of money. This professional converter can give you the benefits of someone who is paying for a paid subscription from being able to download the files and getting to enjoy them endlessly.
- You can convert to many types of file formats depending on your needs. For example, you can convert Apple Music songs to MP3, FLAC, WAV, and M4P.
- The Digital Rights Management of music files from Apple Music or iTunes will be automatically removed during the process of conversion.
- Enjoy a very easy way to convert your files.
- Convert quickly and conveniently with the use of the very user-friendly interface of AMusicSoft Apple Music Converter!
Having read all the amazing advantages of using AMusicSoft Apple Music Converter, it must already be your first choice to use in the processing of the conversion of your files so you can be able to burn as many songs as you want. After being able to know what this professional converter can do and it is very excellent, we now have to figure out how to use it.
- The first step is to look for a professional converter, download it, and then install it on your phone or device. You can start the pre-selecting of the music files that you want to burn, as this professional converter supports multiple conversions of files, you can select a whole album or playlist to save time.
- Secondly, you should create a folder where your converted files will be stored. You can directly save it to the folder, or you can also do the copy and paste method, or the drag and drop. You can also create a name for the folder so that you can be able to easily recognize it. You can make a personal alias, or use the name of the artist, title of the album or song, and the genre of the music that you will be burning.

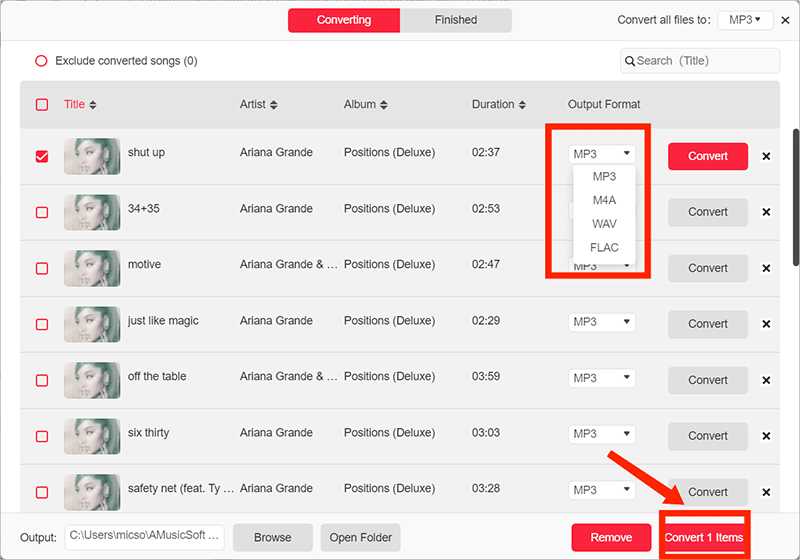
- Now, it is time to choose the output format that you wish to use. To name the supported formats in AMusicSoft Apple Music Converter, you can have MP3, WAV, AAC, FLAC, AC3 and M4A. After the output format selection, choose an end folder where to save the converted songs.

- You just have to tap “Convert”, and wait for a few minutes for AMusicSoft Apple Music Converter to do its job.
As you finish the conversion, you will be amazed to be able to burn as many music files as you want by just following these three easy steps. This professional converter is really a must-try as you will never ever go wrong with the use of it.
To Summarize It All
As music lovers, we also tend to find ways how we can be able to enjoy songs that we love conveniently and based on when we wanted to listen to them. Songs from Apple Music are also hard to deal with due to technical restrictions or DRM which make it difficult for us to download any song that we want and transfer it to a CD. It is a good thing to have guides like this one so that we are sure that we are doing the right thing.
How to burn music from iTunes to a CD? With the introduction of AMusicSoft Apple Music Converter, it will be easier for anyone to do the burning of music files from iTunes to CD without too much worrying about technical restrictions like DRM. This tool is a must-try, and you will be amazed at how it can transform you from an enthusiast to a music addict.
People Also Read
- How to Get Classic Christmas Songs MP3 Free Download
- How To Move SoundCloud Songs To Apple Music And Vice Versa
- Let Us Learn How To Play Apple Music On VLC
- How To Add Apple Music To WMP (Windows Media Player)
- Google Play Vs iTunes Store: Which is Better?
- How To Play Apple Music On Peloton: Guides And Procedures
- Detailed Guide About How To Use Apple Music On TikTok
 About The Author
Robert Fabry is an ardent blogger, and an enthusiast who is keen about technology, and maybe he can contaminate you by sharing some tips. He also has a passion for music and has written for AMusicSoft on these subjects.