Learning How To Download Music To iCloud Drive
It is true that there are a variety of ways how can we listen to songs we like through the use of Apple Music or any hardware that you can connect to your devices such as Beats 1 and the like. In this article, we are going to talk about how to download music to iCloud drive, so in cases when you wanted to listen to music across your Apple devices, accessibility would not be an issue. The thing is you can save all the songs that you wanted to listen to in your iCloud, and then access these song files on any Apple device where the iCloud has the same Apple ID used.
The step-by-step procedures on how to download your music to iCloud drive is a way for you to be able to enjoy songs that you love, anytime you wanted, or anywhere you are. In this article, we are going to talk about the proper ways how to download music to iCloud drive, so if you wanted to have a detailed guide on how to do such a task, you have to read this article until the very end.
Contents Guide Part 1. What Are the Procedures on How to Add Music to iCloud Drive?Part 2. Convert Apple Music to MP3 for Uploading to iCloud DrivePart 3. Sync the Converted MP3 Songs to the iCloud Drive on Your Mac ComputerPart. 4 To Summarize It All
Part 1. What Are the Procedures on How to Add Music to iCloud Drive?
For the initial part of the article, we are going to share with you some guides on how to download music to iCloud drive. We are also going to incorporate the step-by-step procedures that you have to follow depending on the device that you are using, such as iPhone, iPad, Mac computer, or Windows computer.
How to Add Music to iCloud Drive Using Your iPad or iPhone?
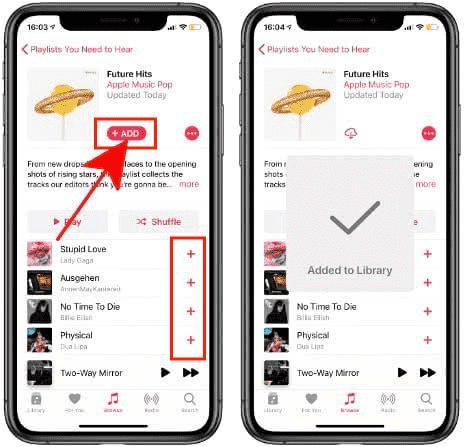
- Launch the “Music” app on your iPhone or iPad, and then you can now start selecting the songs or a playlist that you wanted to add to your iCloud Music Library.
- Click the "+" icon next to the song. The chosen song will be downloaded and added to your library. A cloud icon will be shown instead of the plus sign after you added the song to your library.
- The same thing is possible for complete playlists. First, open the desired playlist in Apple Music. Then choose Add to save the playlist to your library.
How to Add Music to iCloud Drive Using Your Personal Computer or Mac Computer?
- To start, you have to make sure that your personal computer is running the latest version of iTunes. Once you have made sure it is, start choosing the songs that you wanted to add to your iCloud. Otherwise, you have to update iTunes to be able to proceed.
- Then, click the three dots that you will see beside or next to the songs, and then to finalize things you can now tap the “Add To My Music” option. How to download music to iCloud Drive with your computer? Just follow the steps above!
Part 2. Convert Apple Music to MP3 for Uploading to iCloud Drive
Now that we have an idea of how to download music to iCloud Drive on your iPad, iPhone, Mac computer, or personal Windows computer, let us now share with you a tool that will help you convert Apple Music to MP3 for uploading to iCloud drive. This tool is called the AMusicSoft Apple Music Converter, a professional converter that will help you convert Apple Music songs that are protected by Digital Rights Management or DRM to MP3, so you do not have any limitations when it comes to the types or quantity of songs that you wanted to upload to your iCloud drive.
As we all know, songs from Apple Music are DRM-protected. How to back up Apple Music under the DRM protection policy? This tool has a lot of features, and you would be so amazed at how can it be so helpful when you are dealing with songs from the Apple Music app. It will not just help you save a copy of the songs, but it can permanently make your streaming experience with Apple Music free and unlimited. Let us have a glimpse of some of the most notable features of the AMusicSoft Apple Music Converter below.
- Save a lot of your energy and time while using the AMusicSoft Apple Music Converter. The tool can convert your songs to MP3 16 times faster than the basic professional converter.
- Convert your songs to a lot of formats depending on your needs and requirements.
- The AMusicSoft Apple Music Converter is beginner friendly and has three easy steps that would help new users to cope and get in the flow easily.
- The tool can get rid of the Digital Rights Management of protected songs so that there can be no limitations in the accessing and playing of songs, anytime you want or on any hardware, you are using, given that they are for personal uses only.
Let us now have the three steps of how to use the AMusicSoft Apple Music Converter to convert songs from Apple Music to MP3, below.
- Initially, go and search for the AMusicSoft Apple Music Converter, and download it. Once completely downloaded, install it on the personal computer that you are going to use. Do not forget to get the cable as you will be using it to connect your device to your computer.
- Once connected, the AMusicSoft Apple Music Converter will automatically start scanning all the music files that are in your Music library. The span of time that the tool will scan the library depends on how many files are stored on it.

- Secondly, you have to make sure that you have created the folder where you will save all the files that you will be converting. You have to make sure that you are familiar with the name that you are going to formulate, so you can easily access it anytime you need. Then start selecting the type of output format which you wanted to have as outputs. You have a variety of choices, and in this one, we have to tap the MP3 format.

- Once you are ready with the folder and the types of output format that you want, you can now tap the “Convert” button to be able to start the process of conversion to the MP3 format. You just have to wait for a few minutes for the AMusicSoft Apple Music Converter to finish the process of conversion.

Part 3. Sync the Converted MP3 Songs to the iCloud Drive on Your Mac Computer
Now that we have the idea of how to convert songs from Apple Music to MP3, let us now check the steps on how to sync these converted songs to the iCloud drive.
- On your Mac computer, tap “System Preferences”, and then tap “iCloud”, and then choose “Options”.
- You have to place a tick on the folder which is called the “Desktop and Document Folders”, and then tap “Done” so that the iCloud drive is enabled.

- Once you are done, you will see the iCloud Drive icon on the Finder, tap it to open. All the songs that have been converted using the AMusicSoft Apple Music Converter will start to sync to your iCloud server automatically.
Part. 4 To Summarize It All
It is really important that you have an idea of how to download music to iCloud drive especially if you love to listen to songs using the Apple Music app, or songs that are from the Apple Music library. Through this way, you can be able to joggle in between all the Apple devices that you have on hand. You can access the songs from your iPad, iPhone, iPod Touch, Mac computer, and a lot more devices that are operated by Apple.
Given that songs from Apple Music are protected by Digital Rights Management, it is a huge help that we have tools like the AMusicSoft Apple Music Converter to help us deal with the complications of DRM. Although we do not encourage you to do it if you are going to sell the songs or benefit from it with money involvement, but if you just wanted to listen to these songs to wash your worries away, then it would not be an issue.
People Also Read
- How Do I Transfer Music From iTunes To My MP3 Player?
- “How Do I Get Alexa To Play My iTunes Music” - Solved!
- Best Alternative To Adjust Apple Music Playback Speed
- How To Set A Ringtone From Apple Music Without iTunes
- Let Us Learn How To Crossfade On Apple Music
- How To Stop Apple Music From Automatically Playing?
- Learn How To Keep Apple Music Playing In Background
- Which Is Better, YouTube Music Vs Apple Music?
 About The Author
Robert Fabry is an ardent blogger, and an enthusiast who is keen about technology, and maybe he can contaminate you by sharing some tips. He also has a passion for music and has written for AMusicSoft on these subjects.