How To Fix My iTunes Doesn’t Recognize My iPod
There are so many possible factors why a user would experience about why isn't iTunes recognizing my iPod. Some of the major reasons include your old device, outdated version of the iTunes app, a problem on the iTunes system, setting made for device recognition, a worn-out cable used for connection and more. Since iTunes is a big help for users who own an iPod, they might be looking for reasons behind “my iTunes doesn’t recognize my iPod” error as well as the ways to do in order to fix it.
iTunes can act both as an online media store to purchase items and as a medium for easy restoration and backup of files saved in the library. In order to fully access the complete features of iTunes when it comes to such procedures on your iPod device, it must be recognized first on the iTunes system. To help you in solving the issue of why is my iPod not showing up in iTunes, I will be giving you the top solutions to try.
Contents Guide Part 1. What To Do If iTunes Doesn't Recognize My iPod Device?Part 2. Bonus: How to Back-up Files in Apple Music and iTunes on Another Device?Part 3. Final Words
Part 1. What To Do If iTunes Doesn't Recognize My iPod Device?
If the problem regarding why isn't iTunes recognizing my iPod is encountered, you may be able to solve it via simple and doable procedures. Kindly see the list of suggested fixes below.
Solution 1: Check Your USB Cable
One reason to suspect behind “my iTunes doesn’t recognize my iPod” error is the unsuccessful connection between iTunes and iPod. When it comes to this factor, this might be about your utilized USB cable. To check and solve the problem, just unplug it and then physically examine it to see if there are some damages. Make sure to thoroughly check the cable ends as these are the most prone to breakage.
If signs for physical damages are seen, consider changing it to a newer one. This will surely fix the problem by then as no damages are seen in a new one.
Solution 2: Connect Your iTunes and iPod Correctly
Why my iTunes doesn’t recognize my iPod? There might also be a problem with the internal connection made between the two. So, you better re-do the connection to check if it will make a difference. Just have your iPod removed from your computer and turn it off. You may also try restarting your computer for more assurance. Once finished, get the cable again and connect the two devices. Upon connection, a window on your iPod will show up asking if you Trust This Computer. Do not forget to tap on the Trust button This will allow the connection to proceed.
Solution 3. Make Sure to Use the Latest Version of iTunes and iOS
Another tip to get away from “my iTunes doesn’t recognize my iPod” error is to install the latest version of both the iTunes app and iOS. To install or update the latest iOS, just head to your Settings app and then click on General. Look for the Software Update option and then see if there is an available update. If you are seeing one, then click on Download and Install.
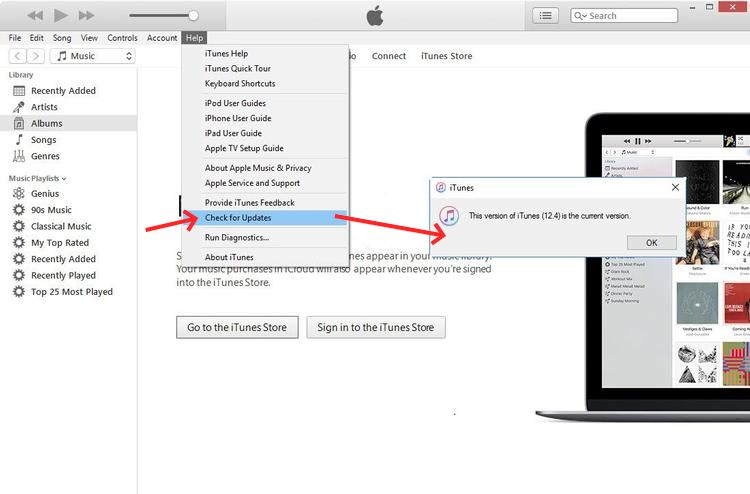
Now, for the iTunes update, just click the iTunes tab from the menu bar above once the application was launched. Select Check for Updates. The location of this option will differ based on the device type that you use.
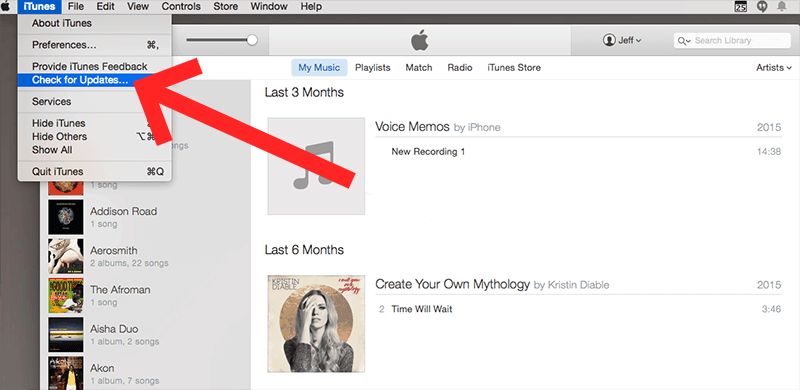
If you are using Mac, then you can just follow the mentioned steps, but on Windows, you’ll have to access the Help menu instead. From here, you will quickly see the Install button. This is to be followed by the Agree button, confirming that you’ve agreed with the terms and conditions set by Apple. Once update is done, just connect the devices again.
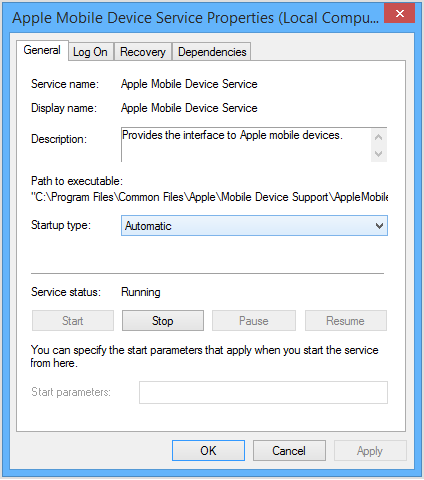
Solution 4. Ensure That the Apple Mobile Device Service is Running
This is especially important to Windows users. Just click the Windows Start button -> type services.msc in the search box and hit enter > in the popping up Services window, find "Apple Mobile Device Service" and right-click to choose "Properties". Set the Startup type pop-up menu to Automatic. Click Stop the service. After the service has stopped, click Start the service. Click Ok. Then restart the computer and open iTunes and connect the device.
Part 2. Bonus: How to Back-up Files in Apple Music and iTunes on Another Device?
Sometimes, errors like “my iTunes doesn’t recognize my iPod” on the iTunes app do happen at unexpected times. There are cases that multiple errors happen at once that you will end up not using the application anymore. If this happens to you, then it is only normal to worry about the files that you’ve saved beforehand. Is there an effective way to back-up your curated music collection?
Fortunately, there is an application designed for such specific service and the best that you could use is AMusicSoft Apple Music Converter. Talking about backing-up your file copies, AMusicSoft can assist users in downloading the converted files. As mentioned, it can also do conversion procedures, giving you copies of accessible formats such as MP3, WAV, FLAC, AAC, AC3 and M4A. When these files are played on another device, you won’t have a hard time as they can be played without error. So you can enjoy Apple Music songs on PS4, Alexa, Roku TV, Xbox One, and more media devices.
AMusicSoft can also remove the DRM from Apple Music and can give you the results in just a short time with the help of its 16x working speed. With the help of this speed, any process would be finished in just a short amount of time. Even the steps to follow are very simple and won’t stress you out during the real-time procedure.
Check out the complete list of steps below.
- To get started, download AMusicSoft Apple Music Converter from the website of AMusicSoft. This site can be accessed easily by just using your browser.
- Open AMusicSoft Apple Music Converter and then choose the music files to convert and save. Just tap the selection box before each chosen item from your library.

- Click the output format that you prefer. The end location must be set as well in this step.

- Hit the Convert button to begin with the conversion process and wait for a couple of minutes until it is done.

- Finally, download the results from the Converted menu above.
Part 3. Final Words
If unfortunately, you are suffering from “my iTunes doesn’t recognize my iPod” problem, always know that there are so many solutions available to get away from this. The fixes that you may follow is not only limited to the three solutions discussed above, as you can always search for more in the internet. On the other hand, if you want to secure a back-up of all the files saved on your music library, you can use AMusicSoft Apple Music Converter. The guide on how to use this tool is discussed in detail above.
People Also Read
- How Do I Check My Apple Music Subscription?
- How To Turn Music Into Ringtones On iOS And Android?
- How To Set A Song As Alarm On iPhone?
- Easy Guide To Solve Family Sharing Album Not Showing Issue
- Can I Play Apple Music Lossless On PC?
- How To Change a Music File Type
- How To Turn Off Music Library On iCloud
- How to Transfer Music from iTunes to SanDisk Sansa Clip
 About The Author
Robert Fabry is an ardent blogger, and an enthusiast who is keen about technology, and maybe he can contaminate you by sharing some tips. He also has a passion for music and has written for AMusicSoft on these subjects.