Detailed Guide On How To Add Music To Premiere Pro
Most of you may not be aware about Premiere Pro and how good it is when it comes to video editing. Meaning to say, you are surely not familiar as well about its features and services. Talking about video creation that can support the incorporation of music, Premiere Pro is definitely a must try.
Learn about how to add music to Premiere Pro as you walk through the guide below. The things to remember, as well as the detailed step by step guide to follow in finding, importing and editing the tracks that you want to play on your videos will be included, too.
Contents Guide Part 1. What is Adobe Premiere Pro?Part 2. How to Add Your Music to Premiere ProPart 3. Alternative Source of Music to Add on Premiere ProPart 4. Final Words
Part 1. What is Adobe Premiere Pro?
As expected, only a small number of people would know about Premiere Pro. To tell you a brief description of this software, it is used particularly for desktop video editing software on Mac and Windows.. One big difference between Premiere Pro in other programs is that it is subscription-based. The free trial option is now a measly seven days. Although the subscription fee is quite pricey, it is justifiable for its features and it is pretty evident with the results produced.
Features of Premiere Pro
- Clear, flexible interface and responsive speed
- Bulk edit on video timeline and flexible alignment controls for titles
- Rich ecosystem of video production apps
- Excellent stabilization tool
- Unlimited multicam angles
- GPU acceleration when working with Lumetri Scopes
- Support for industry-level ARRI Alexa 35 cameras
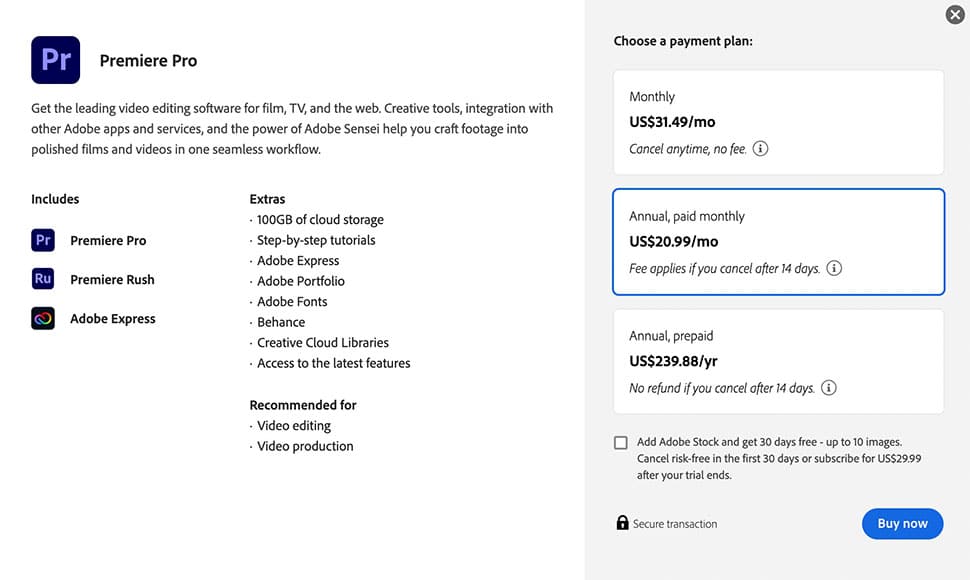
To add music to Premiere Pro, you should get a subscription plan first. Before you purchase Premiere Pro, it's worth digging deeper into the product’s pricing to decide if it’s the right solution for you. Adobe has two main ways to buy Premiere. You can either buy it alone or buy the whole suite. For the monthly subscription, you have to pay $31.49. If you committed to the yearly plan upon signing up for an account and subscription, the subscription fee will be much lesser (only $20.99 per month, $251.88 total cost for 12 months). Or $239.88 if you pay for a year upfront. So, once you are choosing Adobe Premiere Pro, I’d recommend getting the yearly plan.
For users who need more than just Adobe Premiere Pro, the Creative Cloud All Apps plan is great value for money. This subscription also includes 20+ desktop and mobile apps like Photoshop, Adobe Fonts, Adobe Lightroom, and 100GB cloud storage of cloud storage. That costs $52.99 per month with an annual plan. But a full year paid upfront for the plan costs $635.88. It also offers the Student and Teacher plan, which is the most affordable option you’ll find. Adobe is currently running a promotion where you pay only $19.99 per month for the first year that you use it.
How Can Music Change the Impact of Your Video?
For any video, clip or show, music can always be the mood setter. This is the easiest way to convey the mood in different video parts, whether it is about happiness, sorrow, love, affection, thriller, suspense and more. In this way, the message that you want to relay can easily be understood by your viewers.
Music can really make an impact not only on the video being edited but also on the mood of the person watching it. To explain it simply, if the music is beating quickly, the viewer might feel eagerness or excitement, but if it is beating slowly, it might make them feel sadness, calmness and the like. In short, the audience can relate faster to your created video if it has music on it because it can make them connected easily. This is the very reason why you should learn about the importance of adding music to your video, which is why, you should see below the more detailed explanation on how to add music to Adobe Premiere Pro.
Part 2. How to Add Your Music to Premiere Pro
People who are very interested in video creations about multiple contents are surely the ones who are eager to know about adding music. They must have had the same reasons mentioned above with regards to using music in making impactful videos. Explained and listed below are the complete steps that you should know and follow about how to add music to Premiere Pro, so, you better keep an eye on these details to have your best work.
Step No. 1: Choose the Audio to Use and Import It to Premiere Pro
Begin with knowing which music to add. After having the final idea about the type of audio to use, make sure to know the main source of it. To add music to Premiere Pro, you may try different ways. For example, you may get it from YouTube, from a streaming platform like Apple Music and Spotify, from your local computer and more. Premiere Pro even supports music that you made and arranged.
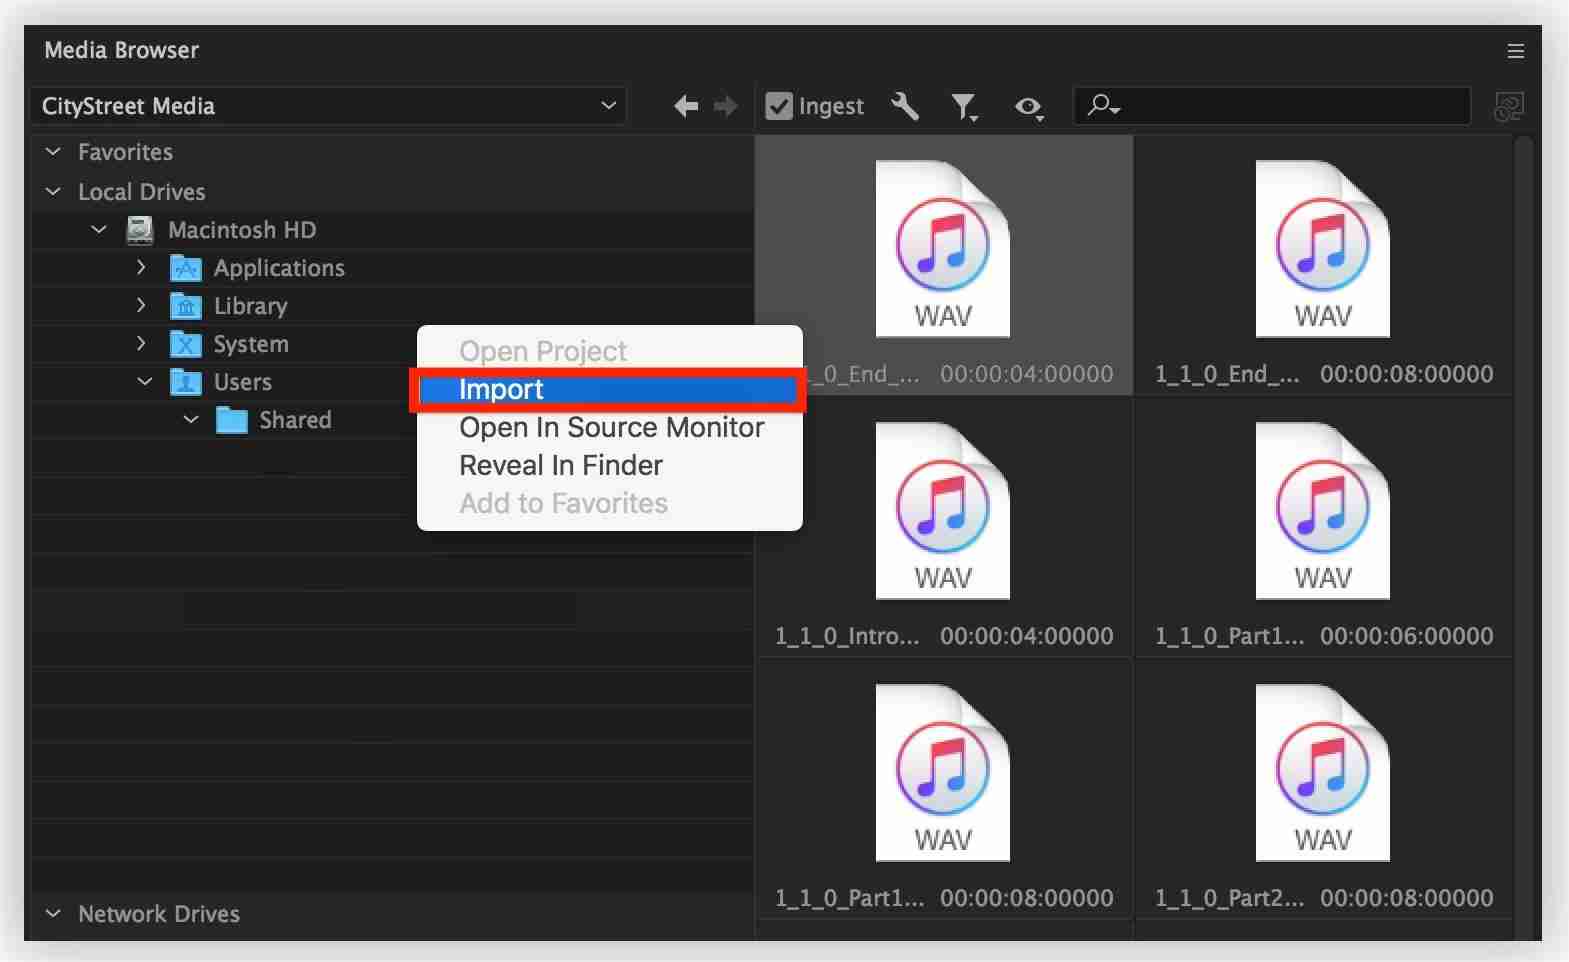
Once the music is known, launch the Premiere Pro on your device and then start importing the music you found. Start out in the Audio workspace by selecting Audio at the top of the screen or choosing Window > Workspaces > Audio. Choose Window > Media Browser to reveal the Media Browser panel. From the current window, locate the desired music and then do a right click on it if you are using a Windows computer. On the other hand, if you are using Mac, Control-click it. After doing so, click the Import button.
Step No. 2: Add Music to Your Video Sequence
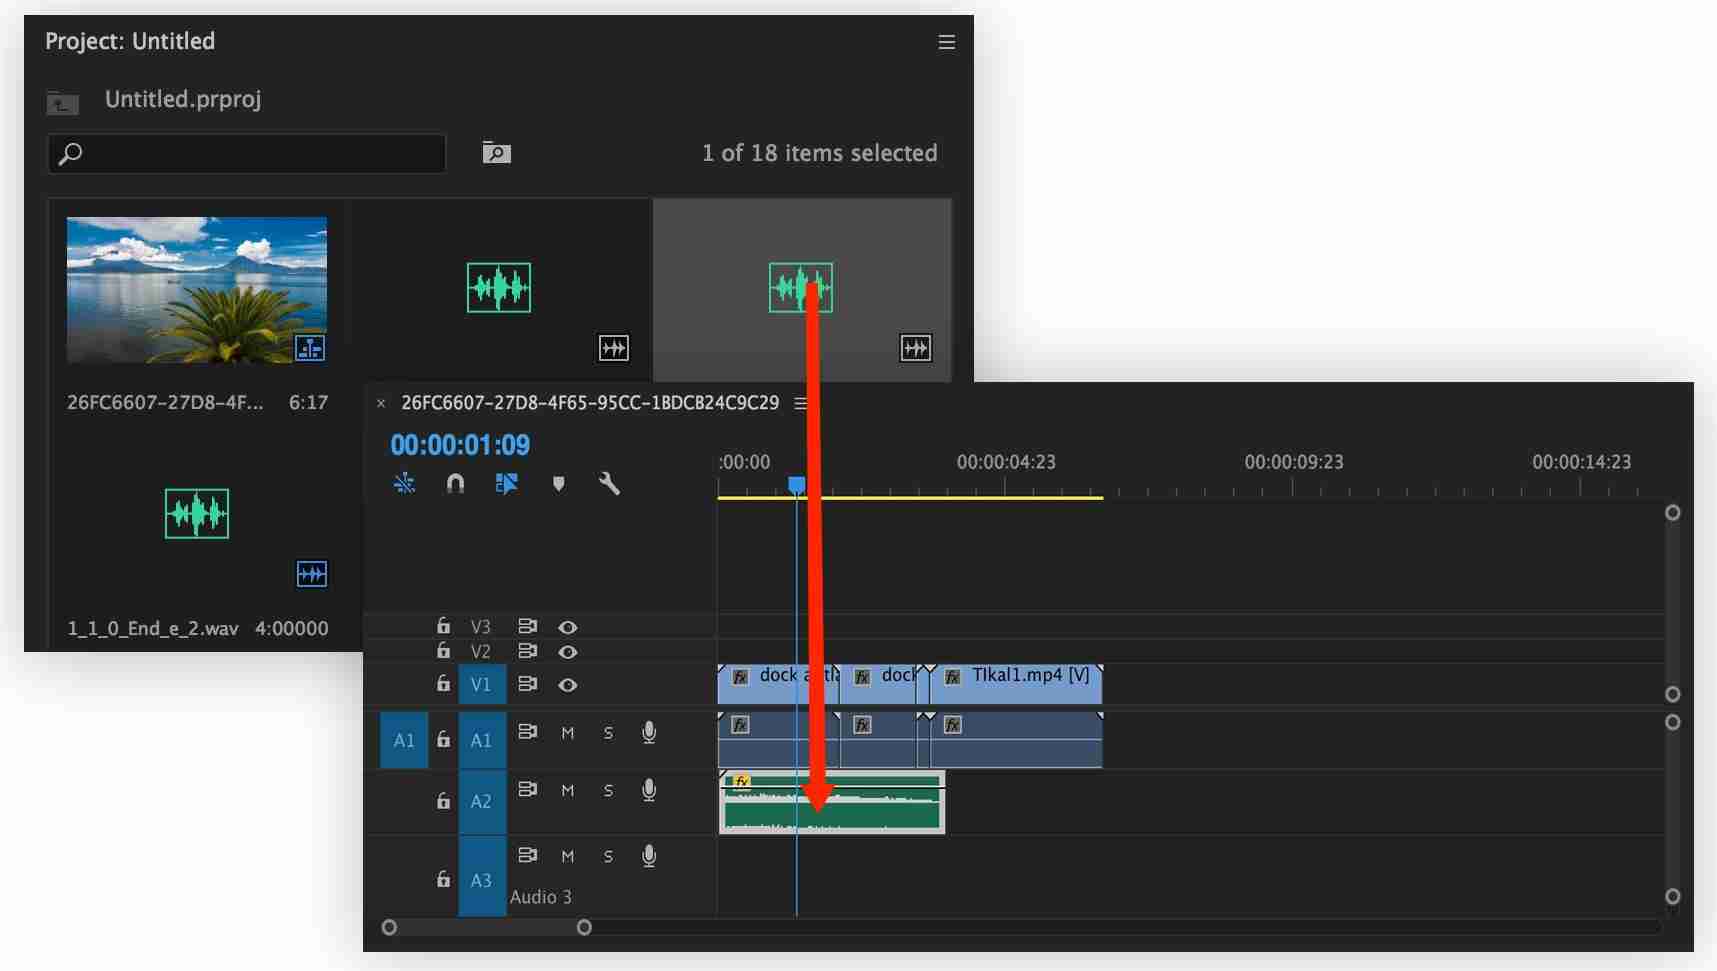
Before proceeding with the main procedure to add music to Adobe Premiere Pro, you should first choose the video to edit and open it on Premiere Pro. Just select the Window tab and then choose Project panel. After that, the music you’ve added before will show up automatically. Just double tap it to launch it on the Source panel. From here, you have the chance to play the music and check if the music you’ve chosen is compatible with the video you’ve selected.
For the length of audio to utilize or for the specific part, just drag the clip and stop in the exact part that you wish to use. This can be done particularly in the Timeline panel. Trimming of the created video can also be done.
Step No. 3: Make Adjustments on the Music Added
Now that you are already done with the procedure to add music to Premiere Pro, adjustments and modifications on the audio added could be done. Fortunately, there were a lot of features to choose from when adjusting the audio on your video. For example, you are allowed to do some trimming, volume adjustments whether it is too loud or not and edit multiple effects on it.
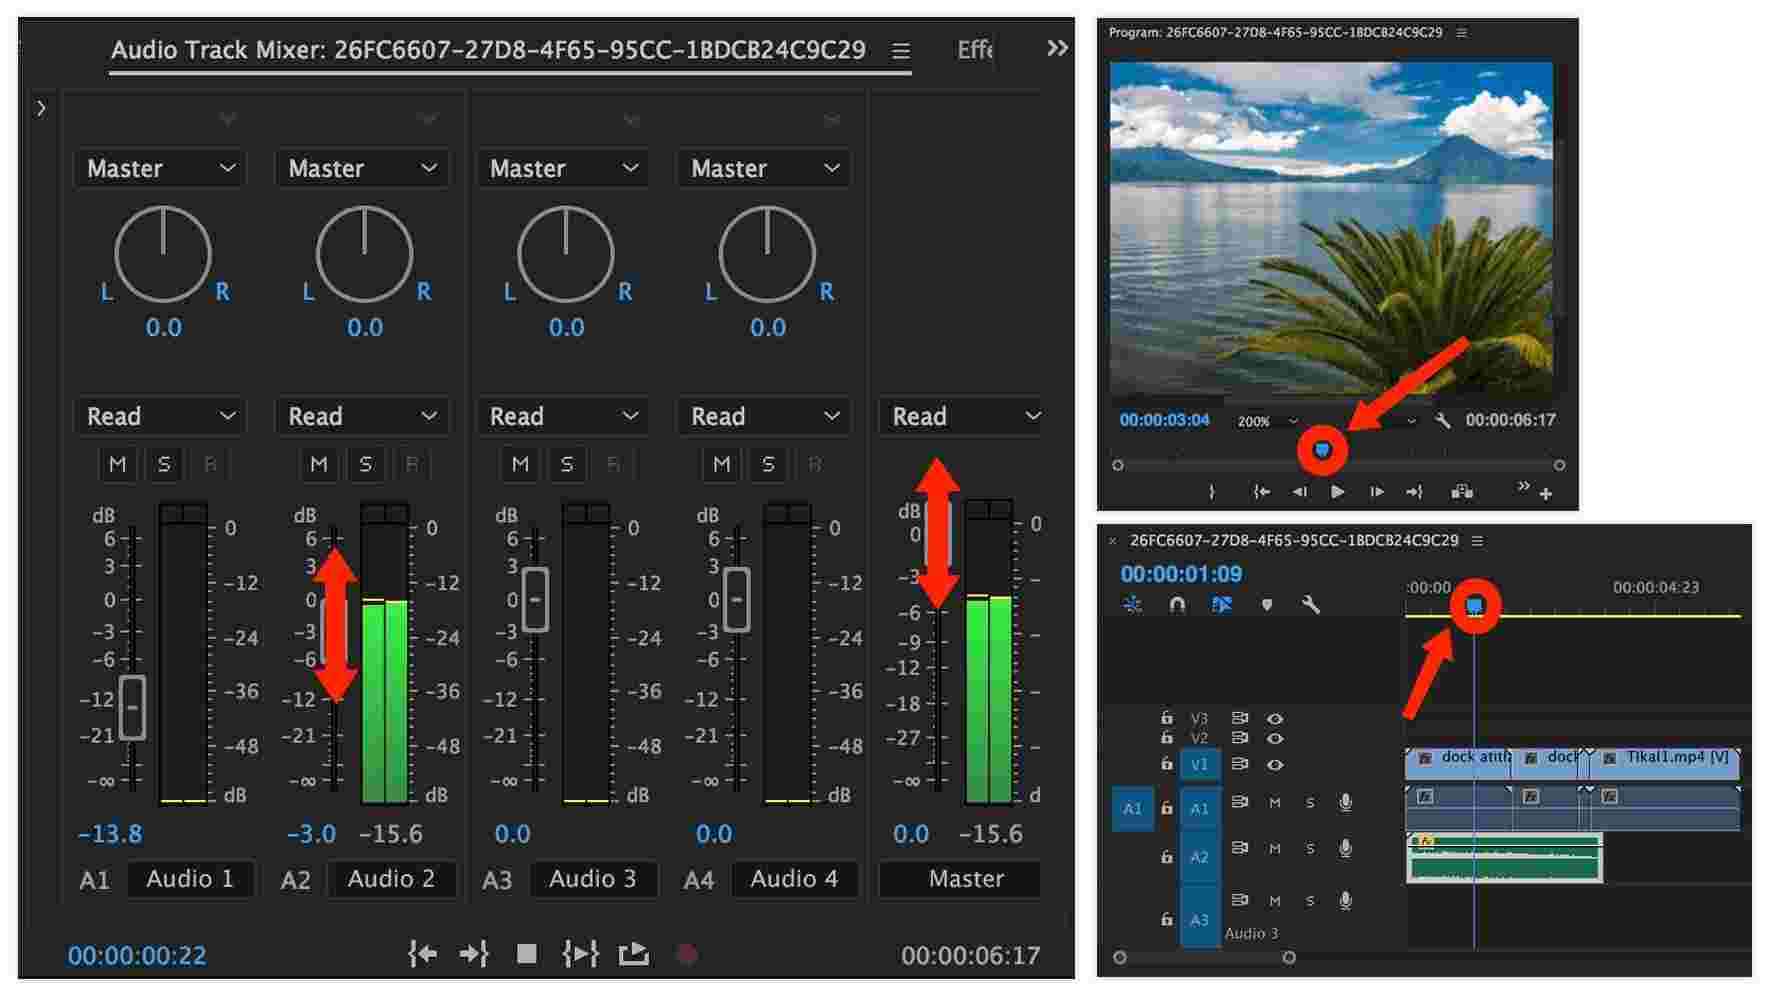
To know what kind of adjustment is needed, play the initial file created by just clicking the space bar button. If you want to stop at a certain part, tap the Space button again. In changing the volume of the music, select the Window tab and then choose Audio Track Mixer. After doing so, notice that there is a playback panel at the lower part of your Audio Track Mixer. Play the sequence created and then adjust the slider, going up or down to make the audio louder or quieter.
You may also explore other features, control and effects available on Premiere Pro to modify your video clip according to your like.
Part 3. Alternative Source of Music to Add on Premiere Pro
As said a while ago, apart from YouTube and other sources of music, you may also use streaming services such as Apple Music. However, it is not possible to just add any Apple Music file to Premiere Pro because the files are protected with DRM. As long as DRM is present, there is no way to add music to Premiere Pro. So, DRM removal should be your first step. But for you to do that, you have to use a professional music converter that can also convert and download them into supported formats.
AMusicSoft Apple Music Converter is a tool that can make perfect conversion, download and Apple Music DRM removal processes. To make sure that the resulting audio will play on Premiere Pro, convert it into any of the supported formats. Fortunately, AMusicSoft can produce the formats of MP3, FLAC, WAV, AAC, AC3 and M4A. With its capability to remove the DRM, you can proceed with conversion and download smoothly.
This tool will help you in the conversion process enabling you to listen to Apple Music offline for non-stop streaming. With AMusicSoft, you can expect to have the best audio quality in the shortest period possible. To be more specific, it has a speed of 16x faster. It can even keep the ID tags and Metadata info of the songs even after the procedures undergone. In order to know the steps, let us see them below.
Step 1. To begin the process, you have to start downloading the AMusicSoft Apple Music Converter on your device.
Step 2. Once you have downloaded the tool, run the tool on your computer or device. Choose the songs that you wanted to convert.

Step 3. Choose the format of conversion and then allot an end folder after the process. You nay choose among MP3, FLAC, WAV, AAC, AC3 and M4A.

Step 4. Tap the Convert button to let the process begin. Finally, download the converted songs from the Finished tab above.

Part 4. Final Words
The process to add music to Premiere Pro is just easy if you will assess this entire guide. Just make sure to follow the detailed procedure shared above to get the best results that you wish to have. Now, if you want to utilize tracks that are from the Apple Music service, use AMusicSoft Apple Music Converter. This tool can help you greatly in downloading the songs into supported formats with a promising audio quality.
People Also Read
- How To Put A Song On Repeat On Apple Music?
- Three Best Ways To Enjoy Apple Music On Firestick
- Complete Guide On How To Create Ringtones In iTunes Free
- How To Get Lossless Apple Music Stream Quality Settings
- Why Does My Music Stop When I Open Facebook (Explained)
- How To Export iTunes Backup Contacts To CSV
- 6 Best MP3 Converter To iTunes
 About The Author
Robert Fabry is an ardent blogger, and an enthusiast who is keen about technology, and maybe he can contaminate you by sharing some tips. He also has a passion for music and has written for AMusicSoft on these subjects.