Best Way To Copy iTunes To USB For Car Music In 2025
iTunes music files are mostly protected files that are encoded in AAC music format. Sadly, this file format could not be easily played on some devices. To have them streamed on without limitations, conversion of iTunes files into MP3 format is a must. Once converted, it will then be easier for you now to copy iTunes to USB for car. Aside from car stereos, there are also some other devices that will allow you to insert a flash drive for music streaming.
The process of how to copy iTunes music to USB for car would be the main focus of this article. This is to help the drivers or passengers to enjoy more comfortable driving hours while enjoying their favorite music. Check out the discussion below to learn more about how to do such a process.
Contents Guide Part 1. Copy iTunes Music to USB for Car via iTunesPart 2. The Best Way to Transfer Apple Music to USB Drive to Listen in CarPart 3. Conclusion
Part 1. Copy iTunes Music to USB for Car via iTunes
As you read this section, you will be learning about the easy steps on how to copy iTunes songs to USB for car. This is best especially if you are planning to go on a long drive and you want some music playing in your background. However, a far destination will surely consume your mobile phone’s battery life. So, it is advised to stream music using your car stereo instead.
Check out below the procedure to copy iTunes to USB for car.
- Get the USB flash drive that you have prepared for this process. Make sure that your USB has enough storage space to secure saving all the iTunes tracks that you plan to copy.
- Insert the USB into your laptop or computer and wait for a few seconds until it was read by your device.
- If it is done, proceed to your iTunes application and open it.
- This will usually take only a few seconds to open. Once opened, tap on the iTunes tab on the toolbar above.
- A new menu will show up in which the Preferences option must be clicked. After a second, the Advanced Preferences window will be displayed on your screen.
- Among the tabs you see, click on Advanced. This will show you then three descriptions in which you have to select the first two you see. These two say “Keep iTunes Media folder organized” and “Copy files to iTunes Media folder when adding library”. If you are done, hit the OK button seen at the bottom right corner to save the changes made.
- Now, go back to the main interface and then choose the File tab this time. In its submenu, click Library and follow it with Organize Library option.
- In the Organize Library window showing on your screen, do not forget to mark the box before “Consolidate files”. Click OK button again.
- Completely doing this step means that the music files from your iTunes music library were successfully transferred to iTunes Media folder. This means as well that you can now copy iTunes to USB for car.
- Proceed to your iTunes Media folder. If you can still remember, you already came across this location a while ago. To be more specific, this could be found in the Advanced Preferences window.
- This will show you all of your music collection. You may then start choosing the tracks, albums and playlists that you want to save. Just copy and paste the song files selected. To make the process a little faster, copying and pasting an entire folder would be better.
Part 2. The Best Way to Transfer Apple Music to USB Drive to Listen in Car
To copy iTunes to USB for car and directly play it into your car stereo, the items must be unprotected. However, not all iTunes contents are DRM free when purchased. So, to be able to copy iTunes music files to USB and stream them without restrictions not only on your car stereo but also on other devices with a USB drive, conversion of tracks into an accessible format is a must. However, this is not possible if you will just be doing it within the iTunes application.
For this process, I would recommend using AMusicSoft Apple Music Converter. This tool will help you make protected songs unprotected and will help you as well in converting the songs into another audio format. After that, exporting them from iTunes into your device locally will come up next and then transferring them into USB drive would be possible then. In addition, AMusicSoft has a 16x faster working speed and could finish the entire process in just a few minutes.
Let us see the steps below on how to utilize this tool properly and be able to copy iTunes to USB for car.
Step 1: Through your browser, search for AMusicSoft website and then download the Apple Music Converter. Launch it then on your device.
Step 2: Add the songs into the converter by copying and pasting them into the converter or doing the drag and drop method to put an entire copy of the music files.

Step 3: Now, it is time to select the MP3 format. For the formats that AMusicSoft supports, aside from MP3, you may also have WAV, AAC, FLAC, AC3 and M4A. After doing so, select the end folder too.
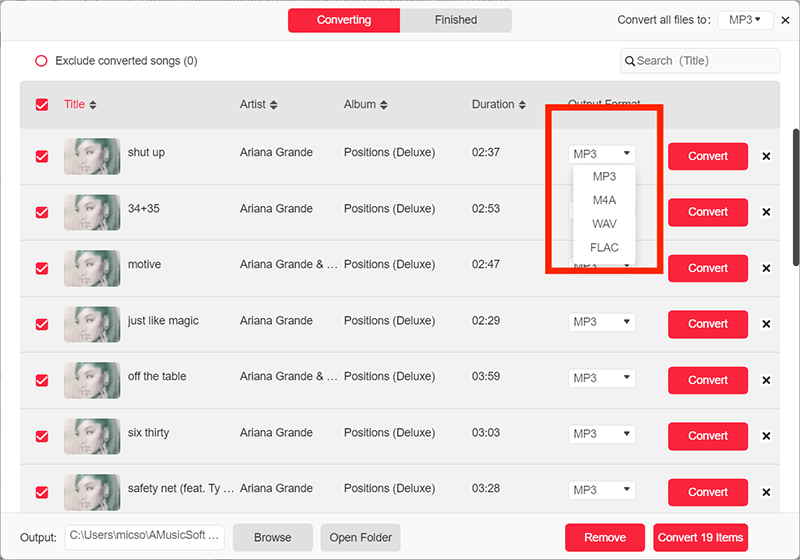
Step 4: To start the process, click the Convert button placed below.
Step 5: ee the Converting tab and see the tracks that have been converted already.
Part 3. Conclusion
The most recommended tool to copy iTunes to USB for car is AMusicSoft Apple Music Converter. Once the tracks are converted and downloaded on your device locally into an accessible format, just follow the steps of inserting the USB drive into your device and then transfer the copies by just copying and pasting them. Once done, insert the USB you used into your car stereo and let the songs to play.
People Also Read
 About The Author
Robert Fabry is an ardent blogger, and an enthusiast who is keen about technology, and maybe he can contaminate you by sharing some tips. He also has a passion for music and has written for AMusicSoft on these subjects.