Is iTunes Playlist Not Syncing? Quick Fixed 2025!
It is quite troublesome if you want to listen to your favorite music then you found out that iTunes playlist not syncing on your device. This is one of the issues that iTunes users complain about recently that I have encountered. Even though iTunes is considered one of the best when it comes to syncing a variety of files especially music, it happens to be not as perfect as it seems. I understand that as a user this will give you frustration instead of enjoying the music that you like.
If you are one among the many who are having the same issue and looking for a solution for this then you can rest your mind now because there are some ways how to fix this. Here, I will provide you with a step-by-step guide on how to resolve this issue so, just keep reading and you will find out.
Contents Guide Part 1. Why Are My iTunes Playlists Not Syncing?Part 2. How to Fix iTunes Playlists Not Syncing Between Devices?Part 3. Bonus Tip: Manage iTunes Music in a Better WayPart 4. Conclusion
Part 1. Why Are My iTunes Playlists Not Syncing?
There are some reasons why the iTunes playlist not syncing.
- The sync library is not activated on all or some devices.
- It could be that your iTunes, masOS or iOS is not updated. If it is already outdated then it means that there are some services that you can’t use that are only available on the latest version.
- Your Apple ID is not synced with your iTunes or maybe you used a different Apple ID on your device. Of course, if you have a different Apple ID then it is expected that your playlist available on that account will not be visible on the other.
- You have a problem with your internet connection.
Part 2. How to Fix iTunes Playlists Not Syncing Between Devices?
In this section, I will discuss some of the useful tips that you can do if you encounter the iTunes playlists not syncing. These fixes will allow your playlist to be available and synced on all the devices that you have.
1. Enable iCloud Music Library
One thing that can make your songs or playlist accessible on your devices is iCloud. Enabling your iCloud, it will make your songs be available and in sync with your devices. Thereby, this also helps in dealing with your iTunes not syncing problems. I provided the steps below on how to enable iCloud on different devices.
On iOS Devices (iPhone or iPad)
- First, on the springboard of your device, select and open your Settings app.
- Then, once open, search on the option and tap on Music.
- Lastly, make your iCloud Music Library enabled by toggling the Sync Music option to ON. Wait until it finishes syncing your tracks on your account.

On iTunes
The following steps will help you enable your iCloud Music if you having a problem iTunes playlist not syncing on your desktop.
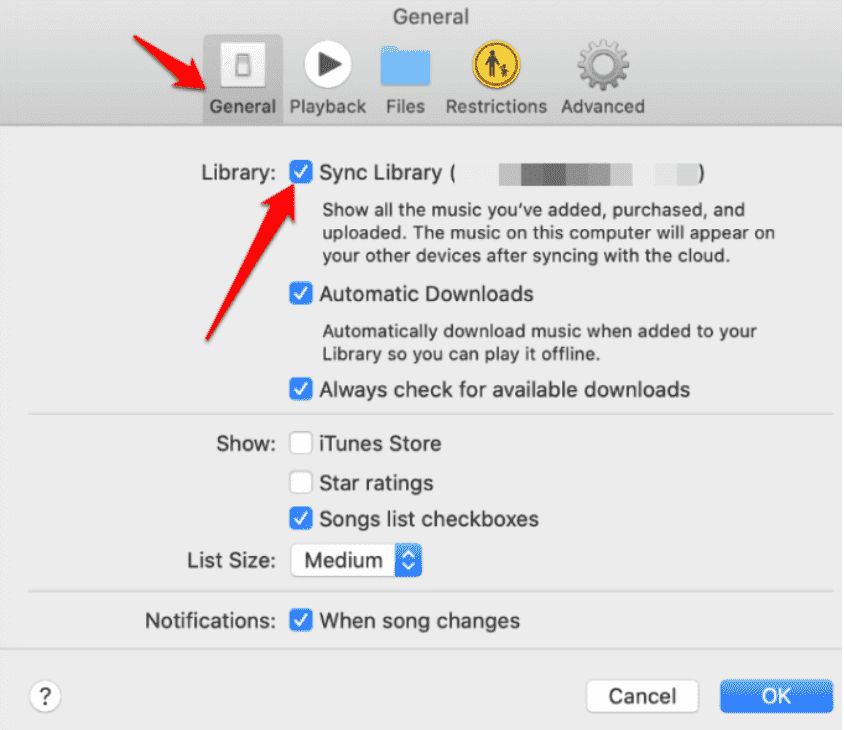
- First, select your iTunes app and run it on your Mac or Windows PC.
- Next, if you are a Windows user, go to Edit Menu and select preferences. On the other hand, for Mac users, just go to the iTunes menu that is located on the upper portion of the screen and select Preferences as well.
- From there, select Sync Library to turn it on and click OK.
Once you enabled your iCloud Music Library option then you are ready to go! You can now able to play your iTunes on the devices that you have.
2. Confirm Your Apple ID
One reason why your iTunes playlist not syncing is that your Apple ID that you are using is different from the ones you use on your device. So, it is better to check this one as well because this will hinder you to play your music on your devices. Here are the steps on how you can check the Apple ID that you used on your device.
Launch the Settings app on your iPhone or iPad, then tap your name and wait until you see the Apple ID on your device. Verify if it is the one you used on your iTunes, if not change it to the ones you are using.
On your Mac or PC, open your iTunes app then go to the Store option at the upper part of the screen. Then click on the Account link to see the Apple ID that you used in iTunes.
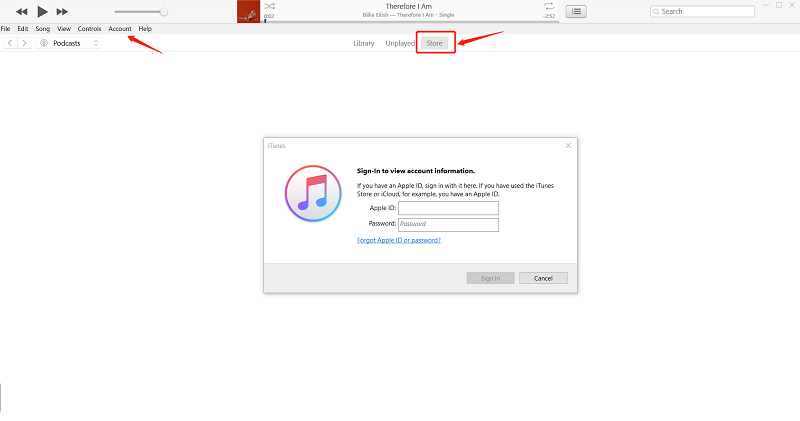
Once you confirmed that it is not the Apple ID that you used, just simply log out of your account then log in to the one that has the subscription. By doing this, you can able to access your iTunes playlist on any device.
3. Update Your iTunes, macOS and iOS
There are often times why the iTunes playlist not syncing is because your macOS, iOS and iTunes versions are outdated. For this reason, you will experience such issues. Therefore, you must update them, so you can access your music tracks on the devices you own.
4. Toggling Your Mobile Data Option on Device
Toggling your mobile data on your device might be sound unusual but it is one of the ways to resolve the iTunes playlist syncing issue. You can try this for yourself and maybe this can help you with your problem too.
- Select and open the Settings app of your iOS device and then search for iTunes & App Store, tap on it.
- Lastly, once you see your Mobile Data option, simply toggle it. Check your iTunes if your playlist is already synced on your device.
Part 3. Bonus Tip: Manage iTunes Music in a Better Way
Tired of dealing with the iTunes playlist not syncing issue? Then, there is another way that you can do so you won’t encounter this again. Curious about it? This is by downloading your music from iTunes library and listen to it even if you are offline. But for you to download your iTunes playlist, you need to have this special tool that we recommend and this is the AMusicSoft Apple Music Converter. This is an all-in-one converter that converts almost every format that you want, such as MP3, WAV, FLAC, etc.
Moreover, this amazing converter not only just converts but also aids you to download music from iTunes as well as in Apple Music. It has this feature that will allow you to keep your converted music as long as you want without worrying if you have a subscription or not.
Aside from that, you can now freely make all the songs for offline use and also, you can transfer it to any device that you have because it is no longer restricted. So, if you want to try this software for yourself just visit their official website to download the installer and get it installed on your computer. Once you have it installed, you can refer to the following steps below on how to use the software and use your downloaded music for offline use.
- Open your AMusicSoft Apple Music Converter on your desktop.
- Once open, it will automatically scan your available playlist. Wait for a couple of minutes until it finishes, so you can select which music you want to download.

- After you are satisfied with the songs that you selected, you have now the option to set the output format that is compatible with your device, after that choose the destination path where you want to view your converted songs.
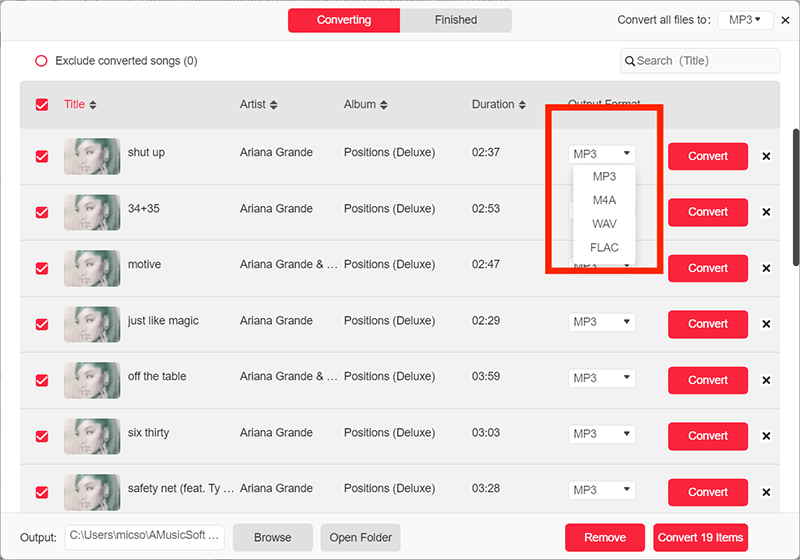
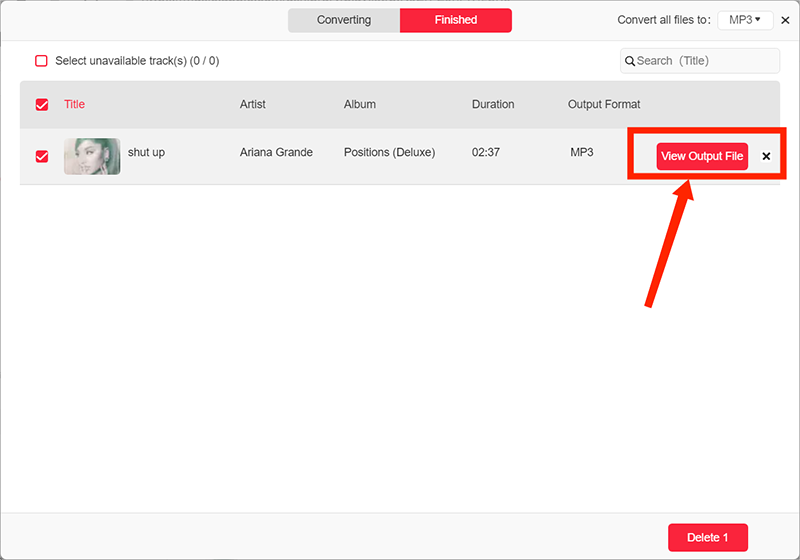
- Once you finalize everything, click on the Convert button to start converting. The progress of the conversion will be visible on the main interface, so you will aware of its status.

- After the process has been complete, you can view it either on the Converted section or on the location folder that you set earlier.
After doing the above-mentioned steps, you can now easily access and play your iTunes playlist without worrying about syncing issue.
Part 4. Conclusion
There are many ways how to resolve the iTunes playlist not syncing issue, this by enabling your iCloud Music, updating your iTunes and iOS, making sure you used the same Apple ID, and lastly, toggling your Mobile data option. Another alternative is by using the AMusicSoft Apple Music Converter to download the songs for offline use. I hope that this guide provides you’re the information that you need to fix the issue.
People Also Read
- How To Turn Off Explicit On Apple Music (2024 Updated)
- Why Does iTunes Separate Songs From The Same Album [Answer]
- Learning How To Add Music To Capcut (A Complete Guide)
- How To Transfer Apple Music To Spotify
- How To Play Apple Music On MP3 Player
- The Best Way To Convert iTunes Library To MP3 [2024 Updated]
- How to Play Apple Music on iPod Shuffle
- How to Play Apple Music on SoundTouch
 About The Author
Robert Fabry is an ardent blogger, and an enthusiast who is keen about technology, and maybe he can contaminate you by sharing some tips. He also has a passion for music and has written for AMusicSoft on these subjects.