How To Do Music Export For iTunes Windows?
If you want to know how to back up your favorite music, you'll like the guide on how to do music export for iTunes Windows here. Though iTunes was well-received in its early years as a professional media player and management, more and more users report that many problems arise during the use of iTunes, some users even lose their music or playlists without knowing it. To save your favorite music forever, you can try to export or transfer songs from iTunes to computer, USB drive, cloud storage service, or any media device you want. How do I export all my music from iTunes? This tutorial will share all the process of exporting iTunes music and playlists! Read ahead to know more about this.
Contents Guide Part 1. Export iTunes Playlist on Windows to ManuallyPart 2. Export iTunes Playlist on Windows as Text or XML FilesPart 3. Export iTunes Playlist on Windows to MP3Part 3. Conclusion
Part 1. Export iTunes Playlist on Windows to Manually
You can transfer your backup iTunes music library from the old computer to a new one if you have bought one. That is why we want to do music export for iTunes Windows computer. Here is how to export playlists from iTunes to Windows manually:
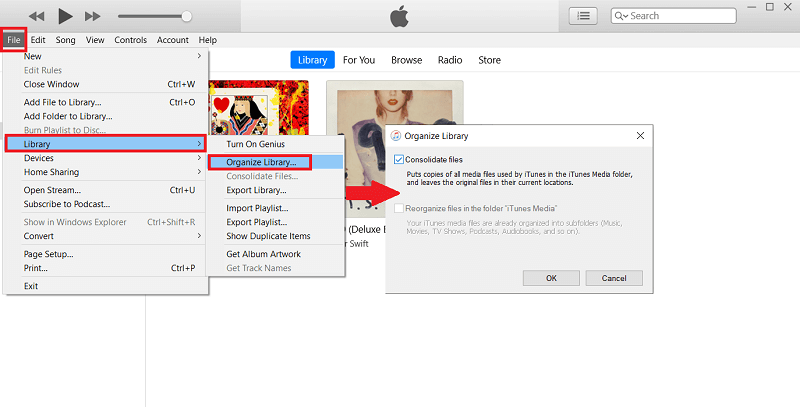
Step 1. You can consolidate all the files in your library first in the iTunes folder to make it easier to move your library to a new computer. So, open iTunes, choose File > Library > Organize Library. Select "Consolidate files."
Step 2. Choose Edit > Preferences, then click Advanced. From the "iTunes Media folder location" section, you can get the folder name where to store your iTunes library. Copy the iTunes folder paths. Quit iTunes.
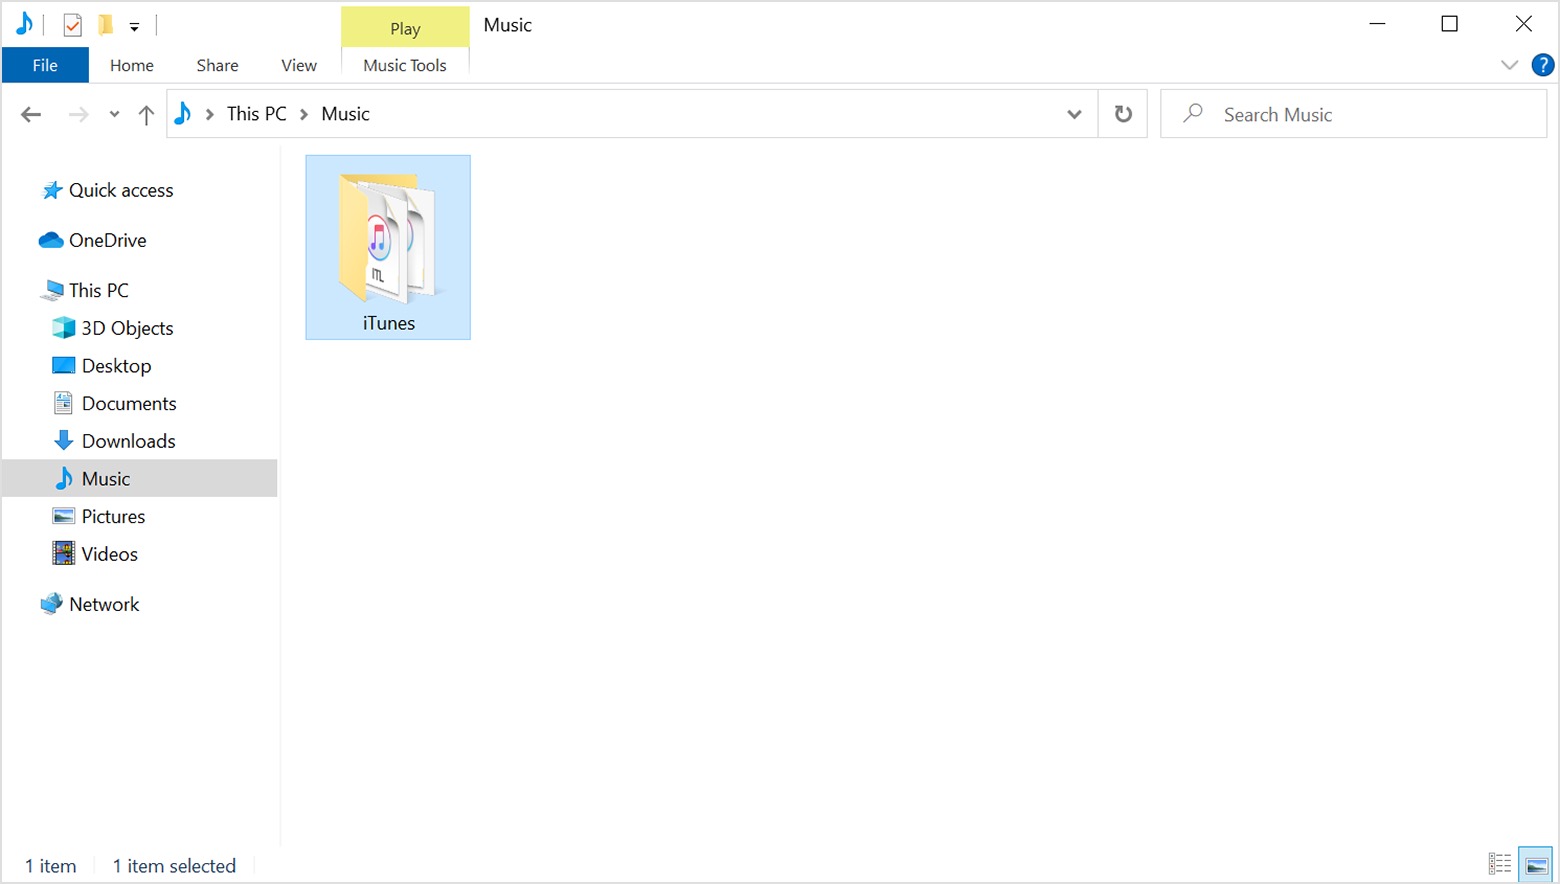
Step 3. Navigate to your iTunes folder in File Explorer. To do music export for iTunes Windows. drag the iTunes folder from its location to the desktop, another folder or external drive.
Although transferring music from iTunes to your computer is so easy, it seems like a time-consuming method. The exported files might not be played on mobile devices.
Part 2. Export iTunes Playlist on Windows as Text or XML Files
When it comes to doing music export for iTunes Windows, you can also export information about a song to use in a database or another app. This might sound hard, but this is actually quite easy once the correct procedure is followed. To export iTunes playlist to a sheet file, check the steps below:
Step 1. Open iTunes on your Windows. After opening, select the Playlists tab. Upon the selection of the Playlists tab, you will then be displayed all the playlists available on your collection. They are placed on the left part of the screen.
Step 2. From the list, select the ones that you wish to get exported. After doing so, tap the File tab and then choose Export Playlist option from the next menu shown.
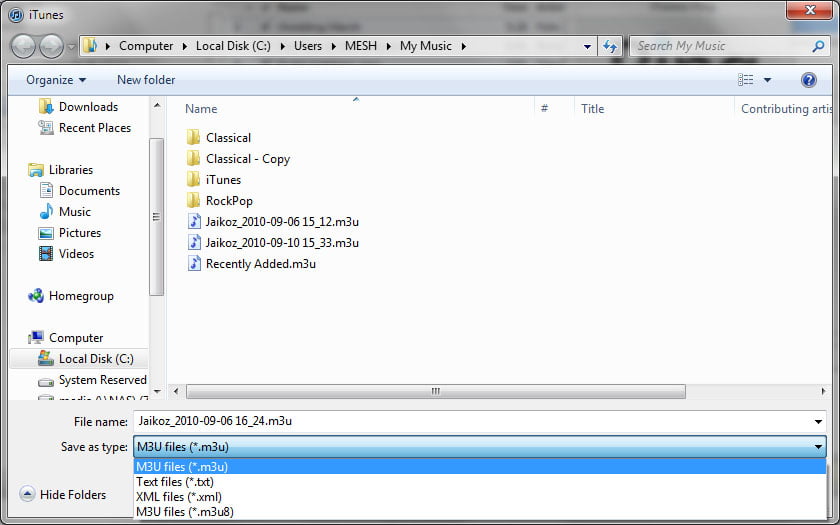
Step 3. A new window will show up in a few seconds wherein you have to check if the File name hasn’t been changed and is correct. Also, select the Save as type button and then select Text files (*.txt). If you are planning to return the iTunes files into the iTunes app after having them exported, you should choose the XML file type instead.
Step 4. To do music export for iTunes Windows, just hit the Save button and wait for a while until the process is done.
Part 3. Export iTunes Playlist on Windows to MP3
all iTunes items that are DRM-free. Music, video, TV shows, and audiobooks purchased from iTunes between 2003 and 2009 are still protected by DRM. Plus, iTunes has been replaced by separate apps, and one of them is Apple Music. Apple uses DRM technology called FairPlay to prevent the distribution of all digital content available in Apple Music to cut short piracy. So you can't directly do DRM-protected music export for iTunes Windows using iTunes.
The only possible way is to make use of a professional tool namely AMusicSoft Apple Music Converter which is very skilled when it comes to DRM removal. It can even convert and download music files not only to MP3 format but also to AAC, FLAC, WAV, AC3 and M4A. One of the benefits that you can get from these formats is that they can easily be accessed by almost all music players. For example, you can freely stream apple music on Roku or Alexa.
To add, AMusicSoft can finish the process in up to 5x faster and is also very capable of retaining the original quality of the sound even after the conversion process. It can even preserve the important details of songs including the ID tags and Metadata info. You can restore your whole Apple Music library even after canceling the subscription.
Step 1. This application is compatible with Windows and Mac operating systems. Click the Free Download button below to install this app on your computer! Then open the application and it will automatically load your music library.
Step 2. Open AMusicSoft software, enter the built-in web player, and sign in with your Apple ID. Then you can search for the song you want to export. Simply by dragging them to the "+" button, the software will fetch data from Apple Music.

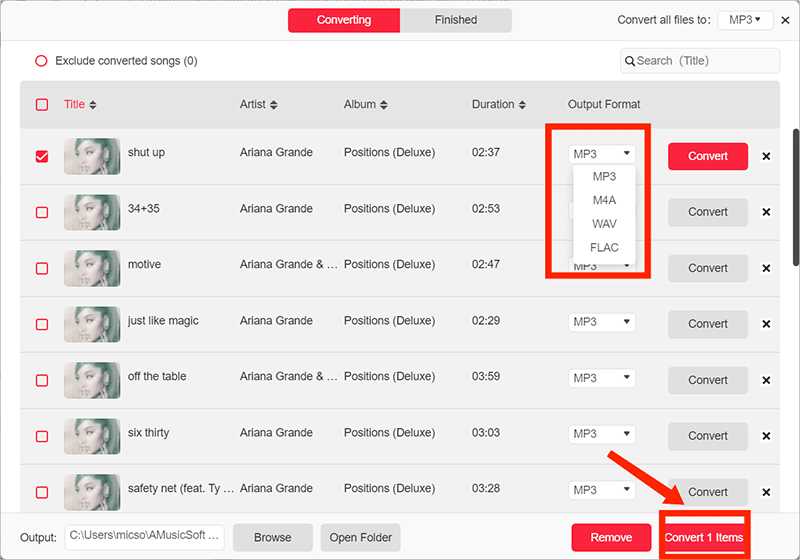
Step 3. Once your iTunes playlists are loaded into the AMusicSoft app, click the Format option. You can set the output format as MP3. Then select as well the output folder to use.

Step 4. If you are done with choosing the right format and the output path, Click on the “Convert” button to start converting. Once it is done, you can now see all your converted songs in the “Finished” section.
Now you have successfully exported your iTunes playlists to MP3 format using AMusicSoft Apple Music Converter. These converted MP3 files are free from DRM restrictions, allowing you to listen to them on any MP3 player or device of your choice. AMusicSoft Apple Music Converter simplifies the process of exporting iTunes playlists to MP3 and ensures that you can enjoy your music collection without any limitations.
Part 3. Conclusion
From the above content, we have given the exact steps about how to do music export for iTunes Windows. Hope the guide can help you back up your favorite music forever with ease. And we also recommend AMusicSoft Apple Music Converter to download DRM-free music in any audio format you like. It’s free software, we advise trying it out for yourself anyway with its free trial version available on both Mac and Windows!
People Also Read
- FULL GUIDE: How To Download iTunes Library To New Computer
- How To Use iTunes To Search For Music Added?
- How To Unsubscribe On iTunes On iPhone, Android And Computer
- Fixed: iTunes Application Unable To Start Correctly On Windows 10/8/7
- How To Organize And Rename Albums In iTunes
- How To Fix My iTunes Doesn’t Recognize My iPod
- How To Delete Songs On iTunes On iPad, Desktop Or Mobile
 About The Author
Robert Fabry is an ardent blogger, and an enthusiast who is keen about technology, and maybe he can contaminate you by sharing some tips. He also has a passion for music and has written for AMusicSoft on these subjects.