How To Copy iTunes Library To External Drive For Backup
With a lot of harmful software appearing online, thinking for the worst is a good thing, especially if it is about the protection of your long-time saved files. This kind of thing is always possible on any application or platform such as iTunes. So, if you have curated a very extensive library and you do not want them to go to waste, then backing up files is very recommended. This can be done via multiple methods, but in this post, we will focus on how to copy iTunes library to external drive.
Fortunately, the process on how to copy the iTunes library to an external hard drives is just very simple and it is tackled fully in the guide below. Whether you are using a Windows computer or a Mac, you may use this guide to create a full backup copy of your iTunes library.
Contents Guide Part 1. How to Copy iTunes Library to External Hard Drive?Part 2. The Best Alternative Method to Keep Your iTunes LibraryPart 3. Final Words
Part 1. How to Copy iTunes Library to External Hard Drive?
To prevent the situation mentioned above from happening, the set of steps below on how to copy iTunes library to external drive would help you. Make sure to follow this detailed guide to avoid it. What you will need before the move? You will, of course, need the computer your iTunes library is currently on. You will also need the following:
- An external hard drive (and power source, if applicable), make sure it has enough storage capacity to hold your library, and for future expansion
- A USB cable to connect the hard drive to your computer like USB 3.0, USB-C cables, or Thunderbolt. Using an older technology, such as USB 2.0, can severely prolong the amount of time it takes, purely from its slower transfer rates.
Step 1. Find an iTunes Folder
- On your computer, select the iTunes app icon in order to launch it.
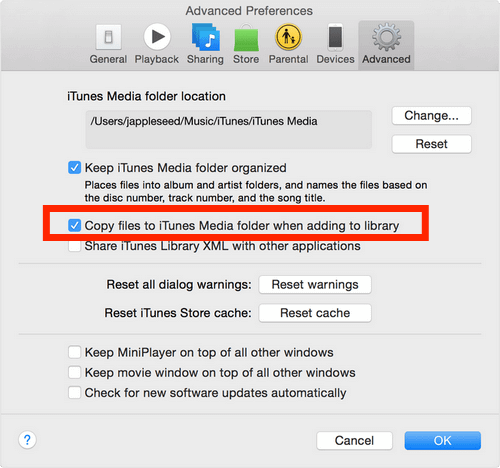
- Open the Preferences window. On a Mac, go to iTunes > Preferences. In Windows, go to Edit > Preferences.
- Select Advanced in the new window.
- Go to the iTunes Media folder location section to find the location of the iTunes folder.
- Select the "Copy files to iTunes Media folder when adding to library" check box to ensure that the songs you add to your library go into this folder.
- Click OK to close the iTunes Preferences window.
Step 2. Consolidate Your iTunes Library
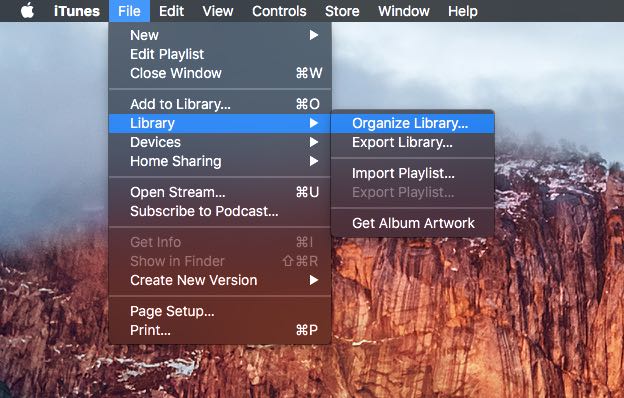
- Click File in the upper left corner of your screen.
- Choose Library in the dropdown menu, then select the Organize Library button.
- Tick the box for Consolidate Files in the window that appears. Click OK.
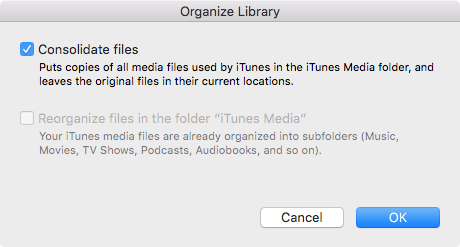
Note: Consolidate Files copies items rather than moving files, so you'll end up with duplicates of any files that were outside the iTunes Media folder. This may take a while depending on the number of the source files being consolidated, their size, the speed of your computer, available storage space and other factors.
Step 3. Move Your iTunes Library to an External Hard Drive
Now how to copy iTunes library to external drive after consolidating and organizing your library? Let us go to the last step to transfer your iTunes library to the external hard drive.
- Close and quit iTunes on your computer.
- Connect your hard drive to the computer with a USB cable, and wait until it pops up on the desktop.
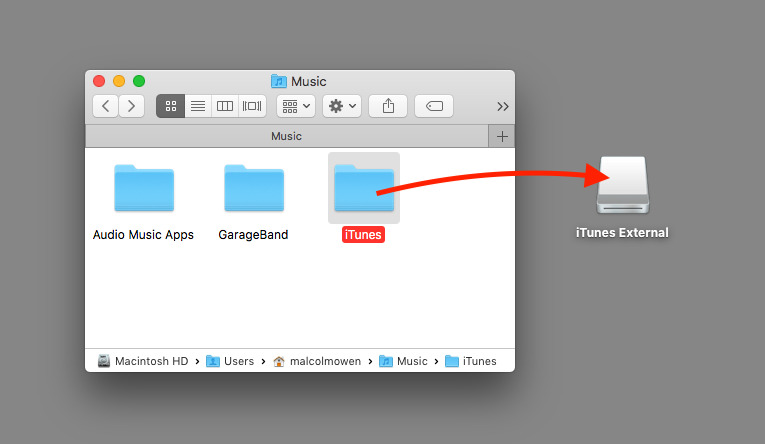
- Find your iTunes Media folder in your iTunes folder. (Mac: Finder > username > Music, Windows XP: \Documents and Settings\username\My Documents\My Music\, Windows Vista or later: \Users\username\Music\)
- click and drag the iTunes folder directly onto the icon for the external drive. Alternatively, copy the iTunes folder, navigate to the place in the external drive you want to use to store iTunes, then paste.
- At this point, the iTunes folder will be copied over to the external storage.
This process could take a while, depending on the bandwidth of the connection, the size of the iTunes folder, and if the computer or the drive is being accessed by other tasks, this could take a long time to complete. Also, once the transfer has been completed, iTunes needs to be told where to find the files. You need to hold the Option key (Mac) or Shift key (Windows) to open iTunes. This will bring up a Choose iTunes Library window with three options. Select Choose Library on the far right. In the next window, navigate to the external drive and enter the iTunes folder. Find and select the iTunes Library file, and click Open.
At this point, iTunes will open up from the new location and will be accessing files from the external storage instead of the computer's storage. If you wish, you can close iTunes and disconnect the external drive. To reuse that iTunes library, you will need to reconnect the drive to the computer before opening iTunes again, else it will offer a "Library cannot be found" error.
Apart from using iTunes, there is another way to do the procedure of how to copy iTunes library to external drive. Learn about this method in the next part of this post.
Part 2. The Best Alternative Method to Keep Your iTunes Library
There are so many ways available in doing the process of how to copy iTunes library to external drive, but the most effective and reliable among them is through the use of a third-party application. This kind of tool can help you keep a permanent copy of the music files selected right after download and conversion. Meaning to say, you will have permanent rights on managing the files, wherein you can choose to transfer an iTunes playlist to another computer or burn CDs from iTunes in order to play them via CD players.
To make this possible and save your favorite iTunes and Apple Music tracks, you may use AMusicSoft Apple Music Converter. This music converter will help you convert the files into accessible formats like MP3, FLAC, WAV, M4A, AC3 and AAC. With its conversion and download speed that is 16x faster, every user can save so much time from waiting for the results to come. Fortunately, using AMusicSoft is just very easy. It has a simple user guide that even beginners can conveniently follow.
In addition to that, it can also keep the significant details related to the tracks even after the processes done. Most importantly, it can conduct DRM removal. As long as the tool is capable of such, other processes are possible and playing music on any device is possible. See below the steps that you should follow to download iTunes and Apple Music to compatible formats.
- Head to your computer’s browser and navigate to the website of AMusicSoft. From here, you can get AMusicSoft Apple Music Converter by tapping the Download button. The installation comes next once the download is successful.
- After doing so, add the music tracks by selecting them from your collection.

- Provide the format of conversion to use by choosing from the format menu of AMusicSoft. The location where to save the results needs to be specified as well.

- Click the Convert button to initiate the start of the process and wait for the availability of the results.

- Lastly, access the Converted menu to download the converted music files.
Part 3. Final Words
Discussed above are the two methods that may be utilized for the process of how to copy iTunes library to external drive. If you can’t get it done by using the iTunes app, then you should try on using AMusicSoft Apple Music Converter. Just follow the guide steps tackled in order to use this tool properly.
People Also Read
- Best Tips To Fix Apple Music Not Working On CarPlay
- “Does Google Home Work With iTunes” – Yes Or No?
- Solved: How To Delete All Music From My iPhone
- How To Make Song Available Offline In Apple Music?
- Why Can’t I Download Songs On Apple Music? How To Fix It?
- Three Best Ways To Enjoy Apple Music On Firestick
- How To Put A Song On Repeat On Apple Music?
 About The Author
Robert Fabry is an ardent blogger, and an enthusiast who is keen about technology, and maybe he can contaminate you by sharing some tips. He also has a passion for music and has written for AMusicSoft on these subjects.