Best Ways To Transfer An iTunes Playlist To Another Computer
Learning the process to transfer an iTunes playlist to another computer is a good strategy if you wish to use another device in streaming music. Instead of curating another set of playlists and albums again in your new computer, it is better to just transfer them since it is way easier and faster. This is quite advantageous, especially for those who have a very extensive music collection.
Let us see below all the methods that you must try when it comes to the process on how to transfer an iTunes playlist to another computer.
Contents Guide Part 1. Export iTunes Playlists to New Computer with iTunesPart 2. Transfer iTunes Playlists to New Computer with iTunes MatchPart 3. Transfer iTunes Playlists to Another Computer through AMusicSoft [100% Work]Part 4. Conclusion
Part 1. Export iTunes Playlists to New Computer with iTunes
Discussed below are the suggested methods in transferring iTunes playlists into other devices.
Transfer iTunes Playlist Via iTunes Application
The good thing about iTunes app is that it is very easy to use. You can easily transfer an iTunes playlist to another computer by just utilizing the Import and Export functions of iTunes. Let us see below how to use these functions.
- Launch iTunes on the computer A that you want to export playlist. Select the playlist in iTunes that you want to transfer.
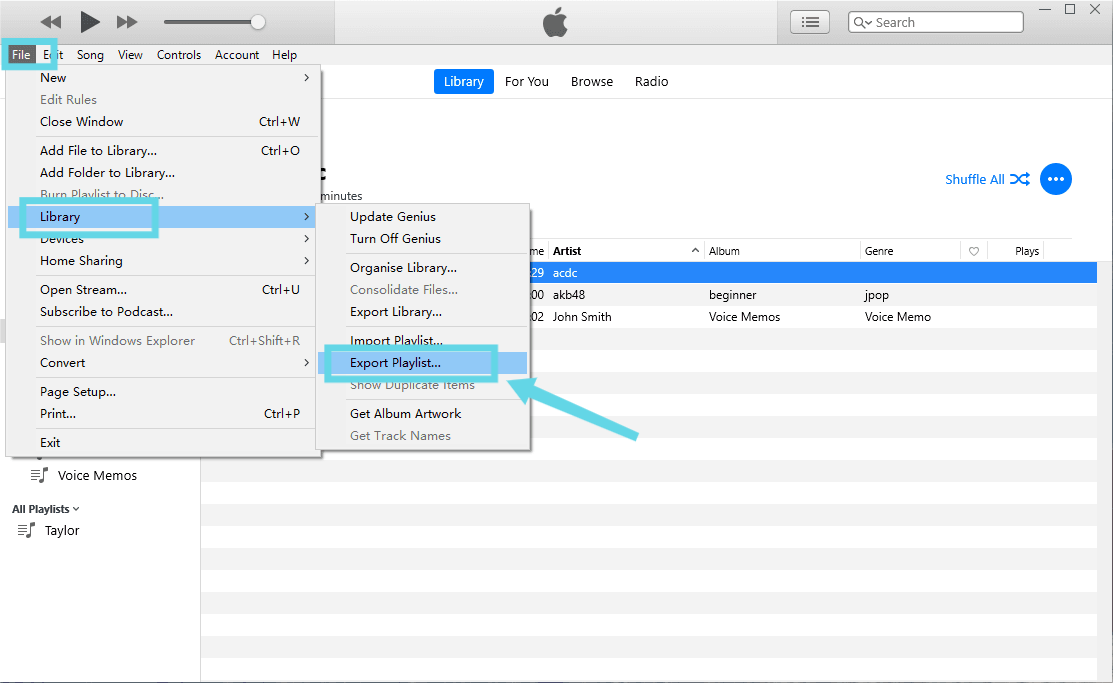
- Click the "File" menu for Windows or the "iTunes" menu for Mac. Next, click "Library" from the dropdown menu. Then, click the "Export Playlist" from the pop-out menu.
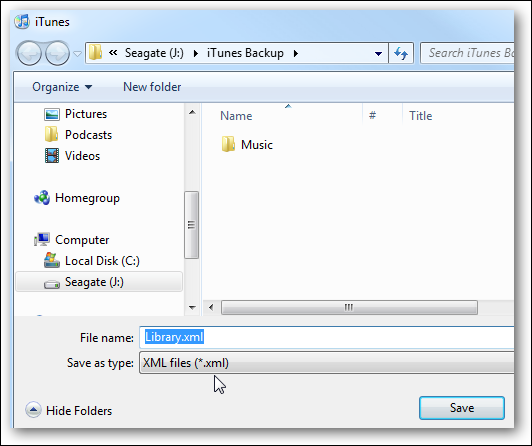
- A File Browser window will appear. Choose a new location to save the iTunes playlists files. Select "XML files (*.xml)" from the "Save as type" dropdown. By default, the playlist name is populated with the same name in the iTunes playlist. You can retain it or save a new name.
- On your computer B that you want to import playlists, open the iTunes application as well and then quickly navigate to the Library section. Tapp the "File" tab (for Windows) or the "iTunes" menu for Mac. From the "Library" menu, this time, click "Import Playlist".
- Then, direct to the exported XML files and make sure to click the Open button in order to import the entire playlists on your computer B.
See? The procedure is just very easy to follow. But of course, even if this is just super simple to do, there are some cases when other playlists you exported could not be imported successfully. This is because the playlists might appear not available on your new device.
If this happens to you, you may try other methods such as using an external hard drive, USB flash drive, or other programs. To help you with that, I also included some alternative methods that you may use to transfer an iTunes playlist to another computer. Check them out below.
Transfer iTunes Playlist Via USB Flash Drive
Fortunately, copying playlists in a flash drive is just very easy. Follow the steps below.
- Make sure that you have a USB flash drive with enough storage space to save all the playlists you have. After getting it, have it inserted into your computer.
- Wait for a while until it is recognized by your computer.
- Once done, open its respective folder.
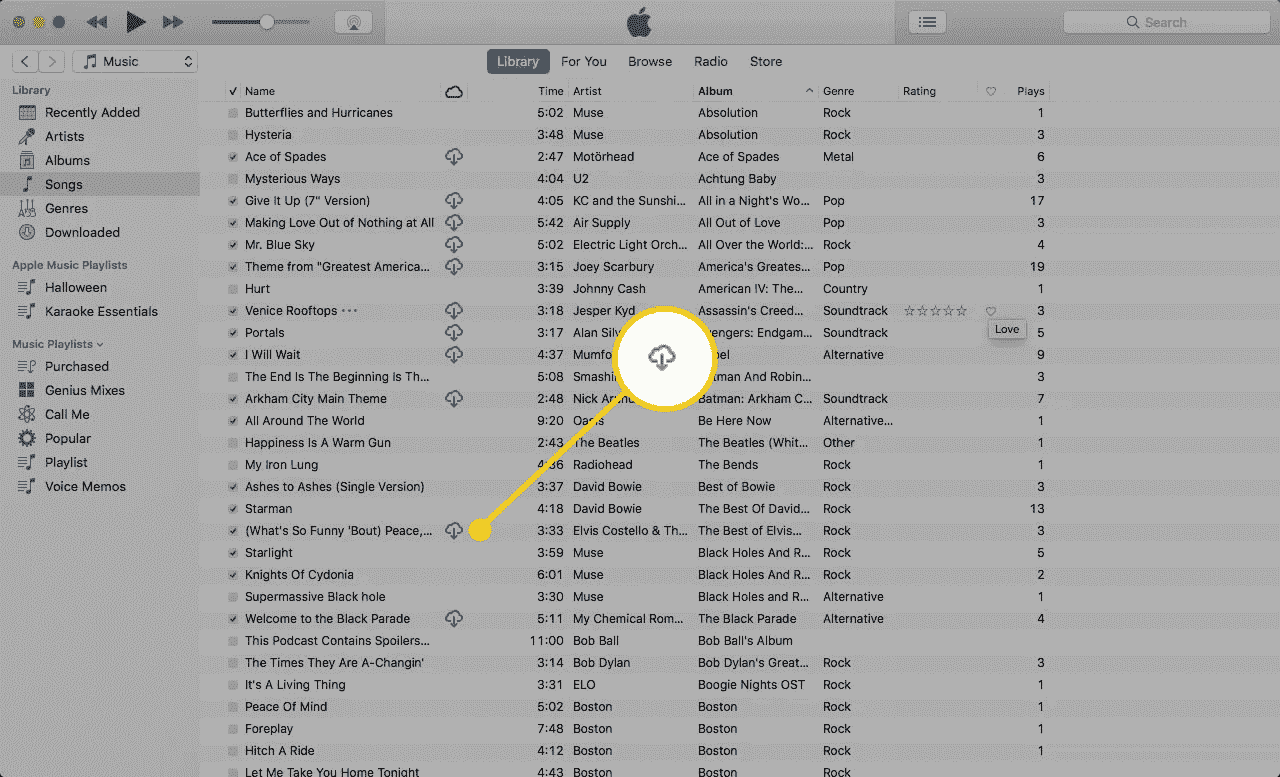
- Now, navigate to your iTunes application and proceed to your curated playlists by clicking on the Music tab first.
- To copy all the songs you have, hold down the Ctrl button while selecting all the items inside the playlist. After doing so, drag and drop them into the folder of your inserted USB.
To transfer an iTunes playlist to another computer, just insert the USB containing the copied playlists into the new computer of yours and then copy and paste them into any local folder you have.
Transfer iTunes Playlist Via A Copy Or Backup Software
In addition to the methods discussed above, you may also utilize backup software to transfer an iTunes playlist to another computer. But you have to take note that the storage space of the new computer must be good enough to save the entire music library you have. If you have it checked already and everything is fine to proceed, see the steps below and learn how to do it.
- Begin with the download and installation of the backup software you have.
- Using your old computer, make sure that iTunes is synced into that device of yours.
- Then through a connector, connect any iOS device or Android you have to your old computer.
- Right after that, with the use of the backup software, you may now start copying all the contents you have copied on your iOS device.
Part 2. Transfer iTunes Playlists to New Computer with iTunes Match
iTunes Match is a paid service from Apple that allows you to store all your music in iCloud, regardless of where it originated from. iTunes Match offers an easy way to transfer an iTunes playlist to another computer. It can sync your music collection across all Apple devices you have. Apart from that, it makes sure that there is also a backup copy of this music collection of yours that could be found on the web.
Here is how to use iTunes Match to transfer an iTunes playlist to another computer.
- Launch your iTunes on computer A and then proceed to iTunes Store next.
- Scroll all the way to the bottom, and under Features, tap iTunes Match.
- Click on Add This Computer, and enter your Apple ID password when prompted.
- After a few seconds, your iTunes library is now available in iCloud. Click Done at the bottom right corner of the screen, which will take you to your library.
- Open the iTunes application on the other computer. Sign in with your iCloud account and then go to iTunes Store.
- Tap the Store menu and do not forget to enable the iTunes Match application.
- A few minutes after doing that, all of the music files you uploaded to your iCloud account will be downloaded on your new computer’s iTunes library.
Note that to transfer an iTunes playlist to another computer using iTunes Match, you will preserve all your playlists, play count, ratings, and other metadata linked to your tracks. If everything goes according to plan, you will have an exact clone of your library on your old computer.
Part 3. Transfer iTunes Playlists to Another Computer through AMusicSoft [100% Work]
If you are well equipped with iTunes and Apple Music, you must know about the limitations that you might get through when it comes to the number and type of devices that you may use in streaming the music. Only the authorized ones are those that can access them. This is because the DRM encrypted the music files to protect them. So, to make sure that they can be played on your new computer, despite the type or what model it is, you must be able to remove the DRM from the songs and have them converted into a music format that could be accessed in every device. How can you transfer an itunes playlist to another computer without iOS devices like iTunes or iTunes Match?
The process of DRM removal is only possible if you will use a professional third-party application. This is because iTunes itself is not capable of such a procedure. To share with you the best tool that you may use, it is no other than AMusicSoft Apple Music Converter. Aside from DRM removal, conversion and download are also included in its offered services. So, you can play iTunes on Alexa, Google Play, MP3 players, and more. Note that this tool can help you transfer an itunes playlist to another computer within just a short time because it can work at a 16x faster speed. But of course, its fast working speed has nothing to do with the results. AMusicSoft makes sure that it only provides high-quality audio.
One last thing is that you will surely find it very easy to use. Because of its interface’s simplicity, you can quickly know what button to click next and so on. Let us see below how easy it is to use AMusicSoft Apple Music Converter.
- Via any browser you have, direct to AMusicSoft official page and download the Apple Music Converter from it.
- After the successful installation of the application, open it and start adding your iTunes music collection by just selecting them from your library. To do this, tick the box before each song title.

- Now, it is time to choose the output format that you wish to use. To name the supported formats in AMusicSoft Apple Music Converter, you can have MP3, WAV, AAC, FLAC, AC3 and M4A. After the output format selection, choose an end folder where to save the converted songs.

- Then tap the Convert button and wait until the conversion process is done.

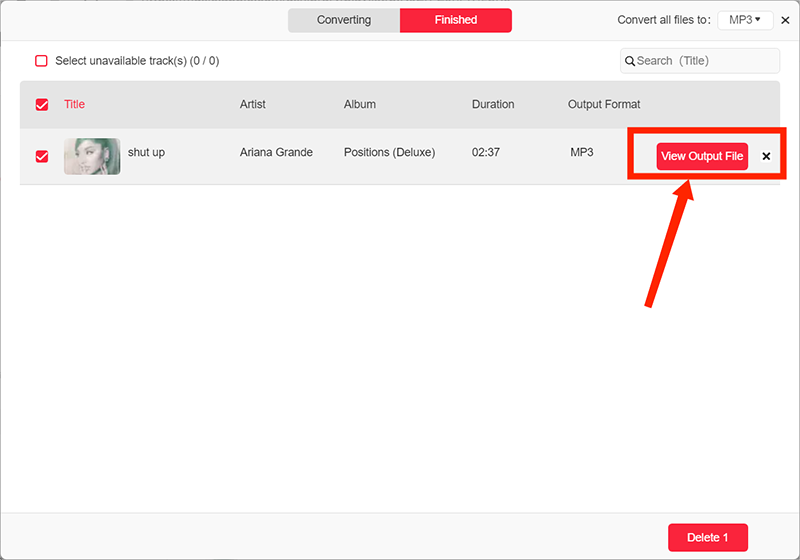
- If the songs are already converted, click the Converted menu above and download all the songs.
After downloading all the converted songs on your old computer, you may use an external hard drive or USB to transfer an iTunes playlist to another computer. Just follow the guide that was discussed above.
Part 4. Conclusion
There are many ways to transfer an iTunes playlist to another computer. You may choose from using iTunes Match, USB flash drive, external hard drive or through iTunes itself. All of these methods are very recommended, but since you are thinking about enjoying the songs in the long run, you should use AMusicSoft Apple Music Converter instead. This will help you in saving a local copy of your Apple Music favorites.
People Also Read
- How to Transfer iTunes Backup to iCloud
- Easiest Methods To Export iTunes Playlist To Spotify
- Best Ways: How to Export Songs From iTunes
- The Best Way To Transfer iTunes To Spotify
- Why Is iTunes Splitting Albums Into Two?
- Three Ways To Upload iTunes Music To Google Play
- Best Way to Copy iTunes to USB For Car
- “How Do I Get Alexa To Play My iTunes Music” - Solved!
 About The Author
Robert Fabry is an ardent blogger, and an enthusiast who is keen about technology, and maybe he can contaminate you by sharing some tips. He also has a passion for music and has written for AMusicSoft on these subjects.