How To Download Music From iCloud To iPhone/iPad?
If you want to know how to restore the Apple Music library on iOS devices, you'll like the guide on how to download music from iCloud to iPhone and iPad here. Though Apple Music is a large and well-known music streaming platform all across the world, many users still encounter problems. For instance, some tracks are lost accidentally. It is frustrating because you invest an amount of time and effort in creating a playlist with your favorite songs.
But don't worry! It is not hard to avoid facing problems such as having your music disappear from your library, it’s better to have them re-downloaded to your device. Here, we will teach you different ways to download music again from iCloud to iPhone and iPad.
Contents Guide Method 1. Download Purchased Music to iPhone with iTunes Store AppMethod 2. Download Purchased Music to iPhone with iTunes/Music AppMethod 3. Download Music to Any Device with Apple Music ConverterConclusion
Method 1. Download Purchased Music to iPhone with iTunes Store App
How to download music from iCloud to iPhone/iPad? If the songs you want to download are bought from the iTunes Store, you can easily get them back in the iTunes Store app on your iPhone or iPad directly. Follow the steps below:
Step 1. Make sure that your iPhone is compatible with iOS 10.0 or later. For iPad, required iPadOS 10.0 or later. Launch iTunes Store on iPhone or iPad.
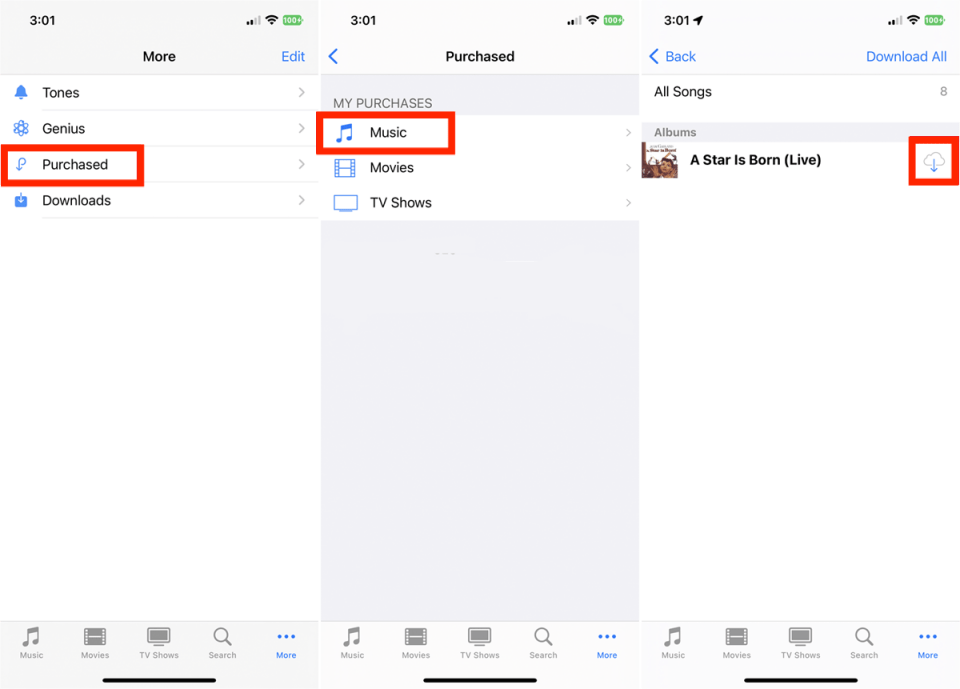
Step 2. At the bottom of the iPhone screen, tap on More > Purchased > Music. On the iPad version, tap the Purchased icon at the bottom and select Music.
Step 3. Now you can see a list of all the tracks you've purchased using your Apple ID account. To see a list of all tracks, tap "All Songs." If a track has a Play button, it's already downloaded to the phone. If you instead see a cloud, it's purchased but not downloaded. Tap the cloud icon to download it.
You may be interested: How To Purchase Songs From iTunes Store >>>>
Method 2. Download Purchased Music to iPhone with iTunes/Music App
How to download music from iCloud to iPhone and iPad if you'd rather redownload your music from a computer? Since there is no desktop app for the iTunes Store, you need the help of iTunes and the Apple Music app. Here's how to do it with your Windows or Mac computer.
Redownload Music with iTunes
Step 1. Open the iTunes app on your Windows PC or Mac (macOS Mojave or earlier), choose Music from the pop-up menu in the top left, then click Store.
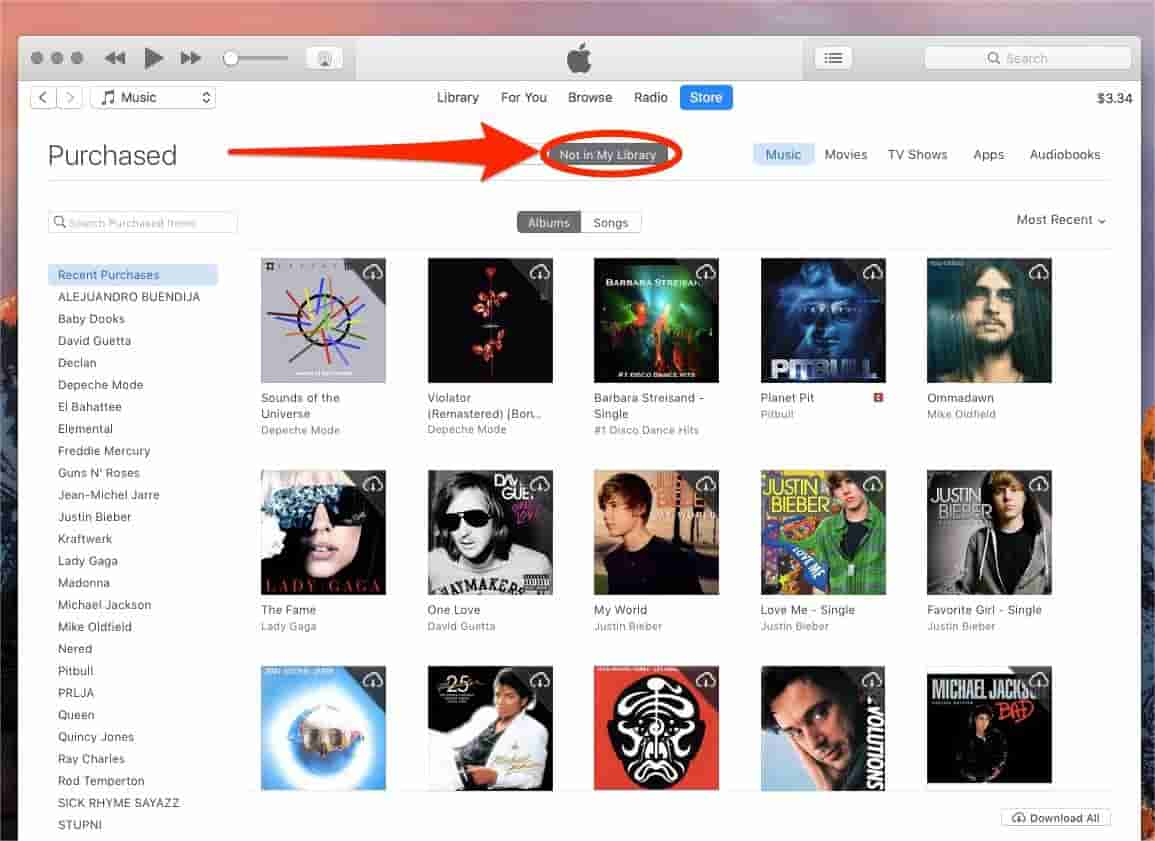
Step 2. Click Purchased near the top right of the iTunes Store window. On this page, you can choose Music, Movies, TV Shows or Audiobooks. Here we click on Music.
Step 3. Click the All option. You can view all your past purchases. To download an item, click its Download button (cloud icon). You can also click the Download All button in the bottom-right corner of the interface.
Step 4. If you want to redownload only the previously purchased music not already downloaded on this computer, click Not In My Library near the top of the interface, then click the Download button. iTunes starts downloading all previously purchased songs and albums.
Step 5. Connect your iPhone/iPad to iTunes and click the Device tab. Choose Music from the Settings section. Then check the Sync Music option and choose the origin of the songs you want to download to your device. Finally, click Apply to get the songs from iCloud to your iPhone/iPad.
Redownload Music with Apple Music
How to download music from iCloud to iPhone/iPad using the Apple Music app? Beginning with Macs running macOS Catalina and later, iTunes was replaced by separate apps. So if you are using the newest Mac, you should find the iTunes Store from Apple Music. Follow the steps outlined below.
Step 1. Open the Music app on your Mac, and make sure you have authorized your computer to play iTunes Store purchases. Click iTunes Store in the sidebar. If it isn’t shown there, choose Music > Settings > General, make sure iTunes Store is selected, then click OK.
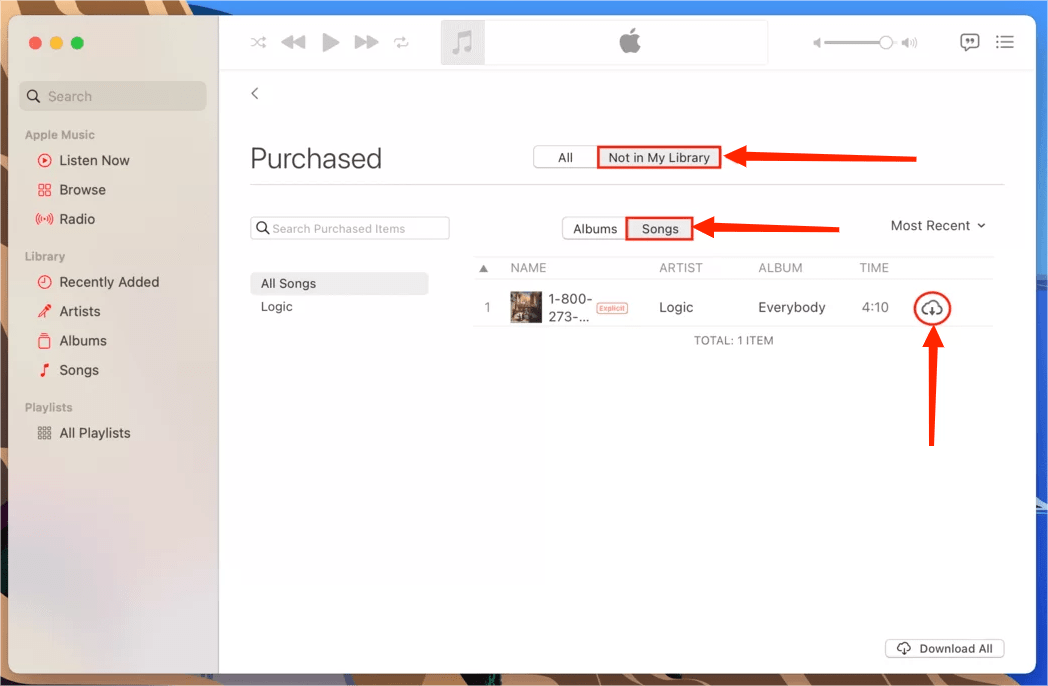
Step 2. Click Purchased on the right side of the iTunes Store window. If you want to redownload only the previously purchased music not already downloaded on this computer, click Not In My Library near the top of the interface, then click the Download button. iTunes starts downloading all previously purchased songs and albums. To download all items, click the Download All button in the bottom-right corner of the interface.
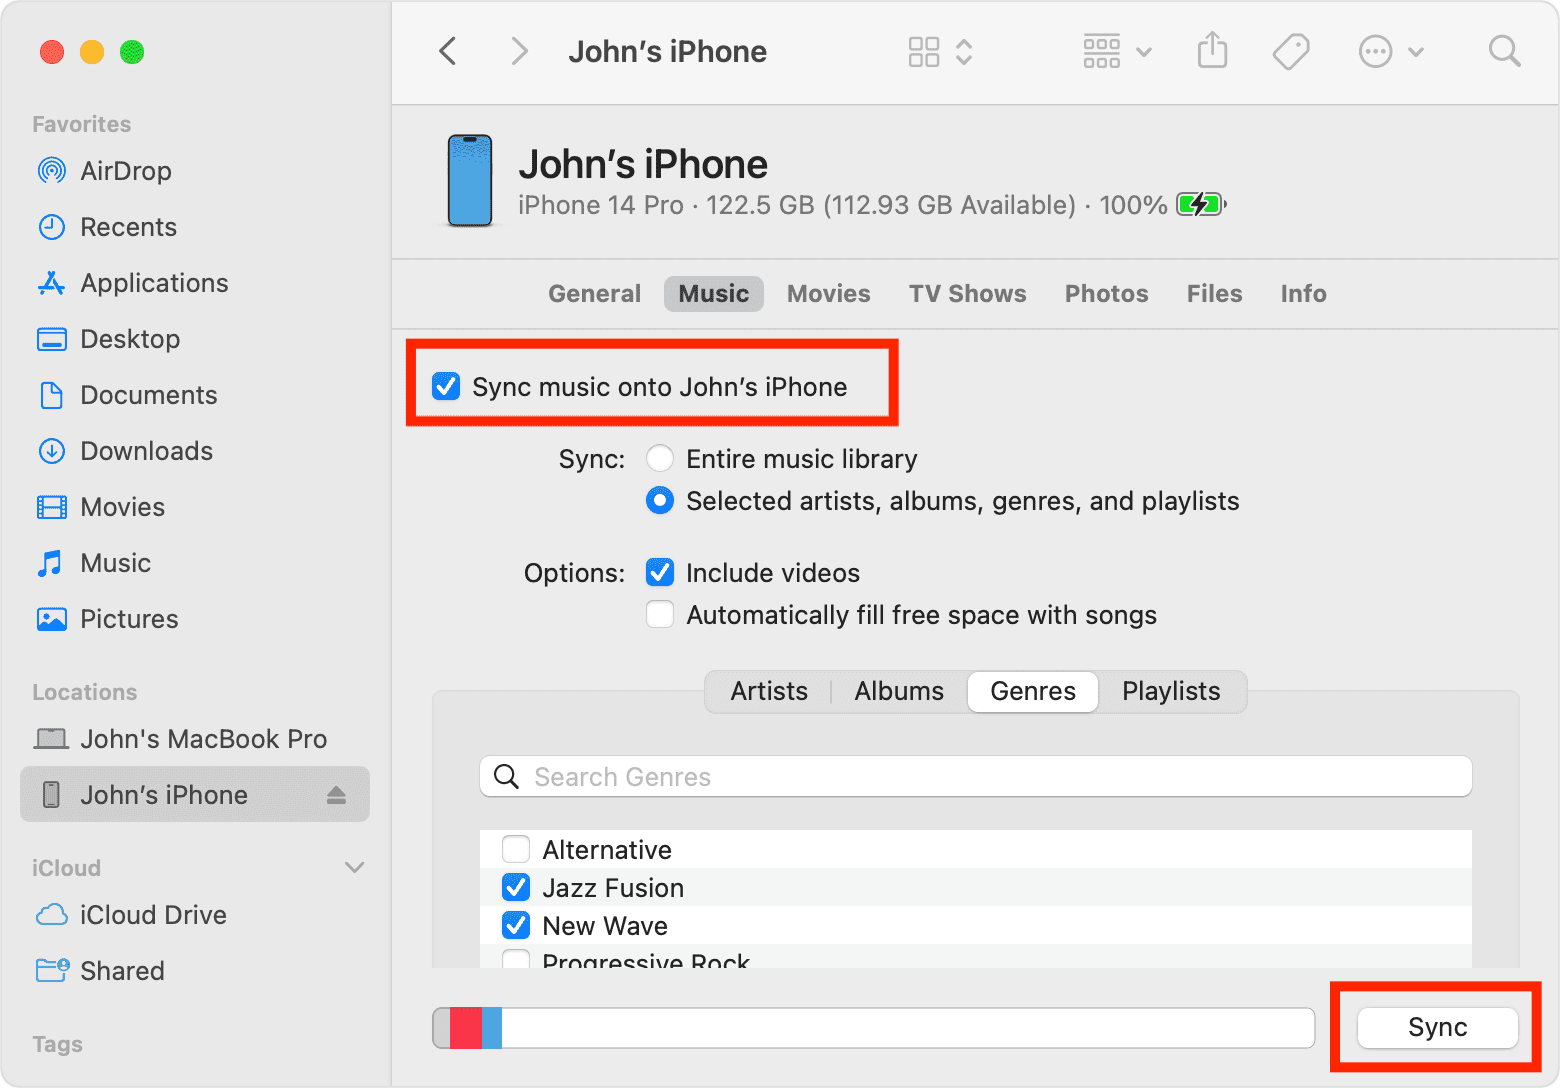
Step 3. Connect your iPhone to your Mac using a USB or USB-C cable. Once done, you will see the device in the Finder sidebar. Click your iPhone in the Finder sidebar. Click Music in the button bar. Select the "Sync music onto [your iPhone name]" tickbox to turn on the syncing of your music. With the tickbox selected, syncing is set to transfer all your music to your device. Here you can sync the entire music library or choose "Selected playlist, artists, albums and genres". When you’re ready to sync, click Sync.
By following all the procedures above, you can now learn how to download songs from iCloud to your iPhone. But there are some issues. For example, iCloud requires a stable and strong internet connection to sync your library. In other words, if you don't have a good internet connection, the sync will fail. Plus, the music you downloaded cannot be played on non-Apple devices. Is there an easier way to download and transfer your songs to any device or media player?
Method 3. Download Music to Any Device with Apple Music Converter
We have shared how to download music from iCloud to iPhone using the iTunes Store app, iTunes and Apple Music app above, you can try out which one applies to you. However, the songs you download via these apps can't work with non-Apple devices because all audio content on Apple Music and iTunes is protected and restricted with digital rights management (DRM), allowing only authorized devices to play.
Due to DRM, you can't open Apple Music song files to your own music players, even though you have downloaded them on your device. To improve the compatibility of Apple Music files, you can remove DRM first. There are lots of Apple Music DRM removal tools that can make Apple Music songs not DRM-protected with ease. AMusicSoft Apple Music Converter is the best choice and you can have a quick look at it here.
AMusicSoft Apple Music Converter can remove DRM from Apple Music and iTunes while keeping the original quality preserved. With a batch conversion feature provided, you can convert them to DRM-free MP3, MP4, AAC, M4A, FLAC, WAV, or other mainstream format files with lossless audio quality. All of these formats can easily be accessed and kept on any device, so playing them anytime and anywhere you want wouldn’t be that much concern on device compatibility. In this way, you won’t have the need to access the application ever or connect your device to the internet in order to listen to Apple Music offline. Most importantly, it saves ID3 tags and metadata after conversion for convenient song management.
Step 1. Get the AMusicSoft Apple Music Converter application from the official website by simply hitting the Download button. Once the download is complete, you should proceed with the installation.
Step 2. Launch the AMusicSoft Apple Music Converter and its built-in Apple Music web player will load your music library automatically. Then add Apple Music exclusives you want to download to iPhone to the interface.

Step 3. The output formats supported in AMusicSoft include MP3, FLAC, WAV, AAC, AC3 and M4A. Select one format to utilize and select the destination folder to save files.

Step 4. Now click on "Convert" button to start converting your Apple Music songs to MP3 at up to 5X faster speed. Soon you will get the DRM-free Apple Music songs and play them anywhere you want.

And as simple as that, you now have tons of songs from Apple Music downloaded and saved on your device forever. If you want to transfer them to your iPhone, connect your device to your computer using a USB cable, and sync your computer to your iPhone.
Conclusion
Now that you have finally learned how to download music from iCloud to iPhone using the different methods we have introduced here. Don't hesitate to give all the aforementioned solutions a try to download music on your iPhone and iPad. And if you want to play music on any device without limitations, you can always download and install AMusicSoft Apple Music Converter on your computer. This converting tool is 100% reliable and very helpful! So what are you waiting for? Download and try out the wonders AMusicSoft Apple Music Converter can give you!
People Also Read
- Top Websites To Visit For Downloading Music And Movie
- Can You Download Apple Music On A Roku TV?
- Detailed Guide On How To Download iTunes Library
- How To Download Whole Library On Apple Music?
- How To Download MP3 From iTunes And Apple Music For Free?
- Fixed Guide: Why Does My iPhone Keep Deleting My Music
- Fix Apple Music Not Downloading Songs To iPhone Problem
 About The Author
Robert Fabry is an ardent blogger, and an enthusiast who is keen about technology, and maybe he can contaminate you by sharing some tips. He also has a passion for music and has written for AMusicSoft on these subjects.