If You Cancel Apple Music, Do You Keep The Songs?
Apple Music is a monthly subscription. If you want to try it out first, you can get a free three-month subscription. That’s not a bad deal at all. You can download songs and play them offline even if you’re on the free three-month trial. After the free trial, you can decide to proceed to a monthly subscription.
What if you sign up for their paid service only to end up changing your mind? In other words, if you cancel Apple Music do you keep the songs? It’s worth noting that you are automatically upgraded to Apple Music’s paid service once the free trial is up. Three months is long enough for you to decide if you want to proceed to their paid service.
There’s nothing wrong if you do decide to proceed to a paid plan. However, you can always cancel it anytime. This article will show you the sheer consequence of canceling your Apple Music account. Furthermore, it will also show you ways on how to keep your songs from Apple Music. Read on.
Contents Guide Part 1. See The Consequence of Canceling your Apple Music AccountPart 2. If You Cancel Apple Music, Do You Keep the Songs? Part 3. Conclusion
Part 1. See The Consequence of Canceling your Apple Music Account
The playback feature of Apple Music on a free trial makes it a cut above the rest. Most music streaming services won’t allow you to playback songs. Even worse, they’re going to be bombarded with ads if you’re on their free trial period. Well, Apple Music stands out because it not only allows playback, it also spares you from those annoying ads. You can enjoy all your songs with no interruption at all. It’s as if you’re on a premium plan but you’re not.
With the playback feature, it’s pretty obvious that you can download songs. But you might wonder about the sheer consequence of canceling your Apple Music. Will you be able to keep the songs? Be it a free or paid subscription, the answer to the question is a big no. Truth be told, you are only given access to the songs on Apple Music. Having said that, you don’t own any of the songs that you have downloaded from it.
That is the sad truth about it. Apple Music doesn’t give you the right to own the songs. They protect their songs with DRM or Digital Right Management to prevent you from transferring them from unauthorized computers or devices. That pretty much limits your usage of the service.
If that’s not enough, you immediately lose the right to access the songs once you cancel your subscription. The minute you terminate your Apple Music subscription, access to the songs is denied, including the ones you have downloaded. They will slowly disappear from your authorized computer or device.
The Good News
Don’t get too disappointed right away. The good news is that there are ways for you to keep the songs from Apple Music. In this age of technology, there are ways and means to keep your favorite songs from Apple Music. if you’re wondering about the legality of downloading and keeping all your favorite songs from Apple Music, don’t.
As long as you don’t use your downloads song for commercial purposes, you won’t get in any kind of trouble. Hence, you can only use it for your personal consumption. Read on and find out how you can keep all your favorite songs from Apple Music for a very long time.
Part 2. If You Cancel Apple Music, Do You Keep the Songs?
Don’t think for one minute that your only recourse to enjoy songs from Apple Music is a continued paid subscription to their service. Well, if you want to spend about ten dollars a month, you could just go on.
If you’re a student, they have a student plan that’s lower than that. Their student plan goes for about five dollars a month. However, you would have to be approved by Apple first. You would have to submit some requirements to show proof that you are a student. Furthermore, they have a list of approved U.S.-based universities.
They also have a family sharing plan that seems pretty reasonable. It goes for about 16 dollars a month and six people can share the account. That’s a good deal, that is if you want to share an account.
Needless to say, the three plans require to pay a monthly fee. Paying a monthly fee could eventually be burdensome especially in the long run. If you want to be spared from paying a monthly fee, you can take at the options below. These are awesome options that can help you keep the songs from Apple Music even if you do decide to cancel your subscription.
Option #1. Use the AMusic Apple Music Converter to Download Songs
Spare yourself the burden of paying a monthly fee by availing of the AMusicSoft Apple Music Converter. Using the AMusicSoft Apple Music Converter is a superb way to keep all your downloaded songs from Apple Music. What’s stupefying about it is that you can use it while you’re signed up with Apple Music’s free trial. That should be enough to get you to look into the program. Below are the straightforward steps on how to use it.
- Download the AMusicSoft Apple Music Converter
- Add Your Favorite Songs from Apple Music
- Change Format
- Adjust Settings of Output and Download
The steps below have been broken down to give you a more descriptive picture of the usage of the AMusicSoft Apple Music Converter.
Step 1. Download the AMusicSoft Apple Music Converter
You can download the AMusicSoft from its website. After you have done so, wait for it to install. You don’t have to worry about any kind of program that’s bundled with this particular Apple Music converter. This is a safe program. After installing it, make sure to launch it on your screen.
Step 2. Add Your Favorite Songs from Apple Music
The AMusicSoft Apple Music Converter does not require you to navigate from one program to another. As a matter of fact, there’s no need for you to launch your Apple Music account to add your favorite songs to this particular music converter. When you click on Music on the left-hand side of the program, all the songs from your Apple Music will show up on the main screen. To add the songs you want to download for keeps, simply select them.
Step 3. Change Format
The AMusicSoft Apple Music Converter provides you a long list of file format options so that you can change the file format of your output. The good thing about this particular program is that it removes the DRM from your Apple Music songs.
To do that, you just have to choose a file format that’s DRM-free. Converting to a DRM-free file format will give you more flexibility with your output. So, feel free to change the file format of your songs so that you can play it on a wider range of media players.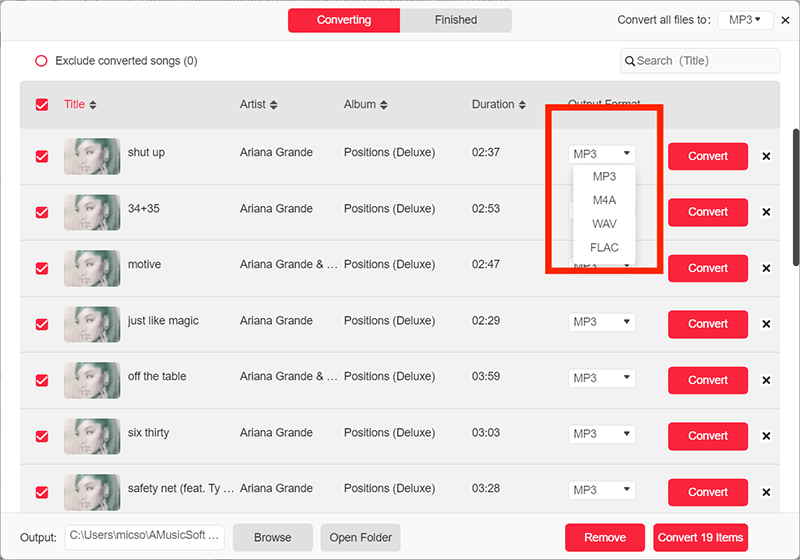
Step 4. Adjust Settings of Output and Download
You also have the option to adjust the settings of your output. If you want to change the bitrate, you can go right ahead. Don’t forget to choose a destination for your output. Once you have done all that, you can proceed to download your song.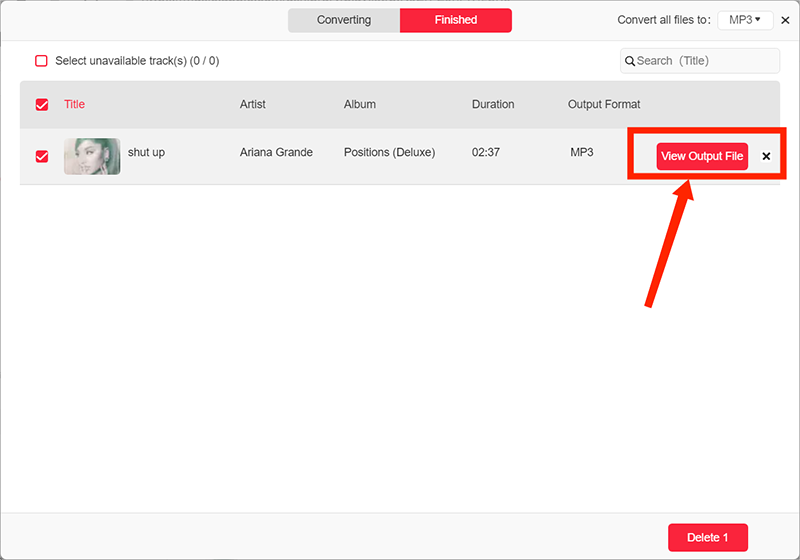
Option #2. Use the Sidify Apple Music Converter
This is another program you can consider using. The steps below will show you how to use it.
- After you have downloaded and installed it, launch it on your screen. Take your cursor to the + sign on the top, left-hand corner of the screen. Click on it to add your music files.
- Another window will appear soon as you click on the + sign. In this window, take your cursor to the Library, which is on the left-hand side of the screen, and click Music. That will prompt all your music files to appear on the main screen. Then select the songs you want to convert and download for keeps.
- Click on the gear icon on the top, right-hand side of the screen to customize your output. That will prompt the Preference window to appear. On this particular window, you can proceed to convert the setting of your output.
- Click on the Convert tab. A small dialog box will appear showing the conversion process. Wait for it to finish.
Option #3. Use the Apple Music Converter from Softpedia
This is a free program that you can look into as well. Just keep in mind the repercussions of using a free program. The steps below will show you how to use it.
- Go to the Softpedia website and click and search for the Boilsoft Apple Music Converter.
- Click on the blue Download Now tab. Launch the program and click on Music under Playlists.
- Choose the songs you want to keep forever and click on the Convert tab on the top menu.
Part 3. Conclusion
The bottom line is that you can only keep the songs if you use an Apple Music converter. Now that you are aware of the consequence of canceling your Apple Music subscription, you can work around it. The most recommended way to work around it is by using the AMusicSoft Apple Music Converter.
There’s no need for you to worry about the consequences of canceling your Apple Music subscription. Just make sure to convert all your songs using the AMusicSoft Apple Music Converter before you decide to terminate your subscription.
Keep in mind that Apple Music automatically upgrades you to a paid subscription. To avoid that, make sure to use the AMusicSoft Apple Music Converter while you’re on the free three-month trial. The sooner you convert your Apple Music songs, the better.
Which of the three options are you willing to try? Feel free to share your thoughts with us.
People Also Read
 About The Author
Robert Fabry is an ardent blogger, and an enthusiast who is keen about technology, and maybe he can contaminate you by sharing some tips. He also has a passion for music and has written for AMusicSoft on these subjects.