How To Create And Edit Spotify Playlist? (Spotify Tricks)
It is easy to edit Spotify playlist, you just have to follow some tips and procedures on how to do it and your Spotify playlist will never be the same anymore. You can even put something on the title of the song if it is for your eyes only and even change the placement of it. Imagine, you can edit a specific song on Spotify, how can this be possible?
Technically it is not allowed; with all the restrictions that we have to consider, we can have a problem in the process of doing so. However, technology has its own ways of pleasing us, with the right tool; anything could be possible these days.
Yes, even the hardest situation to deal with or even the most impossible thing to do can be possible, even the way or method that you can be able to edit Spotify playlist. If you are interested this article will talk about how to do it, and if this seems too interesting for you, you can start joggling through your pen and notebook as we learn how to do it.
Contents Guide Part 1. Create and Edit a Spotify Playlist on Mac/WindowsPart 2. Create and Edit a Spotify Playlist on Android/iOSPart 3. Bonus Tip: Download Spotify Playlists Without PremiumPart 4. To Summarize It All
Part 1. Create and Edit a Spotify Playlist on Mac/Windows
So, the first thing that we must learn is how to do it. How can we edit Spotify playlist? There can be a lot of methods, let us start discussing them one by one.
Method No. 1. Edit The Description, Image, And The Title
- Launch the Spotify application on your desktop computer or your Mac computer.
- Go to the playlist that you have chosen to edit. You can see the list of your playlists in the left column under the “PLAYLISTS”.
- You will then see the three dots at the top of the playlist and below the title of the playlist, click it.
- Then tap on “Edit details”.
- You can now type in the title that you want, you can choose any name you want as long as it has one hundred (100) characters long.
- You can also type a playlist description if you want to easily identify and separate the playlists based on what songs they contain.
- You can now upload the image that you want to represent the songs in the playlists that you have made. By default, you will see a collage made of album covers as the image that will represent your album but you can click “Replace Image” then upload a new image file from your computer if you want.
- The last step is to save the changes that you have made to be able to have it reflected on the next days that you are going to access your playlists.
Method No. 2. Add The Playlists That You Want
- Launch the Spotify application on your personal computer or mobile device.
- At the top part of the screen, tap the search bar to look for the songs that you want to add. To your playlists.
- Then type in the name of the artists, the title of the album, or the title of the song that you want to add.
- Once you have successfully landed on the page of your most wanted songs, click the three dots that will appear beside the name of the track that is between the track length and date fields.
- Once you have clicked it, a menu will appear.
- You then have to click “Add to Playlist”, once you have clicked it the list of the playlists that you have will appear.
- Then click the song that you want to add to your playlist. Once you are done you can now check if the song that you have chosen was already added to your playlist.
Method No. 3. Remove The Songs That You No Longer Listen To
- Launch the Spotify application on your mobile devices or using your personal computers.
- Go to the playlist that you want to edit, you can be able to see the lists of your playlists on the left column under “Playlists”.
- Go to the song that you want to delete or remove, click the three dots beside the title of the song, right part.
- Once you have clicked the three dots, a menu will appear.
- To be able to remove a song from your playlist, you have to click the “Remove from this playlist” on the menu that will appear.
Method No. 4. Change The Order Of Songs
- Launch the Spotify application on your mobile devices or personal computers.
- Choose the playlist that you want to edit, to be able to see your lists of playlists go to the left column under “Playlists”.
- Go to the song that you want to move, click and hold to be able to move it.
- You can start dragging the track to the location where you want to place it.
Part 2. Create and Edit a Spotify Playlist on Android/iOS
Aside from the methods that we have discussed there are other ways to edit Spotify playlist, and this can be done through the use of some applications. In this part, we will be sharing with you some of the top applications that you can use to edit Spotify playlist. Let us start!
Part 3. Bonus Tip: Download Spotify Playlists Without Premium
We have discussed some of the good tools that you can use to edit Spotify playlist, but would you be surprised if we tell you that there is a tool that can cater the best for you when it comes to editing your playlists? The tool that we are talking about is a professional converter that helps you convert your files for you to easily do anything that you want with them. For instance, you can convert your Spotify files to MP3. It is called the AMusicSoft Spotify Music Converter.
This tool will help you to easily edit your Spotify playlist by converting them to file types that are more versatile so that you can be able to enjoy these songs even though you are using a non-iOS device or devices that are not authorized by Apple. Actually, you have to know all about the amazing features that AMusicSoft Spotify Music Converter can cater to you, so we have created a list for you.
- If you believe that time is gold, you must be one of those music lovers who will definitely fall for this professional converter. With the help of AMusicSoft Spotify Music Converter, you can be able to convert song files in just a matter of a few minutes, helping you to easily organize your playlists depending on how you want your songs to be grouped. You can even have a whole playlist or a whole album be converted in just one go, you do not have to manually input a song after the other one just to have them converted.
- You also do not have to remain subscribed to Spotify and avail of their premium subscription just to be able to have the luxury to download and enjoy other benefits that can only be enjoyed by premium subscribers. With the use of this professional converter, you can also feel like you are a premium subscriber helping you save some money that you can use for other essential things that you need.
- The conversion of files will only take you a few minutes but this professional converter will assure you that the quality of songs will remain best and lossless. AMusicSoft Spotify Music Converter will assure you that no quality of any song will be compromised even under the fast conversion of songs.
- AMusicSoft Spotify Music Converter helps to diminish the Digital Rights Management or DRM so that you can easily transfer the songs to any device that you want to use even though the devices that you are going to use are non-Apple devices.
- AMusicSoft Spotify Music Converter is very easy to use; you just have to follow three easy steps to be able to use the professional converter.
- AMusicSoft Spotify Music Converter has a very easy-to-understand interface wherein you can easily see things that you need such as the “Search Bar”, the “Menu” tab, and the “Convert” button.
- AMusicSoft Spotify Music Converter can help you convert your files to a lot of file types, you just have to choose which one will suit your needs, you can choose from WAV, FLAC, MP3, MP4, AAC, AC3, M4P, and a lot more.
Here are the steps on how you are going to use the AMusicSoft Spotify Music Converter.
Step 1. The first step is to look for the converter and then you have to download it and then install it on your desktop computer.
Step 2. The second step is for you to run the software next you have to click the “Open the Spotify Web Player” tabs. Prepare to input all your Spotify account credentials.
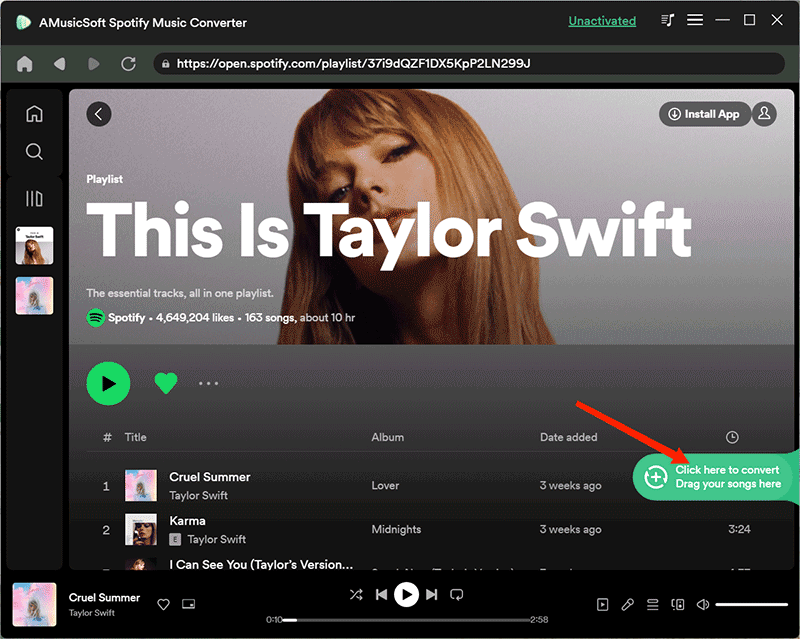
Step 3. Start looking for the songs, albums, or playlists that you want to convert. You can try to drag the playlist that you have chosen and then drop the green action button that is located on the lower part of the interface.
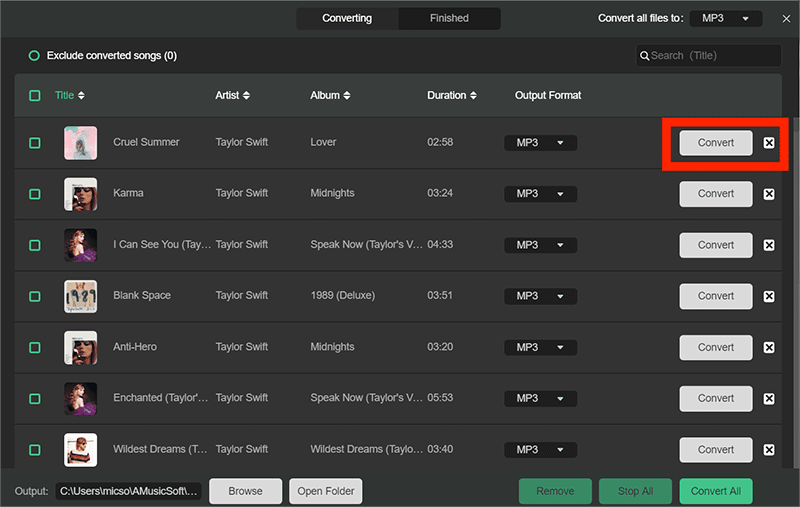
Step 4. Fourthly, you have to create a folder that will serve as storage for the music files that you are going to convert.
Step 5. Lastly, tap the “Convert” button.
Part 4. To Summarize It All
There are a lot of ways that we can edit Spotify playlist; we have made a list that can really help you with how you do it so that you can be able to enjoy the songs that you love to listen to. Aside from the methods and tools that we have selected for you we also have shared with you the best tool that you can use, the AMusicSoft Spotify Music Converter. We hope that you have learned things that can help you edit Spotify playlist you love. You can always make ways so that you can enjoy all the songs that you want to listen to and keep with you for as long as you want.
People Also Read
- How To Play Spotify On Wii U: Things That We Need To Learn
- How To Import Music From Spotify To Windows Media Player
- How to Play Spotify Music on Discord: A Guide for You
- Can I Play Spotify on Media Player: Learn More Here
- Is Spotify Free on PS4: Here Is The Answer
- Spotify Plugins: Somethings You Should Know
- How to Upload Spotify Music Playlist to YouTube
- Groove Music vs Spotify: Which Is Better
 About The Author
Robert Fabry is an ardent blogger, and an enthusiast who is keen about technology, and maybe he can contaminate you by sharing some tips. He also has a passion for music and has written for AMusicSoft on these subjects.