Tips You Need to Know about How to Backup iTunes Music
We can’t just throw away our iTunes music. They’re too precious. After all, we had spent a lot to purchase music from iTunes. The best thing to do with our iTunes music is to save and back them up. This article will show you ways on how to backup iTunes musicso that you’ll never have to worry about losing it.
Keep in mind that the computer or device where we store our iTunes music can always get lost or damaged. Anything can happen to it. So, if our iTunes music isn’t backed up, then we’re bound to lose it forever. That is something we wouldn’t want to happen to our precious iTunes music.
Contents Guide Part 1. Should You Back Up iTunes Music?Part 2. How to Backup iTunes Music by ConvertingPart 3. How Do I Backup My iTunes Library to an External Hard Drive?Part 4. How to Backup iTunes Music via Time MachinePart 5. Conclusion
Part 1. Should You Back Up iTunes Music?
There are two valid reasons why we should back up our iTunes music. The number one reason is that iTunes music is gone. Truth is, it has been replaced by Apple Music. There’s no way you can ever replace the music you had purchased from it. Hence, you need to back it up.
The second reason is that you can always lose the hardware where you have your iTunes music stored. Considering the fact that it would be totally impossible for you to replace your iTunes music, you would really need to back up. So, the question is, how can you back up iTunes music?
Part 2. How to Backup iTunes Music by Converting
The good news is that you can always back up your iTunes music. Even the protected iTunes music can be backed up.
As long as you convert the DRM-protected iTunes music, you will be able to transfer it to another device as a backup. Converting DRM-protected music is pretty much a way of how to backup iTunes music. Below are ways for you to convert your iTunes music so that you can transfer it to another device as a backup.
Option #1. Use the AMusicSoft Apple Music Converter
Using the AMusicSoft Apple Music Converter is the simplest way to back up your iTunes music. It instantly converts your iTunes music, removing the DRM in the process. When the DRM is stripped off from the iTunes songs, it’s going to be pretty easy for you to duplicate or transfer the songs.
You will have more than enough backup copies of your iTunes music. Take a look at the steps below to see how the AMusicSoft Apple Music Converter can help you back up your iTunes music.
- Install AMusicSoft Apple Music Converter on Computer
- Add iTunes Music
- Choose File Format for Output
- Transfer to Another Device
Keep on reading the detailed steps listed below. You will have a better idea as to how you can use the AMusicSoft Apple Music Converter to back up your iTunes.
Step 1. Install AMusicSoft Apple Music Converter on Computer
To install AMusicSoft Apple Music Converter on your computer, you would need to download it first from its official website. Launch it soon as the installation is done.
Step 2. Add iTunes Music
When you see AMusicSoft Apple Music Converter on your screen, the first thing you will notice its single-window interface. Once you launch it on your screen, there’s no need for you to click to get to other windows. What you see on your screen is all you need to convert your iTunes music. To add your iTunes music, you just need to click on Music on the left-hand side. All your songs will appear on your screen. Select the songs you want to convert.
Step 3. Choose File Format for Output
The songs you had purchased from the iTunes Store before the year 2009 are all DRM-protected. With the DRM, you won’t be able to download and transfer the music to another device. Hence, you would need to choose another file format for your output to strip the DRM from your iTunes music. Go to the output settings of the AMusicSoft Apple Music Converter and choose a file format like MP3. Then download it. 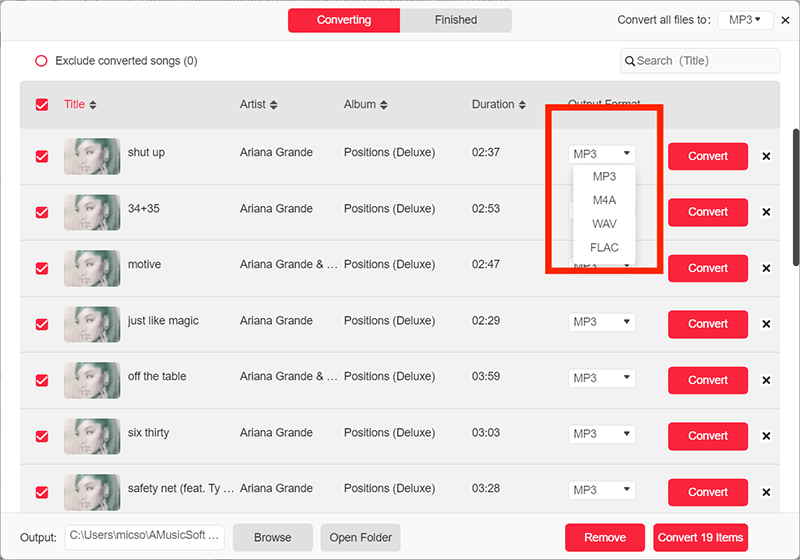
Step 4. Transfer to Another Device
When the output has been downloaded, it will be very easy to transfer it to another device. The output transferred to another device can very much serve as a backup copy for your iTunes music.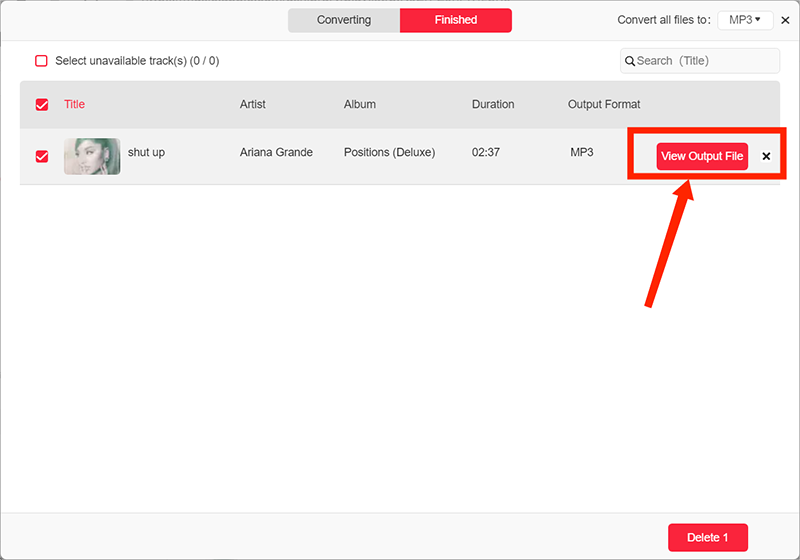
Option #2. Use iTunes to Convert
You can also use iTunes to convert your DRM-protected files. That way, you can duplicate your iTunes music and easily transfer it to another device.
- Launch iTunes. Then click on iTunes on the top menu. Select Preferences.
- A new window will appear. Click on the General tab. Take your cursor to Import Settings.
- A new window will appear again. Go to the Import Using field and click on MP3 Encoder.
- Click on the OK tab. Then go to the top menu and click on File. Select Convert and then Create an MP3 version.
Once you have created MP3 versions of your iTunes music, you will be able to transfer it. That way, you will have backups of your iTunes music.
Part 3. How Do I Backup My iTunes Library to an External Hard Drive?
Backing up iTunes music to an external hard drive is another smart way to keep copies of your precious audio collection. External hard drives are critical storage devices. However, you also need to keep in mind that they are susceptible to damage. Furthermore, you can end up losing it as well.
Hence, keeping as many copies of your audio collection in various external hard drives is very important. The fact that you can always use a program like the AMusicSoft Apple Music Converter guarantees you to have more audio files for backup. Check out the steps below to see how to backup iTunes music to an external drive.
- Launch Preferences from the iTunes menu and select Advanced.
- Click on the Copy files to iTunes Media folder when adding to library section.
- Click on the OK tab.
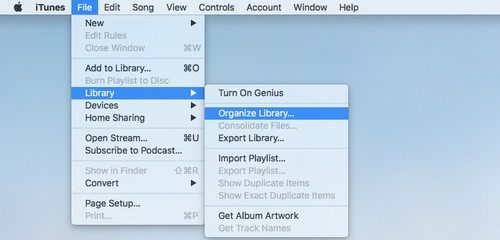
- Go to File and select the Library. Choose Organize Library. Then click on Consolidate files. Click on the OK tab when you’re done and exit iTunes.
- Attach the external hard drives to the computer and open your iTunes folder. Drag songs to the external hard drive.
Part 4. How to Backup iTunes Music via Time Machine
The Time Machine is also a great way to start backing up your iTunes audio collection. The nice thing about using it is that it automatically backs up your audio files. That will save you a lot of time. Keep in mind that for this part, you would need extra space for your backups. One good option for you to manage your space for your backups is to use an external drive. The steps below will show you how to go about using Time Machine.
- Plugin external hard drive. Choose the Time Machine option to back up in the pop-up window by clicking on the Use as Backup Disk tab.
- In case you don’t see the prompt for Time Machine backup, you can set it up in System Preference. Just go to the Apple menu and click on System Preferences. Select Time Machine and that set up the process.
- To start the process for starting it up, click on Select Backup Disk. Then choose your disk. Then click on the Use Disk tab on the lower part of the window.
- Your iTunes audio files automatically back up, which means you don’t have to do anything else. Time Machine backs up every 24 hours and will back up only the files that have been changed.
Hence, you can convert all your iTunes audio files with the use of the AMusicSoft Apple Music Converter and immediately have more backup files.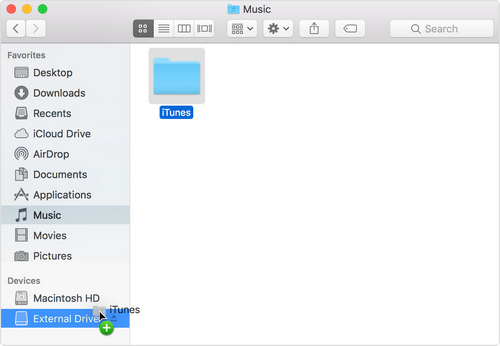
Part 5. Conclusion
There you have it. You can now backup your iTunes music by converting it and transferring it to another device. You can also back up your iTunes library to an external hard drive manually, or simply make use of Time Machine.
If you’re looking for the easiest way to convert your iTunes music so that you can have backups right away, then give the AMusicSoft Apple Music Converter a try. It’s the most recommended option out of the ways mentioned above. Have you backed up your iTunes music? If yes, what kind of ways did you try? Feel free to share your thoughts below.
People Also Read
 About The Author
Robert Fabry is an ardent blogger, and an enthusiast who is keen about technology, and maybe he can contaminate you by sharing some tips. He also has a passion for music and has written for AMusicSoft on these subjects.