How To Change Apple Music Plan On Your Device In 2025?
Apple Music is very considerate to its users by making multiple options to choose from when it comes to the plans or subscriptions that it offers. Each subscription comes with a great price with the Student plan being the cheapest since it is discounted for all qualifying students. If you are in a situation wherein your initial Apple Music subscription is not to your liking, it is very fortunate to know that the procedure on how to change Apple Music plan is just very easy to get done. To learn how to switch Apple Music plans easily, just keep on reading the discussion provided in the coming sections.
Contents Guide Part 1. How to Change Your Apple Music Plan?Part 2. Bonus: How to Listen to Music Without Apple Music Plan?Part 3. Summary
Part 1. How to Change Your Apple Music Plan?
Doing the process on how to change Apple Music plan is very convenient and simple to do. Generally, below are the steps that you have to follow.
Switch Your Apple Music Subscription Via Settings App (iOS)
- The first step to do is to navigate to the Settings app of your iOS device.
- Tap on your name. From the options shown, select the Subscriptions button.
- This will open the Subscriptions section where you will be able to see the all plans that Apple Music offers.
- Among them, choose the one that you want. In order to confirm the changes that you have made, you will be asked to give your Apple ID. In some devices, Touch ID or Face ID is enough.
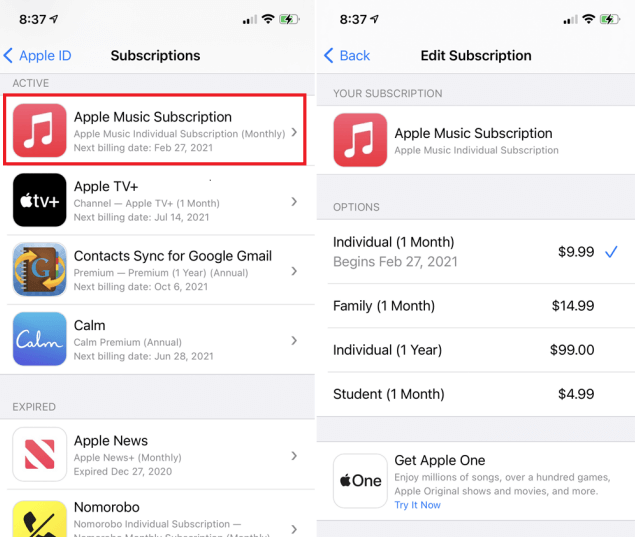
Since the Student subscription plan needs more verification than the remaining ones, you have to prepare the documents needed including your recent ID or registration form to confirm that you are still a student.
Switch Your Apple Music Subscription on Android
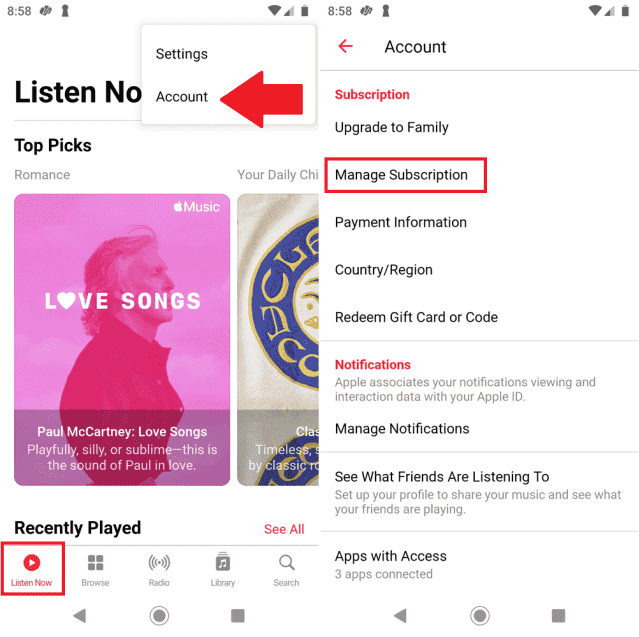
How to change Apple Music plan on non-iOS devices? Android users subscribed to Apple Music can tap the Listen Now icon, then open the three-dot settings menu and select Account. From there, choose Manage Subscription and choose a new subscription plan.
Aside from the procedure above, there are still alternative ways how to change Apple Music plan. Let us say that you currently have a plan but are planning to switch to a different subscription plan instead, the steps to do are just easy and very convenient to perform. Check them out below.
Switch from Individual Plan to Family Plan
- On your device used, tap on the Apple Music application installed.
- Tap the Listen Now tab. Then tap the Account icon in the upper right corner.
- As you can see, there is the option to Upgrade To Family Plan. Select it then.
- Now, tap on the Upgrade button in order to proceed.
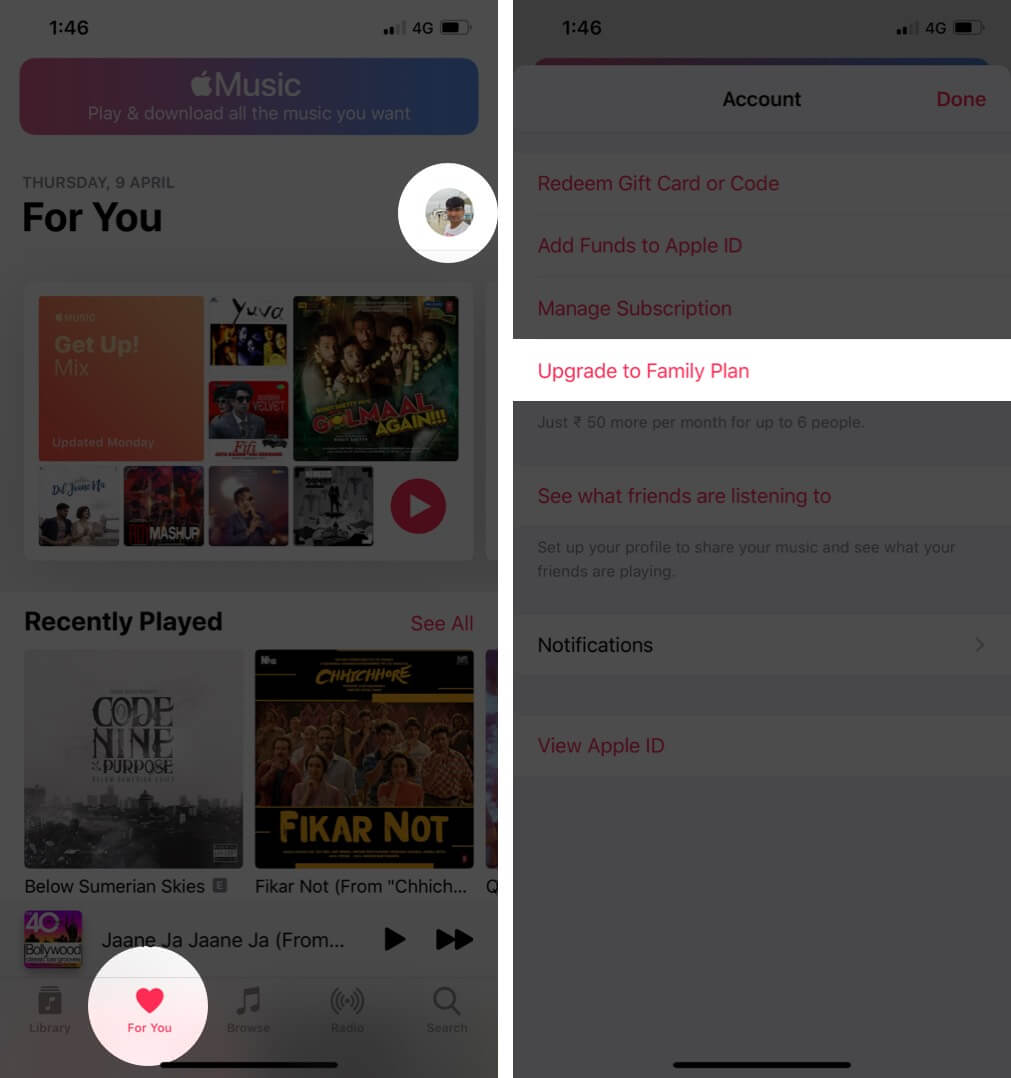
Since you will be using a Family Plan instead, you have to make sure first that you are already authorized and verified to be the family organizer and that you have already set up the Family Sharing feature. If you haven’t done it yet, you can easily configure it on your device’s Settings app and then iCloud.
Switch from Family Plan to Individual Plan
Explained in the procedure below are the steps that must be taken if you wish to know how to change Apple Music plan from Family to Individual. Be reminded that this is strictly according to what type of member you were in the Family plan that you previously have.
- Again, get started by opening your Apple Music app on your used device.
- After doing so, click the For You tab and then select the Account option once done.
- In the new window that has opened, click Manage Subscription.
- As you can see, there are two options given and you may select one from Individual (1 year) or Individual (1 month).
Note: If you are the head of the Family Subscription plan before and you suddenly changed your Apple Music plan into Individual, then the members included on the Family plan will automatically lose access to their accounts before. So, before doing this, all of the members must be fully aware of what is to happen, and changing plans must be agreed upon to avoid any problems to occur in the future.
Part 2. Bonus: How to Listen to Music Without Apple Music Plan?
All of the procedures tackled above are quite helpful in learning how to change Apple Music plan. But of course, you will have to remember all of these steps so that doing them at the time you wish on changing yours would be very much easier. Fortunately, aside from getting your Apple Music plan, there is also another way how you can achieve the best music streaming experience without an Apple Music plan and in order to enjoy that, let me help by sharing with you the tool that can give you the said experience.
AMusicSoft Apple Music Converter is a very powerful tool that will enable you to do a lot of procedures. To name them, you will be able to do conversion, download, and Apple Music DRM removal processes. Apart from these things, there are also more to have from AMusicSoft and they are listed below.
- AMusicSoft will allow you to have the best audio quality of the converted Apple Music songs.
- You can reduce the total time that you will be consuming from waiting for the process to end. It has a 16x faster speed of conversion and can finish all other processes multiple times faster than any other converters.
- Can remove the DRM protection from songs which will eventually make the songs unprotected and free from any sort of procedures.
- You may have Apple Music songs converted into MP3, AAC, FLAC, AC3, FLAC, and M4A.
- Trying other music players to stream the songs will also be possible for you.
- You will be capable of offline playback since downloading of songs is supported by AMusicSoft.
Now, you have to follow the steps below in order to use AMusicSoft Apple Music Converter properly.
- Start by downloading AMusicSoft Apple Music Converter.
- After it has been completely installed and launched on your device, it will automatically start with the scanning process and your entire collection will be read in just a few minutes.
- Once it is finished, you will then be able to start the song selection process as well as upload it. This could be done by tapping the box before each song title that you have selected.

- If you are done, choose the output format that you want to have and then allot a destination folder as well.
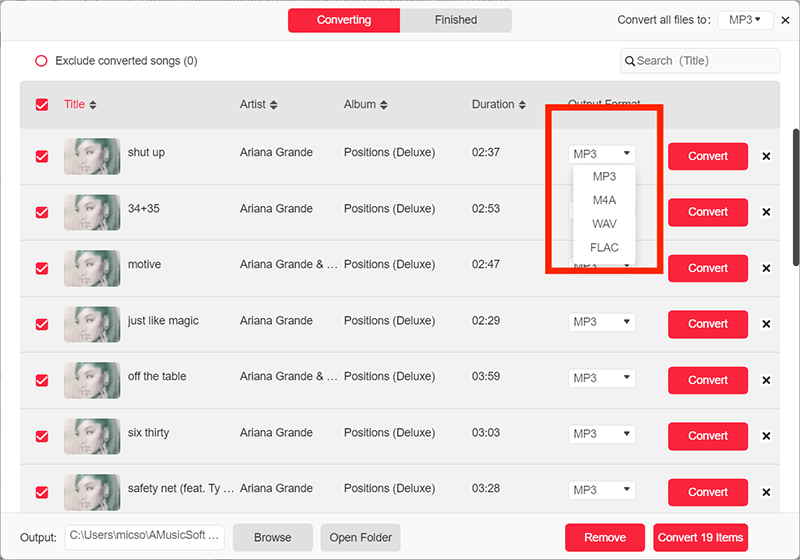
- Now, hit the Convert button and have the process started.

- Check the converted songs which are found on the Converted tab.
Part 3. Summary
After having the song titles converted and downloaded through AMusicSoft Apple Music Converter, you will now be able to stream your favorite songs without being limited to any condition. So, it is obvious that utilizing this music converter would be a very great help to enjoy your favorite music. On the other hand, if your goal is to really know how to change Apple Music plan, the procedure for each subscription is already listed and explained above.
People Also Read
- Get Perfect Gaming BGM: Play Apple Music on PS5!
- Level Up Gaming Experience: Play Apple Music on Xbox One!
- How Can You Play Apple Music Without Internet Connection?
- Ultimate Guide: How To Show Lyrics On Apple Music
- How To Fix Apple Music Skipping Songs Error In 2024?
- How To Listen To Audible Audiobooks On Apple Books
- Guide of Downloading The Highest Apple Music MP3 Bitrate
- Offline Music Guide: How Long Does Apple Music Last Offline?
 About The Author
Robert Fabry is an ardent blogger, and an enthusiast who is keen about technology, and maybe he can contaminate you by sharing some tips. He also has a passion for music and has written for AMusicSoft on these subjects.