How to Export Music From iTunes to Computer in 2025
iTunes is a media library and a one-stop software wherein you can almost do anything from managing playlist, playing your favorite movie, listening to music, and even purchasing soundtracks, that’s why many people prefer iTunes as it provides everything that you need especially for the music enthusiast.
The most common questions that I encounter among iTunes users are “Is it possible to export music from iTunes” or “How to export music from iTunes to computer?”. If you are also looking for an answer to these questions then you are just in time because we are going to tackle it from this article and we will give you solutions. This guide will also help those who are just new to iTunes. So, what are we waiting for, let’s begin!
Contents Guide Part 1. Back up iTunes Library before Exporting MusicPart 2. How Do You Transfer Music from iTunes to Computer?Part 3. How to Export Music from iTunes to Computer or Other Devices?Part 4. How to Download Music from iTunes to Computer for Free?Part 5. To Conclude Everything!
Part 1. Back up iTunes Library before Exporting Music
The first thing you should how to export music from iTunes to computer is by creating a Back-up to keep your files safe, but before creating a back-up, there is also one thing you should do too, this is to consolidate your iTunes library first. The reason why you need to consolidate it is to make sure that all of the files on your iTunes library would be in the same place when you make a manual back-up, this helps to make it organized once you create a back-up. In here, I will provide the steps starting from consolidating iTunes Library then creating back up.
Steps on How to Consolidate iTunes Library
- Launch iTunes.
- Then, click on “File” on your menu bar that is visible at the top portion of your computer screen or the upper part of your iTunes window. Next search for “Library” then “Organize Library”
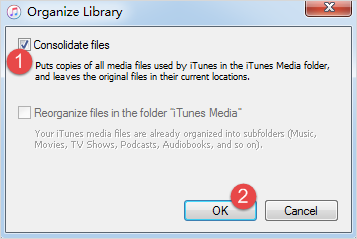
- Next, once you click the “Organize Library”, select the Consolidate Files by ticking the box.
- Finally, Click okay.
Once you consolidate files, the music files that are outside your iTunes Media Folder are now added to your iTunes Media Folder. You may now have an option to delete the ones that are outside after checking if the copies are already available in your folder so you can save up space if you wanted to. You can check your iTunes Media Folder by following the steps I provided below.
Steps on Finding the iTunes Media Folder
iTunes Media folder can be found in your iTunes folder. You can find it by going to User > Music > iTunes Media.
But if you are having trouble locating your iTunes Media folder even after following the default one, you can refer to the steps below how to do so.
- Launch your iTunes
- Choose “Edit” then “Preferences” on the menu bar that is visible at the upper portion of the iTunes window.
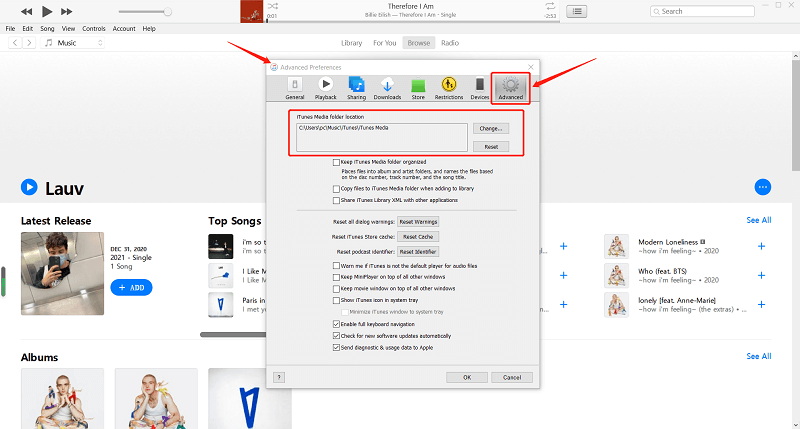
- Next, select the Advanced tab.
- Finally, you can check the location of your iTunes Media folder by looking inside the box on “iTunes Media folder location”
Once you verified that your consolidated files are on your iTunes Media folder, the next process will be backing up your iTunes Library or media files to an external drive.
Steps to Back up Library and Media Files
- Close iTunes.
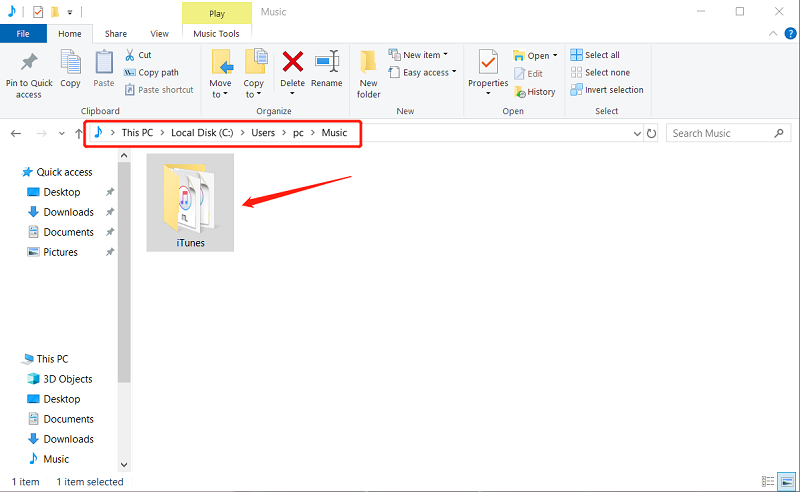
- Look for your iTunes folder.
- Copy your iTunes folder by right-clicking the folder of you iTunes
- Then, once copied, you may now go to your external hard drive, right-click the select paste.
By following the steps above, the process of copying the iTunes Folder will begin. Take note that the process might take a long time depending on the size of your iTunes library. So, it is also better to divert your attention to other things while waiting.
Part 2. How Do You Transfer Music from iTunes to Computer?
So, one way how to export music from iTunes to computer effectively is by transferring it manually. This is the most common way that a person or people could ever think of which is right. So how to export music from iTunes to computer manually? See the step-by-step guide that I provided below:
Step 1. Find the location of the iTunes music folder on your desktop
Finding the location of your iTunes music folder is important because this is where we can find the music files that we want to export.
For Mac users, you can go to the Finder page, select Go, then click Home on the menu bar which is visible at the upper portion of the screen, after that double click the Music folder so you can access the iTunes folder.
For Windows users, Click the Users then username, next click My Music find the iTunes folder so you can see iTunes music.
Step 2. Drag and drop the iTunes folder on your desktop
There are many ways how you can transfer iTunes folder to desktop but the easiest one is just dragging and dropping the file to its new destination.
Step 3. Export the iTunes folder to the computer
If you are using the same computer, you can just simply move the folder that you drop on your desktop to any location on your computer.
If you are using a different computer, you have to connect an external drive on your computer, then copy and paste the iTunes folder in your drive, once done safely remove your drive from your computer. Then connect the drive on the recipient computer and simply drag the iTunes folder from your external drive to My Music folder (for Windows) or Music Folder (for Mac).
Honestly, this method has also a downside. Exporting iTunes music to the computer manually is very time- consuming because it takes so much time to transfer music files. Also, there is no guarantee that the music files that you transfer will work. Some of the iTunes music that you purchased are still encrypted with Apple’s DRM technology which means that it protected and you can’t just play it on other devices.
Furthermore, sometimes by moving iTunes manually, you can also experience an iTunes error which prevents you suddenly from transferring tasks. But there is another way or option how to export music from iTunes to computer that you can use which is much faster and will solve your problem in regards to DRM technology, just keep reading because I will be going to further discuss it in the next section.
Part 3. How to Export Music from iTunes to Computer or Other Devices?
As I mentioned earlier, there is another way how to Export Music from iTunes to computer which is much faster compared if you are going to do it manually, and aside from that by doing this method, you can also freely transfer it to any devices that you want. So how to do it? We will need a special converting tool for that which is the AMusicSoft Apple Music converter so we can export it to your computer or other devices.

AMusicSoft Apple Music converter is a type of converter which allows you to convert any format to your preferred format that is compatible with your device, like AAC to MP3, or MP4 to WAV. I mentioned much faster because it has a conversion speed of x16 which can decrease the waiting time as compared with exporting manually, plus even with such speed, it can still maintain the 100% quality of the song.
Another key feature of this converter is that once you converted the songs it will become DRM free which means that it is no longer protected and because of this you can now freely transfer it to any supported application or device that you want.
Also, once the DRM is removed it is still playable even if you are out of the subscription, especially for Apple Music users. This software is a very necessary tool So, if you want to try this ultimate converter then just simply visit their official website, download the software and install it on your computer.
Step-by-step guide on how to convert music from iTunes using AMusicSoft Apple Music Converter:
Step 1. Launch your AMusicSoft Apple Music Converter
Click the shortcut key of AMusicSoft Apple Music Converter to run it.
Step 2. Select songs from iTunes
Once you open your iTunes App, AMusicSoft Apple Music Converter will instantly scan your iTunes library, wait until the scanning is complete then select the songs you want to convert.

Step 3. Choose the output format and output path for the converted songs.
After selecting the songs to be converted, choose the output format and the location where you want to view your converted songs. You will be guided by the software how many minutes left on the main interface.
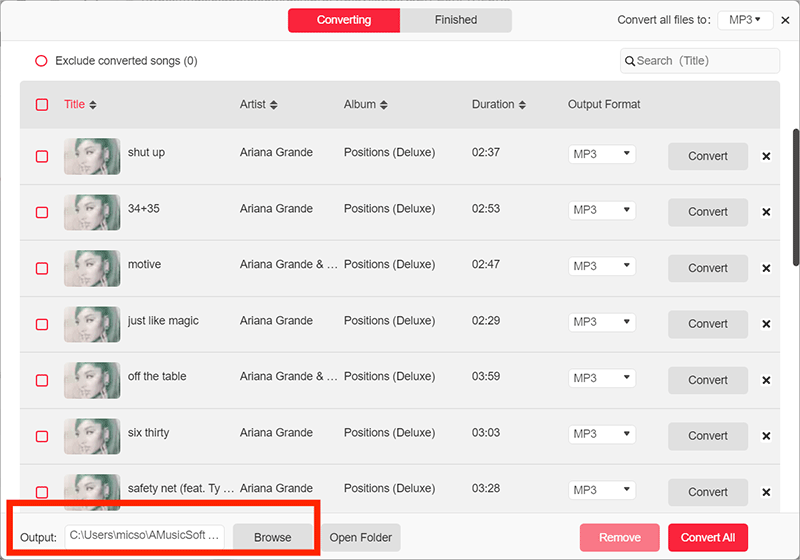
Step 4. Click the “Convert” button to start converting.
You may begin the conversion process by clicking the “Convert” button, once you set up the output format and output destination. Once your conversion is complete, your converted song will now be visible on the converted section.

Now that you have the converted iTunes music, you can now freely export it to your computer or any other devices by copying the converted songs available on your output folder and transfer the file to its new destination devices. What’s good about this, is that you can keep the music as much as you want to.
Part 4. How to Download Music from iTunes to Computer for Free?
Though majority of iTunes music requires you to pay for you to be able to download the music files available in iTunes, there are still collection from iTunes which are free such as video, movies, podcasts, etc. that users can also use. For you to be able to download songs for free, you will be needing an active internet connect and also, the software must be available or installed on your computer. I stated the steps below as your guide.
1. Install the iTunes on the computer
You must have it installed on your computer to apply this trick. If you still don’t have it installed then you can visit their website from there you will be guided by the installation including how to activate the software and also to set up an account on iTunes.
2. Launch the iTunes on your desktop
Once you launch your iTunes, on the left portion menu of your screen, select the “iTunes Store” button. This will direct you to the iTunes store of your browser.
3. Availing “Free on iTunes”
Once on your browser, select “Music” on the upper portion of the iTunes browser window. Find the “Music Quick Links” menu that is visible on the left portion of the screen then proceed by selecting the “Free on iTunes” link.
Browse the free download selections which are under the Free on iTunes page until you see a selection that you want to download. Then, select the “Free” button which you can find under the selection. After that, you will be prompted to input your details such as your iTunes account ID and password.
Wait until the selection that you chose to be available on your computer. Then select the “Music” link on the left portion menu of your iTunes browser to locate the downloaded file, so you can play it on your computer.
By doing the steps above, you will finally get a chance to download music from iTunes to your computer for free.
Part 5. To Conclude Everything!
In this post, we discussed how to export music from iTunes to computer and provided a solution. We explain also why it is important to back up your music files first before exporting to a computer or any other devices. Furthermore, we tackle the different ways how to export music from iTunes to computer it can be either manually or with the help of a converter which is the AMusicSoft Apple Music converter.
I hope that by reading this post you have gained some knowledge on how to export music from iTunes to computer and you can able to apply it for your own.
People Also Read
 About The Author
Robert Fabry is an ardent blogger, and an enthusiast who is keen about technology, and maybe he can contaminate you by sharing some tips. He also has a passion for music and has written for AMusicSoft on these subjects.