iTunes Export Playlist Greyed Out Problem, Solved!
Imagine the excitement that you are feeling because you are about to start streaming your favorites, but only to find out that they are not available for playing. This is kind of annoying right? So, I recommend studying the situation first, so that solving the issue would not be that much headache for you.
The discussion below will tackle the ways that you may use as your guide to fixing iTunes export playlist greyed out the issue. Make sure to allot some of your time to avoid the such problem from occurring on your application and account.
Contents Guide Part 1. Why Exporting Playlist Greyed out?Part 2. How Do I Fix Greyed out Songs on iTunes?Part 3. Bonus: How to Export Songs from iTunes/Apple Music for Free?Part 4. Conclusion
Part 1. Why Exporting Playlist Greyed out?
Through this post, let me help you in solving your problem in relation to iTunes export playlist greyed out. But before that, it is very important to start with understanding the possible causes first, making you one step ahead in fixing the issue. There are many reasons that make exporting playlists or songs unreadable on iTunes/iPhone, please check out the list of the most possible factors.
- Unsuccessful Syncing: Unstable internet connection or weak WIFI and mobile data when you synced the files. So export playlist is greyed out.
- Outdated software is full of bugs and may cause export playlist greyed out problems.
- Corrupted Files: the files you just synced are corrupted or damaged. This means that iTunes failed to recognize them because they are not readable in the first place.
- Protected Songs and Unsupported Formats: If the music files to play on iTunes are encoded in a format that is not authorized, they will automatically be greyed out in the playlist.
- Country Restrictions: music you exported are not available in the region that you are currently residing in.
Part 2. How Do I Fix Greyed out Songs on iTunes?
Since you already have background knowledge about the reasons behind export playlists not working on iTunes and your device, it will now be easier for you to fix the said issue because you literally know where to begin. Let us see below the simplest solutions to utilize.
Re-sync iTunes Songs or Playlists
As mentioned above, the problem with iTunes is mostly about the syncing process made. One of the first things you should try is re-sync your device with your iTunes files carefully. When you sync again, make sure you use the USB cable instead of WiFi. Here’s what you must do to enable iTunes sync over WiFi.
- Connect your device to computer using the USB cable (preferably the original cable).
- Launch iTunes. Select the device icon from the top left.
- Tap on the Music option under settings.
- You will need to turn on music syncing by clicking to checkmark Sync Music.
- Use the other checkmarks below to determine what music to send to the device. For instance, you can sync Entire music library or only Selected playlists, artists, albums and genres.
- Click Apply in the lower right corner of the window. Syncing should start automatically.

- Check that the music is on the device by launching the Music app from the home screen.
Re-Downloading the Songs
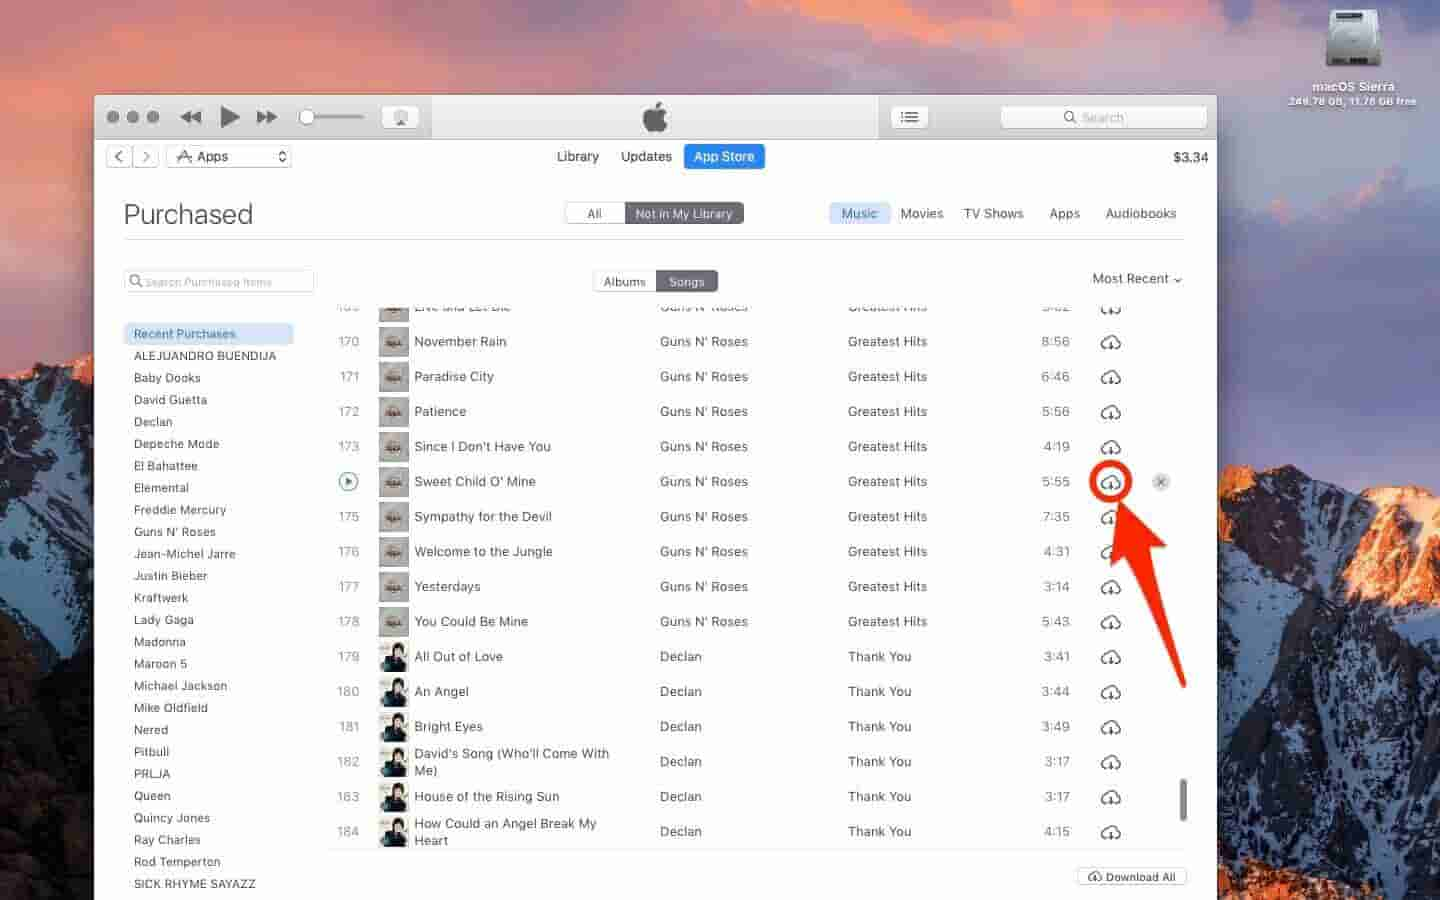
This is only applicable to those who acquired the song files via purchases made on iTunes. If this is the case for you, then it is safe to delete the songs since they can be downloaded once again. To fix the issue about the iTunes export playlist greyed out, head into the iTunes Store and then quickly select your account name. This will show you a set of menu options where you can find the Purchased option. Click it to see all the items you have and delete the greyed-out ones. After deleting all of them, just redownload them from iTunes once again.
If your music files are corrupted or damaged, you can also redownload them on a downloaded playlist.
Update iTunes to the Latest Version
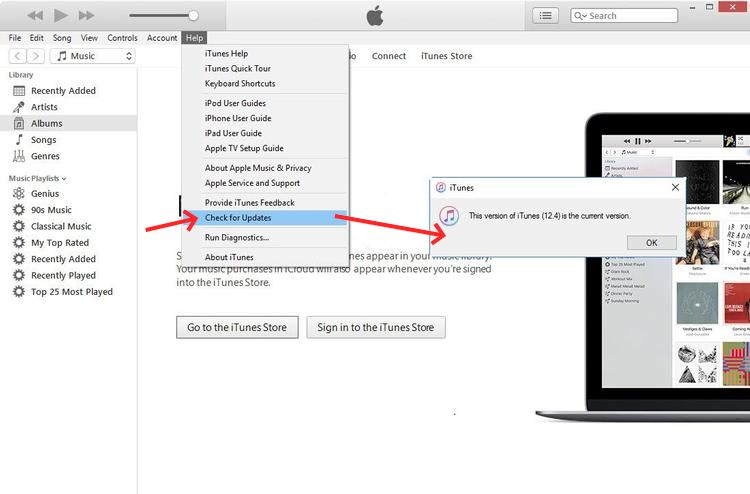
When you find your exporting playlist greyed out, you can check if the version of iTunes is up-to-date. If not, make sure to update it to the latest version.
On your Mac running macOS Catalina and earlier, open iTunes on your Mac > click on iTunes menu > heck for Updates > Go ahead with the instructions to install the latest version of iTunes on your device.
On your Windows PC, open iTunes > click on Help menu > Check for Updates > now follow the instructions to install the latest version.
Re-authorize Your Computer
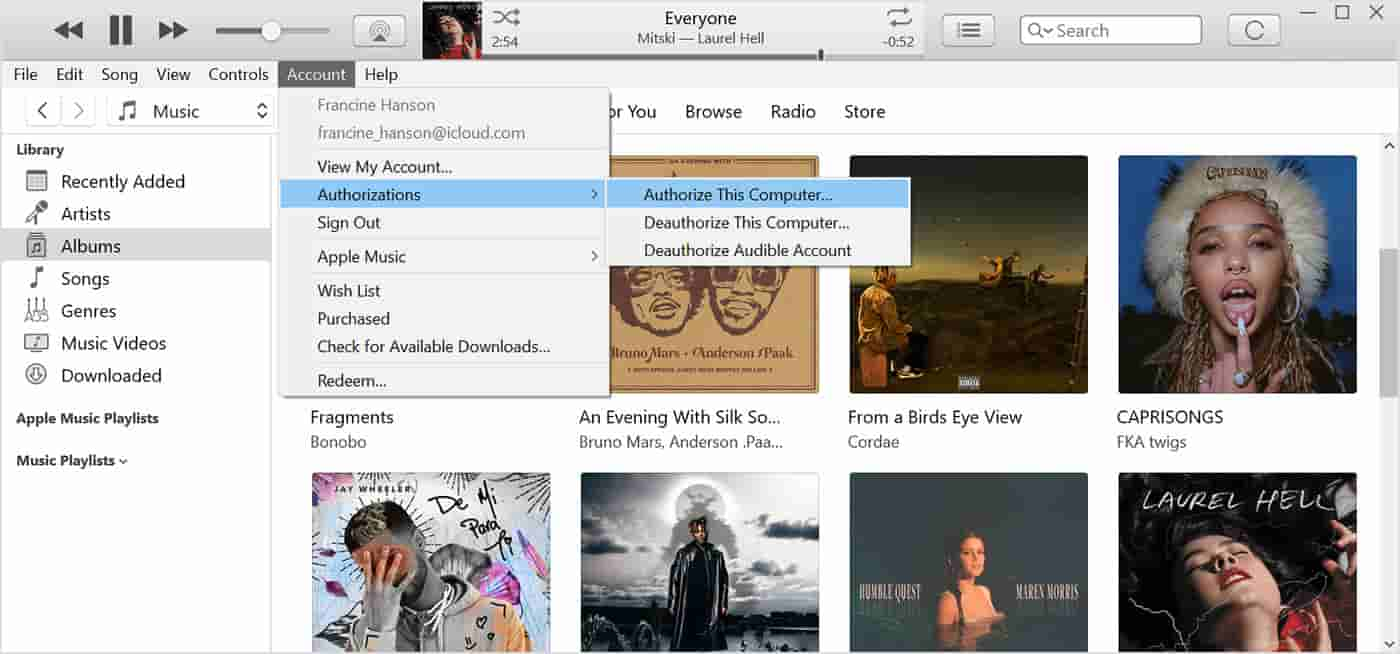
You may also try re-authorizing your computer to see if you can fix the issue about the iTunes export playlist greyed out. Albeit it sounds a bit strange, it can do the trick. iTunes might have forgotten that your music is authorized.
Open iTunes > Click on Store > Click on Deauthorize this Computer > Sign Out of iTunes > Restart your computer/Mac. Then, sign into your iTunes account > Authorize this computer.
Check Out the Exported Audio Format
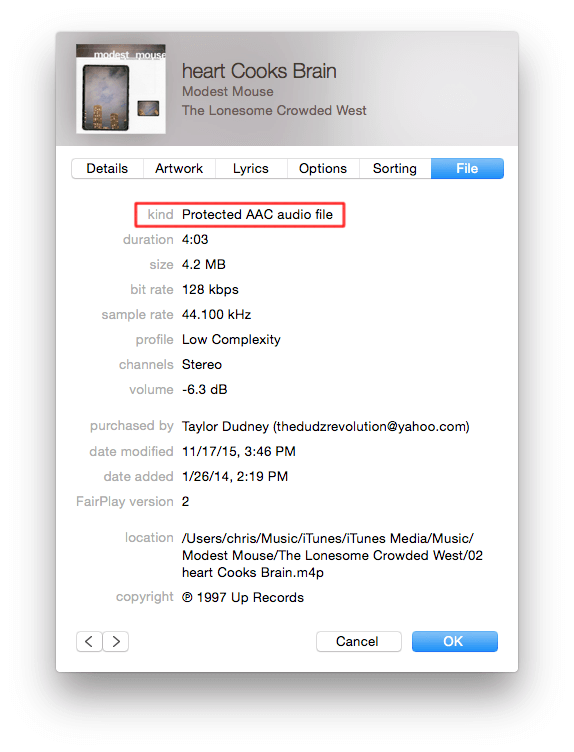
It was mentioned above that songs are in unsupported formats or DRM-protected, which has caused you to encounter the problem of the iTunes export playlist greyed out. To confirm if this is true, right-click on the greyed-out song and select the Get info option. Under the File tab, check out Kind. If you see “Protected” next to Kind, it means the song is DRM protected or unsupported.
To get rid of this problem, you have a couple of solutions—either upgrade to iTunes Match or subscribe to Apple Music. The former allows you to store DRM (Digital Rights Management) protected music in iCloud including the ones you have purchased from iTunes or imported from CDs. With an Apple Music subscription, you can enjoy playing your tracks without any restriction since all the music of Apple Music is DRM protected.
But both two services pay a subscription fee. Apple has increased the prices across its services, including Apple Music in 2022. For example, Apple Music for individuals has increased by $1 a month to $10.99, or by $10 for the annual plan, which will now cost $109 for an Apple Music yearly subscription.
Is there a way to enjoy Apple Music at less cost? You may consider converting the files into an authorized format and removing the DRM via third-party software. How can make it possible? We will share a useful tool below to help you!
Part 3. Bonus: How to Export Songs from iTunes/Apple Music for Free?
It was just mentioned a few seconds ago, that one way to avoid iTunes export playlist greyed out the problem is to make the songs unprotected and converted them into a supported format in iTunes. However, for this process to proceed, you will need help from professional software.
To make searching faster for you, I suggest using AMusicSoft Apple Music Converter in solving the issue. The three significant processes (removing DRM, converting songs, and downloading them) needed can all be done by this tool within just a few minutes. This is all because of its enhanced working speed of 16x faster than the normal conversion speed. With this speed, worries about the quality of the resulting files will surely arise, but to tell you, AMusicSoft is very good in doing its job because it can even guarantee you the high quality of audio that it can produce at the end of the process.
To add, the procedure to conduct in using this tool is just very easy to manage. When it comes to the audio formats that you may have, MP3, FLAC, AAC, WAV, M4A, and AC3 are all available in AMusicSoft. Another best feature of AMusicSoft is to help you burn CDs on iTunes.
Check out the procedure that must be followed in using AMusicSoft to convert music files into supported formats so that problems in relation to iTunes or Apple Music issues could be permanently avoided.
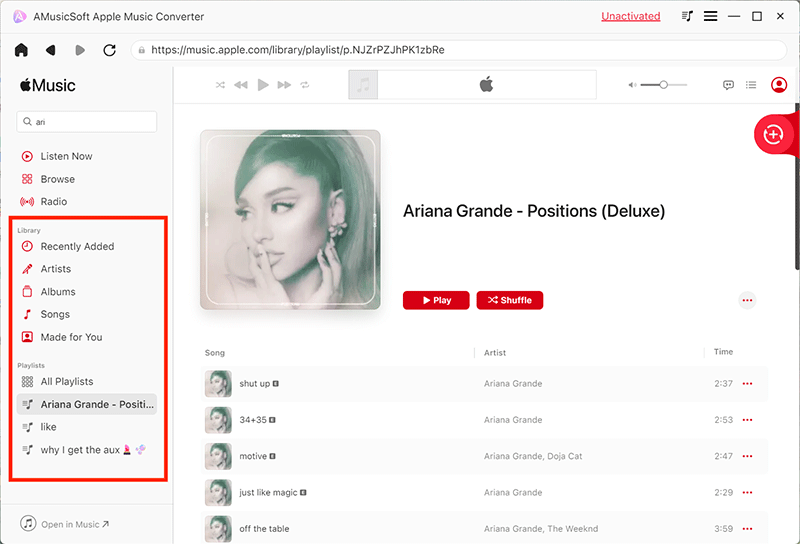
- Make sure that your device is connected to the internet to launch your browser with ease. Once done, search for the webpage of AMusicSoft and download the Apple Music Converter application from it.
- Proceed with installing and launching the application on your device right after the complete download. Wait for a while until your collection is completely read by the music converter. If it is done already, start adding the songs by ticking the box before them to indicate that they have been included for uploading.
- Select one output format to use and allot an output folder to save them.

- Tap the Convert button to get started with the process and just wait shortly until it is done.

- Check the Finished menu and download them on your device.
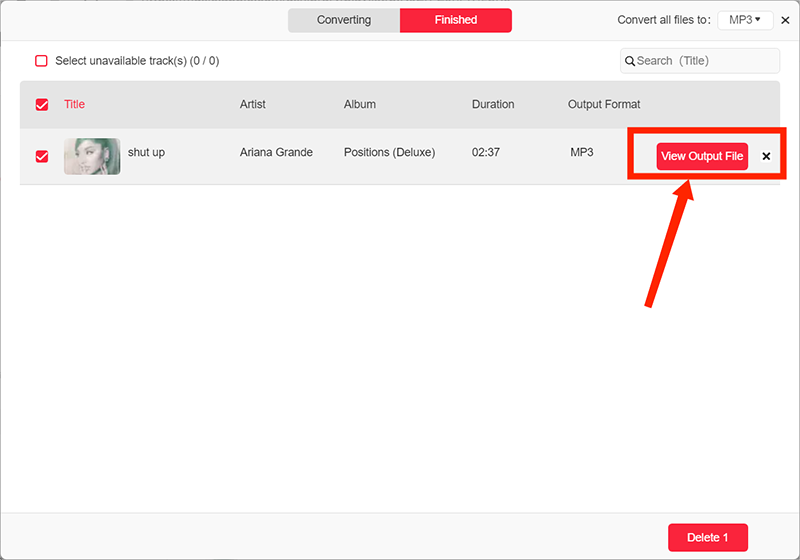
Now you can export your songs or playlists to any music player or device.
Part 4. Conclusion
Hopefully, these solutions have worked for you in fixing the issue of iTunes export playlist greyed out. While most greyed-out songs can be fixed, if the song has copyright issues, that may not be recoverable, so you'd better have them converted and saved in a new audio format that could be accessed without limit. By using AMusicSoft Apple Music Converter, you can effortlessly have DRM-free iTunes and Apple Music song files.
People Also Read
- How Do We Convert Old iTunes Songs To DRM-Free Ones?
- Best Ways To Transfer An iTunes Playlist To Another Computer
- Easiest Methods To Export iTunes Playlist To Spotify
- Learn About The Methods On How To Play iTunes On Alexa
- “How Do I Get Alexa To Play My iTunes Music” - Solved!
- Best Possible Ways To Enjoy iTunes Xbox One
- Best Ways: How to Export Songs From iTunes
 About The Author
Robert Fabry is an ardent blogger, and an enthusiast who is keen about technology, and maybe he can contaminate you by sharing some tips. He also has a passion for music and has written for AMusicSoft on these subjects.