How to Unsubscribe from Apple Music on All Your Devices?
Apple Music offers an extensive catalog of songs, curated playlists, and personalized radio stations that attract millions of users globally. However, whether due to cost concerns, lack of usage, or a preference for another service, you might decide to unsubscribe from Apple Music. In this guide, we’ll walk you through the essential steps on how to cancel your Apple Music subscription on all your devices, and advise on how to back up your music in case you decide to return to the service later. Whether you’re using an iPhone, iPad, Mac, or even a Windows PC, this guide will provide clear instructions to manage your Apple Music subscription effectively.
Contents Guide Part 1. Should We Cancel Apple Music Subscription?Part 2. Back Up Music Before Canceling Apple Music SubscriptionPart 3. How to Cancel Your Apple Music Subscription?Part 4. Summary
Part 1. Should We Cancel Apple Music Subscription?
Before making the decision to unsubscribe from Apple Music, it’s important to evaluate your usage and needs. In this section, we’ll discuss some valid reasons why you might want to cancel:
- Cost: Apple Music charges a monthly fee, and you might find it too expensive, especially if you're not using it often enough.
- Alternatives: There are other music streaming services like Spotify, Amazon Music, or YouTube Music that might offer better value, different features, or a music catalog that suits you better.
- Infrequent Use: If you’re not listening to music that often, the subscription may not be worth the investment.
- Storage: Apple Music downloads can take up space on your device, which may become a concern if you have limited storage.
Ultimately, whether or not to cancel depends on your usage, preferences, and budget. Take a moment to weigh the pros and cons based on your personal music needs.
Part 2. Back Up Music Before Canceling Apple Music Subscription
Unsubscribing is a relatively straightforward process, but it’s important to ensure that you’ve backed up any downloaded music or playlists before you unsubscribe from Apple Music. If you’ve downloaded music for offline listening, canceling your subscription will result in the loss of access to those songs. On the other hand, you can't transfer these downloaded songs on non-Apple devices for playing because Apple Music uses DRM (digital rights management) technology to protect the music content in its library.
To keep your favorite tracks and playlists in DRM-free format, even without an active subscription, using a DRM removal tool like AMusicSoft Spotify Music Converter unlocks your music's full potential by freeing it from Apple's DRM restrictions.
AMusicSoft Apple Music Converter supports an easy to manage interface and app functions and it can remove the DRM from the Apple Music items. Once you got the results of conversion, you can freely share or transfer the songs you've downloaded through Apple Music to other devices or services without restrictions. Even if Apple Music songs are greyed out, you can restore them immediately. It can also produce the audio formats of MP3, FLAC, WAV, AAC, AC3 and M4A, and it can assure you that the quality of conversion is very pleasant to stream.
How to back up your music to make sure you still have it even without an active subscription? Follow the step-by-step guide enumerated below.
Step 1. Click the Free Download button below to back up DRM-free songs on your Windows PC or Mac! With AMusicSoft software, your Apple Music listening process will not be limited by DRM anymore!
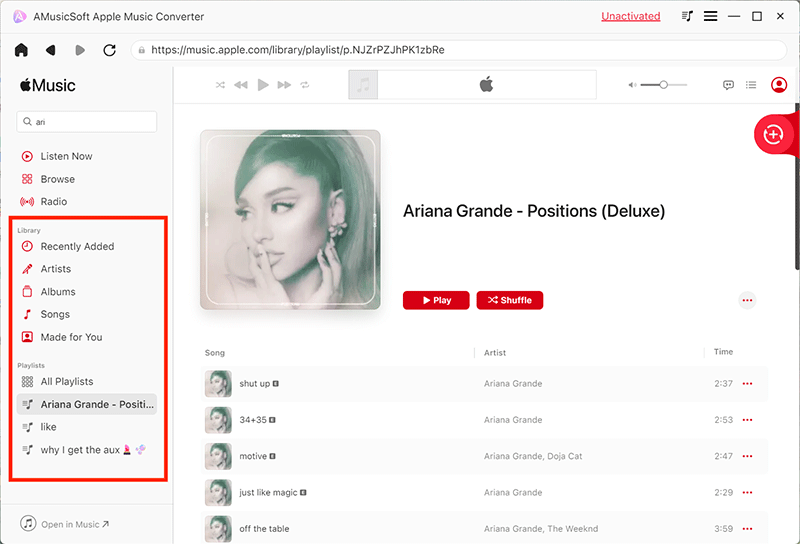
Step 2. Thanks to its user-friendly and straightforward UI, you can enter the built-in Apple Music web player to log into your account after launching. When you locate the music library, browse and find any music you wish to convert. AMusicSoft also supports batch conversion, you can also add a whole playlist or album in one go, letting you save your energy and time as well.
Step 3. After doing so, proceed with the selection of the output format to use. Here we choose the MP3 format because it is the most flexible audio format. You are also free to adjust the output settings according to your preferred output quality. You may also select the output folder for the storage of files.

Step 4. Now convert the selected files by clicking the “Convert” button at the lower right corner of the interface.
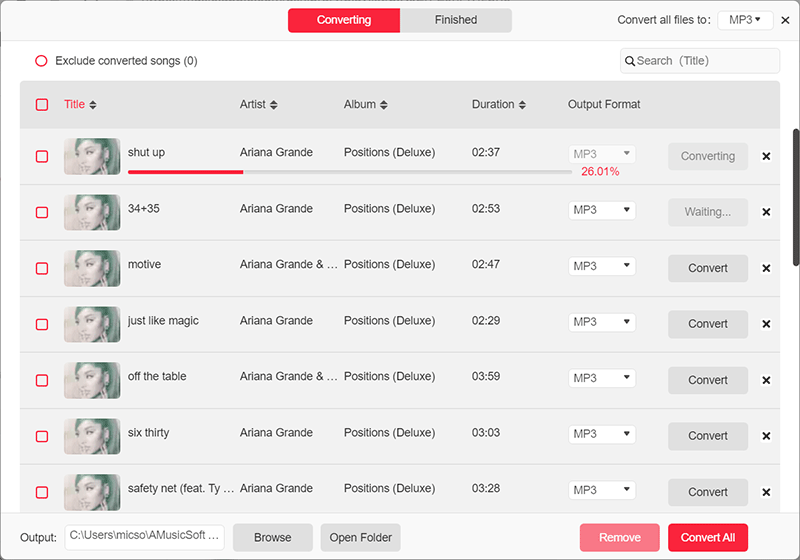
Once the conversion process is complete, you will see the MP3 file within the destination folder you set in the previous step. Now you can check your backup before you unsubscribe from Apple Music. This free Apple Music converter includes the ability to preserve ID3 tags and metadata info like album artwork, title, artist, album, genre, and year. You can easily organize the converted songs and recognize them when playing them on players that can read ID3 information.
Part 3. How to Cancel Your Apple Music Subscription?
By taking above steps, you can preserve your music even after canceling your subscription. Once you’re ready to unsubscribe, follow these steps depending on the device you use:
For iOS Device
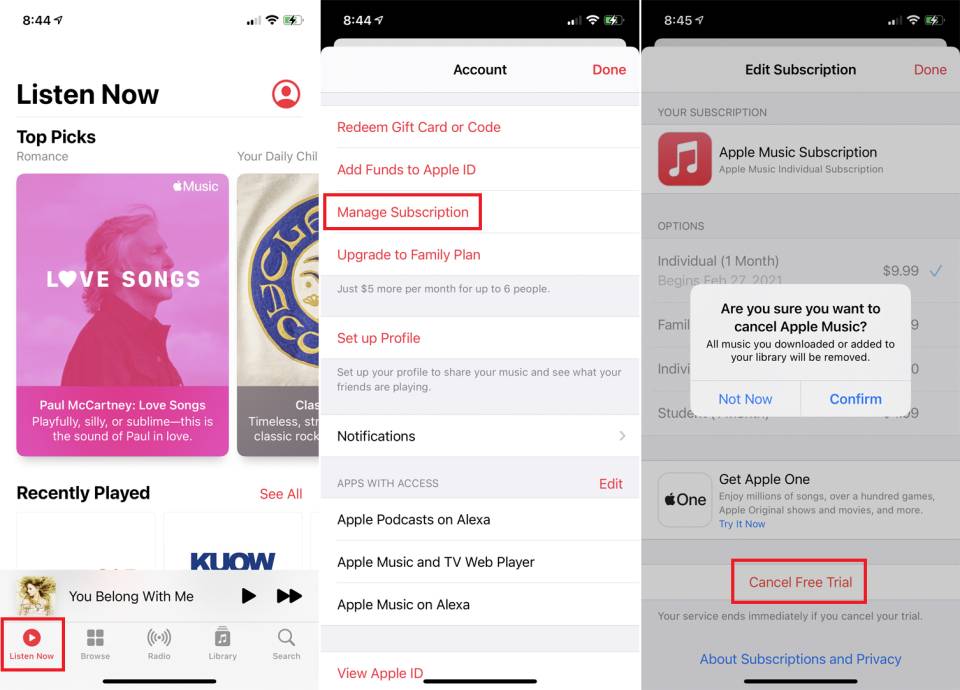
- Fire up your Apple Music application and notice the tabs that are placed at the bottom part.
- Among the tabs shown, click the “For You” tab.
- In the new window shown, you will see your profile icon. This is located at the upper right part. Click this icon then.
- From the option you see, select Manage Subscription.
- To unsubscribe from Apple Music, tap Cancel Subscription button.
For Mac
- Open the App Store app and click your account name and image in the lower-left corner.
- Click Account Settings. Scroll to Subscriptions, then click Manage.
- Next to the Apple Music subscription, click Edit. Click Cancel Subscription. If there's no Cancel or Cancel Subscription button, the subscription has already been canceled.
For Windows
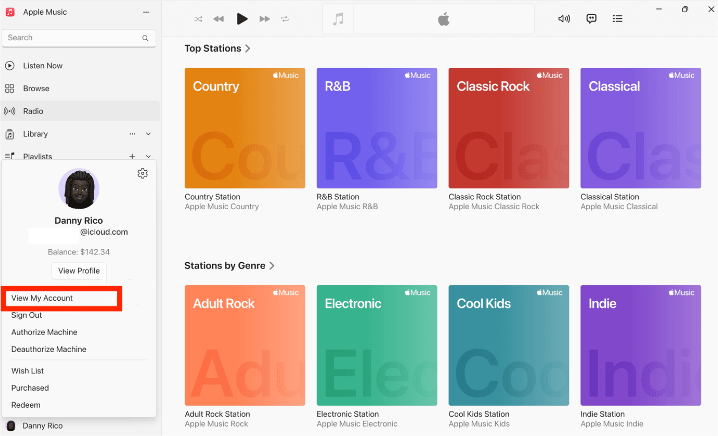
- To unsubscribe from Apple Music on your Windows 11, open the Apple Music app. Click your name at the bottom of the sidebar, then choose View My Account. You may need to sign in with your Apple ID.
- Scroll to the Settings section. Next to Subscriptions, click Manage. Find the Apple Music subscription, then click Edit.
- Click Cancel Subscription. If there is no Cancel or Cancel Subscription button, the subscription has already been canceled.
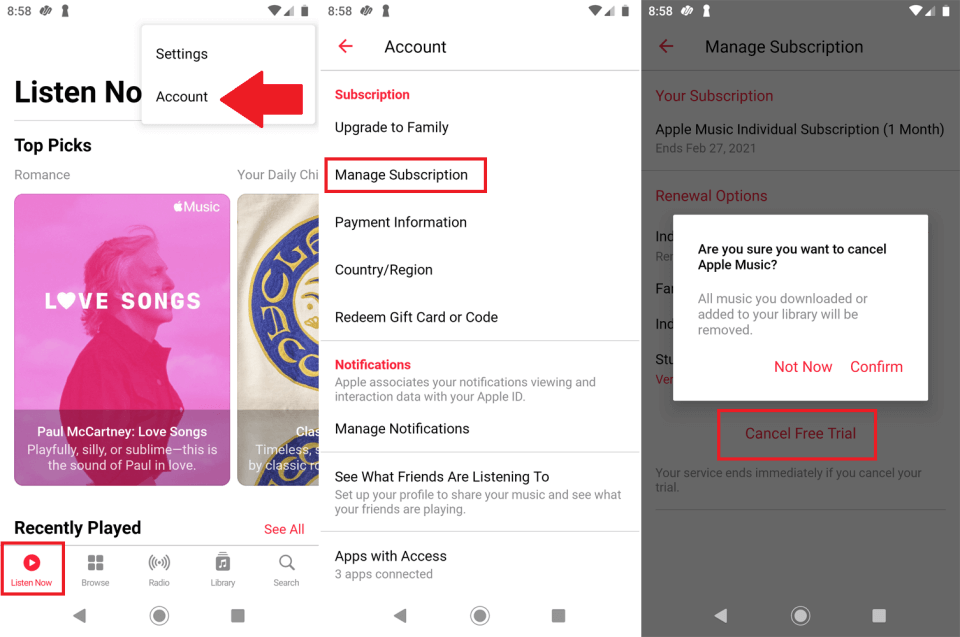
For Android
- Run the Apple Music application on your Android phone.
- Select the Listen Now tab at the lower part and then click next the three-line button found in the new window.
- After doing so, menu options will show up wherein you have to select the Account button.
- A few seconds after, the Account window will open. Choose Manage Subscription and tap Cancel Subscription, then click the Confirm button that could be seen in the pop-up window.
Part 4. Summary
Unsubscribing from Apple Music is a simple process, but it’s essential to back up any music you want to keep beforehand. If you decide Apple Music no longer fits your needs—whether due to cost, infrequent use, or a preference for other services—it’s easy to unsubscribe from Apple Music across all devices. Just remember, once you cancel, you lose access to any music you’ve downloaded through the subscription, but purchased songs will stay with you if you use AMusicSoft Apple Music Converter.
People Also Read
- How To Change Apple Music Plan On Your Device?
- How Much is Apple Music Family Plan
- Know About “Do You Have To Pay For Apple Music”
- Easy Ways To Get An Apple Music Student Discount
- Guide To Get Apple Music Yearly Subscription
- How To Get Apple Music Free Without Credit Card?
- The Simplest Way On How To Switch Apple Music To Student Plan
 About The Author
Robert Fabry is an ardent blogger, and an enthusiast who is keen about technology, and maybe he can contaminate you by sharing some tips. He also has a passion for music and has written for AMusicSoft on these subjects.