How to Play Spotify on Raspberry Pi: A Guide for You
Raspberry pi is a mini-computer in the size of a credit card. It functions by connecting it to a monitor while using the normal mouse and keyboard. You can also play Spotify music on Raspberry pi, and other things that are really fun and interesting. This credit card-sized computer can do all the things the usual desktop computer can do, from playing video games, to typing essays, playing video games, or listening to music, you can be able to do everything.
If you love music and have Spotify, playing Spotify Music on Raspberry pi could be one of the most affordable ways of streaming songs from Spotify. And if you are also looking for a way that you can be able to do it, this article will ultimately serve as a huge help. We will also let you discover ways where you can play Spotify music on Raspberry pi even without a Spotify premium account. So, if you are up to this new discovery, let us get into business.
Contents Guide Part 1. Can You Run Spotify On Raspberry Pi?Part 2. How Do I Play Spotify On My Raspberry Pi?Part 3. How To Play Spotify Music On Raspberry Pi Without Premium?Part 4. To Summarize It All
Part 1. Can You Run Spotify On Raspberry Pi?
Now it is time to learn how we can be able to play Spotify music on Raspberry pi. We need to make it an affordable type of device that will serve as a Spotify Connect so that we can easily be able to play all the songs that we want any time of the day. A premium version of Spotify is needed to be able to proceed with the steps that we will be introducing to you.
How To Set Up A Raspberry Pi Spotify Connect Device
- The first thing first is to make sure that everything in the system is updated. This will be the start-up procedure to be able to easily set up raspberry pi as a Spotify Connect device. There are two commands that we need to run to be able to do all the updates:
“sudo apt update”
“sudo apt upgrade”
- The second thing is to make sure that we have installed both the “apt transport https” and “curl” packages. To be able to have the packages we need to run the code below:
“sudo apt install =y apt =transport=https curl”
- Now that we have installed the packages that we need the next thing to do is to add the “raspotify” GPG key together with its repository. We need this GPG key to be able to verify everything that we get from the repository. To be able to do everything in this step we need these codes:
“curl-sSL httpd://dtcooper.github.io/raspotify/key.asc | sudo apt-key add-v-“
“echo’deb https://dtcooper.github.io/ raspotify raspotify main’ | sudo tee/etc/apt/sources.list.d/rapostify.list”
- We have already installed the raspotify repository to the Raspberry pi, the next thing that we have to do is to install the Raspotify package. With the use of it we can turn the Raspberry pi into a Spotify Connect Device. To be able to install the package we need to run the codes below:
“sudo apt update”
“sudo apt install raspotify”
- Now that we have successfully installed the Raspotify software, it should start automatically.
Part 2. How Do I Play Spotify On My Raspberry Pi?
Now that your Raspberry pi is already set up, the next thing to do is to learn how to play Spotify music on Raspberry pi. We will be giving you some of the ways that you can follow to be able to do this.
Method 1. Use Volumio

The first method that you can try is to use Volumio to play Spotify music on Raspberry pi. It is a music player where you can play music of any type with good quality using the web interface to be able to control it.
You can use your own mobile smartphone to be able to access the Volumio while your Raspberry pi is connected with a speaker on a jack port. This is how you install Volumio on your Raspberry pi:
- To be able to install Volumio you must have an SD card, and then download Volumio from the official website. In the Raspberry pi part, click download.
- There are times that you will need Etcher which you can install and download from its website. Etcher is known to be a tool that can help you create an SD card easily.
- Once you have downloaded Etcher, start it. You can be able to see the Volumio image on the left side, choose it. Then choose “Flash!”.
- And then after a few minutes, you can be able to see that your SD card is ready.
- Once you are done in step d, the next thing to do is to finally insert the SD card in your Raspberry pi, and start everything.
You can be able to manage everything from the web interface, there are extra steps that you need to do if you only have WiFi available.
- Using your computer, look for the Volumio Wifi network, you can use the password volumio2.
- After this, another webpage will open, it has a configuration wizard. You can now follow all the settings that will appear.
- Once you are already finished, you can go back to your normal connection.
With this, you can be able to access the web interface
- Look for your Raspberry pi IP address.
- You can now enter this IP address http://A.B.C.D
- You can now be able to see the interface of Volumio.
The next step is to finally install and play Spotify. Here are the steps that you need to follow to be able to proceed with the installation.
- Go to “Settings” which can be located on the top right of the interface. Then choose plugins.
- Look for Spotify on the list and choose Install.
- After a few seconds, Spotify will be installed.
- Then, you must activate and configure the plug-in that you have chosen.
- Click “Off” to enable Spotify.
- Then go to “Settings”.
- Enter your Spotify credentials and finally, your Spotify account is ready to use.
Method 2. Use Kodi

Another method on how you can play Spotify music on Raspberry pi is by using Kodi. Kodi is media center software. With its use, you can be able to play any media. Here’s how you install Kodi on your Raspberry pi. To be able to start you must take a new SD card, let us take flash OSMC for example, and follow the steps that we will be cited below.
a. SSH Must Be Enabled
A repository file must be sent to Raspberry pi to enable the SSH work. To do this go to “My OSMC”, and then go to “Settings”, and hover your mouse to the SSH server, and choose “Apply” to be able to start it. And then, you must connect with an SCP client like WinSCP and Filezilla. Once you are done with this, you must create a new folder in the current directory where you are.
b. Install the Repository of Spotify
To be able to start the second step, you must download the repository zip file that can be found on the GitHub page. Then, go to the folder you have created a while ago and upload the file that you have downloaded. Then, return to OSMC for the Add-on browser and then you will see “Install from zip file”, click it. Then click “Home Folder”, and choose “Download”. Then, click the specific zip file.
c. Configure and Install Spotify
To be able to install Spotify using this repository, you can try by starting the playback of Spotify. And then choose “Install from repository” which can be located in the add-on browser, and then hover to “Marcelveldt’s BETA Repository” and click it. You can be able to see Spotify in the “Music Add ons” category, once located, click it, and then choose “Install”. And for the final step to be able to play Spotify, click on “Music” which can be found from the “Menu”.
Part 3. How To Play Spotify Music On Raspberry Pi Without Premium?
There are a lot of ways that you can be able to play Spotify music on raspberry pi, we have discussed two of them above. But do you know that you can be able to do this even without a Premium account?
Yes, it is possible through the help of one of the amazing tools we have today, the AMusicSoft Spotify Music Converter, a professional converter. It has a lot of good features that will ultimately taunt you into trying it and seeing how good it is as a partner when it comes to your conversion needs. Here are some of the advantages of using AMusicSoft Spotify Music Converter.
- Save time while using this professional converter, with its help, you can be able to convert a whole album or playlist; there is no need for you to deal with a song after another song. You can save a lot of effort too.
- Convert your most wanted songs from any file types that you want, from FLAC, MP4, MP3, and more, AMusicSoft Spotify Music Converter is a one-stop convenience tool. You can choose any file type you want depending on the preferences you have or based on what you need. If you prefer MP3 format, you can convert your Spotify songs to MP3 format.
- Technical restrictions like Digital Rights Management or DRM can’t be a problem anymore. With the use of AMusicSoft Spotify Music Converter, you can now have eased in transferring your files from a device into another one without DRM protection.
- Save a lot of your money since you will be freeing yourself from paying monthly subscriptions. You can now have unlimited access to your songs and unlimited chances to download all the songs that you want without paying any extra charge. Sounds fun and economical, right?
- This professional converter has easy steps and is very easy to use. You no longer have to deal with a lot of steps and complex processes when you opted to use it.
Here are the steps on how to use the AMusicSoft Spotify Music Converter.
Open the AMusicSoft Spotify Music Converter.
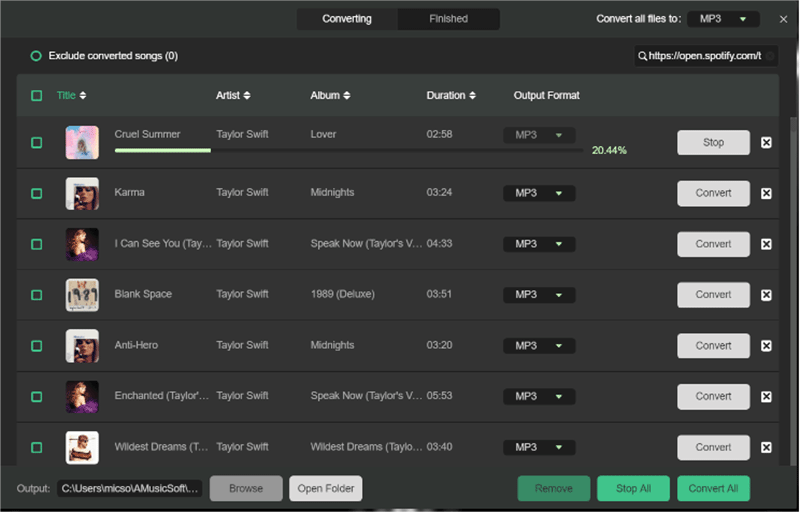
Launch the AMusicSoft Spotify Music Converter, so that you can be able to see everything that it has to offer. Pre-select all the songs and tracks that you want and be amazed at how this professional converter can do justice to its job in just a matter of a few minutes. You can select a whole album or a whole playlist if you want to.
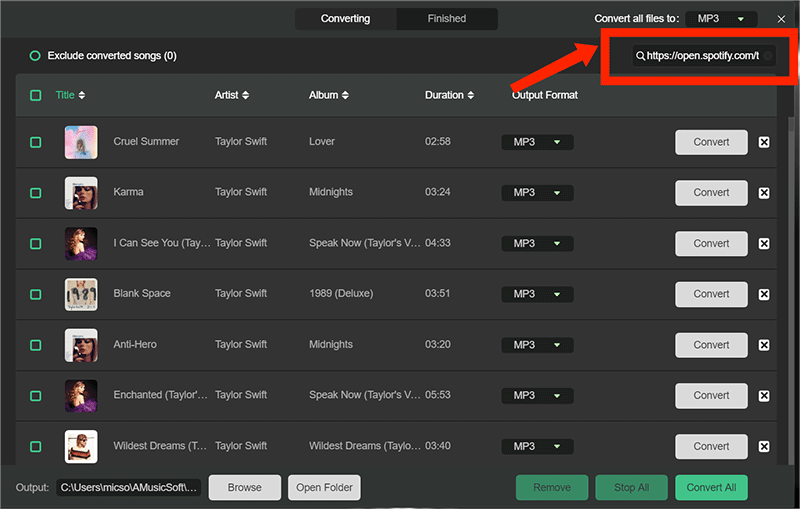
Create A Folder For All Your Converted Songs.
The second step is to create a folder where you will store all your output files. You can personalize this folder and rename it based on your own preferences. It could be the title of the songs, album, or even the name of the artist who sang the songs.
Convert.
And for the last step, click “Convert” to finally enjoy all the songs that you want to listen to.
These are all the three easy steps that you have to follow to be able to easily convert using AMusicSift Spotify Music Converter. With its help, the conversion and transfer of songs are just three steps away from reality.
Part 4. To Summarize It All
Music is a vital part of our everyday lives, from work to our homes; it is a partner that diminishes our stress and helps us cope with all the trying and happy times in our lives. We hope that this article helps you identify the ways that you can be able to play Spotify music on raspberry pi.
Aside from it, it is also a bonus that we are able to discover professional converters like AMusicSoft Spotify Music Converter, one helpful tool that we can use to be able to easily convert our most wanted songs to more versatile file types.
People Also Read
- How to Play Spotify Music on Kodi: A Guide for You
- A Guide on How to Play Spotify on PS4
- Play Spotify Music On Samsung Gear S3: Can I Do It?
- How To Clear Spotify Cache On Mac/Windows/Android/iPhone
- Can You Play Spotify on Multiple Devices Simultaneously?
- How To Create A Spotify Playlist: The Simplified Guide
- How to Redeem Spotify Gift Card: A Guide for You
- Spotify for Chromebook: A Guide on How to Use It
 About The Author
Robert Fabry is an ardent blogger, and an enthusiast who is keen about technology, and maybe he can contaminate you by sharing some tips. He also has a passion for music and has written for AMusicSoft on these subjects.