Learn The Detailed Guide On How To Cut iTunes Songs
Each one of us is surely familiar with iTunes app, but not everyone is aware of the services and features that it can do for its users. iTunes can work as a streaming tool to play the tracks and playlists that you love, and at the same time, can work as a music store to cater your music purchases. For the other services it has, those who are already with iTunes for a long time must know already about trimming some parts of the song. If you do not know about this yet, then you should learn about how to cut iTunes songs.
Cutting a certain part on a track is being done by users to remove the specific part they do not want or to use them for another purpose. In this post, all the insights that you should know about how to trim songs on iTunes will be shared, which in particular is about the procedure to follow. Fortunately, the steps are only simple which could be understood by users easily.
Contents Guide Part 1. Is It Possible to Cut Songs in iTunes?Part 2. How to Cut A Song Part with iTunes?Part 3. The Best Way to Cut iTunes SongsPart 4. Final Words
Part 1. Is It Possible to Cut Songs in iTunes?
As mentioned above, there are so many things that iTunes can offer which include being a music store and a streaming service where people can play any song they want. In iTunes, you are given the opportunity to access any playlist or track that you love since its catalogue is composed of different songs from multiple artists.
How to cut iTunes songs? With all the good reviews that iTunes is getting, you must be wondering as well if it can trim a song part for you. To answer it directly, yes, iTunes can make it possible for you. With the help of its user-friendly interface, editing and trimming has always been easier, simpler and faster.
Part 2. How to Cut A Song Part with iTunes?
In relation to the process on how to trim a song, there are only a few simple steps that you should do to get done with it and produce the results. To know about them, read the list of steps to perform that are shown below.
Step No. 1: Import All the Tracks to Edit on Your iTunes Library
To get started with the process on how to cut iTunes songs, adding all the tracks on your iTunes library must be your first step. In order to proceed with trimming some song parts, the tracks must be displayed on your library in advance. Launch the iTunes app on your computer and then hit the File tab from the menu bar at the top and then select the Add File to Library option from the menu options. Another way to do this is to press down the keys Ctrl plus O. After a while, a new window will show up where you can choose the songs to import.
Select each track to edit and then click the Open button to add them. All the tracks that are encoded in any of the supported formats in iTunes could be added. Fortunately, iTunes can support multiple formats such as MP3 and WAV.
Step No. 2: Choose the Specific Song Part to Cut
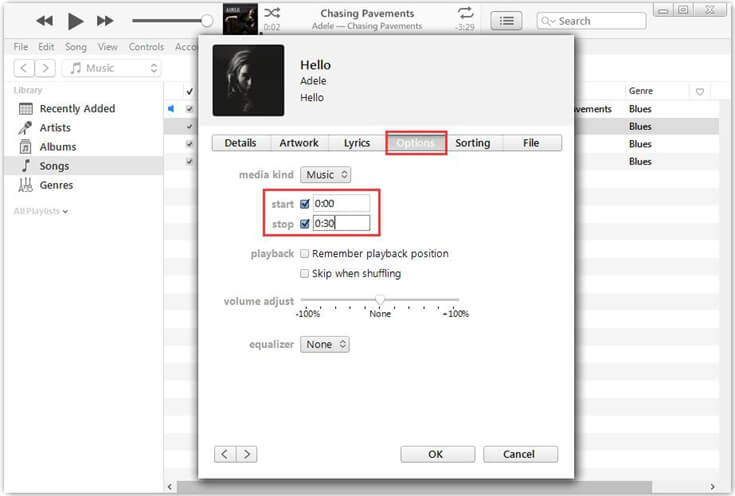
How to cut iTunes songs that are your favorite part? Play the particular song you’ve added and then choose the part where you want to start cutting as well as where to end. Your selection can be viewed through the Status pane that can be found at the top of iTunes where you can adjust your initial selection to cut it accurately. To see the exact part where you want to cut, use the slider given.
Now, do a right click on the track you’ve chosen and then select the Song Info option. A few seconds after, the Information window will be seen on your screen in which you have to select the Options tab. From the new opening window, provide the specific time to cut right next to the Start and Stop boxes given. In here, you may put the exact minutes, seconds and even milliseconds where to trim the song. But keep in mind that the checkboxes must be marked beforehand in order to enter the time. Finally, hit the OK button to save all the adjustments that you did.
Step No. 3: Export the Track and Save the Edited Version
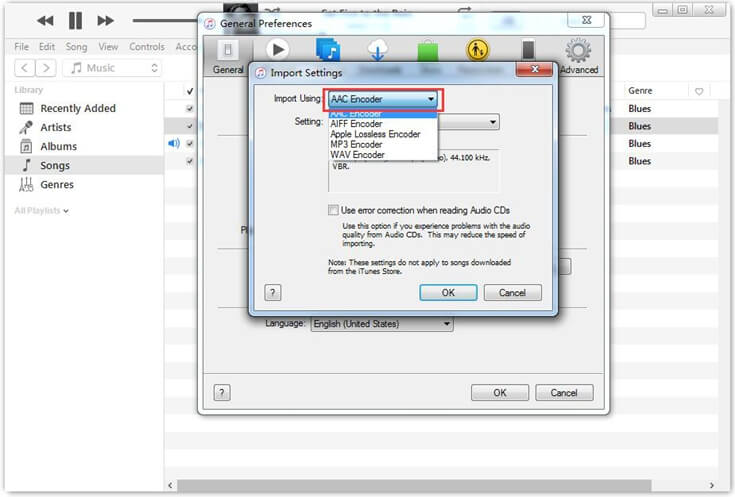
Since you are already done with specifying the start and end parts of the track to trim, you may then start saving the edited version. How to cut iTunes songs with correct format? Navigate to Edit > Preferences > General. Then click the Import Settings button, and select AAC Encoder.
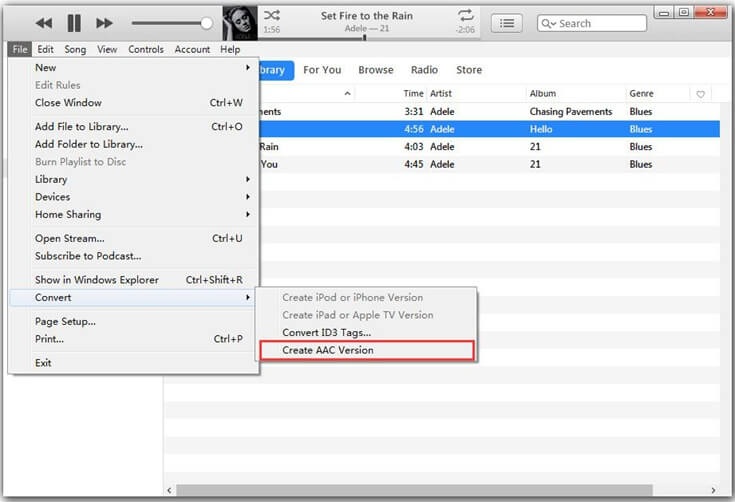
Next, right-click on the song and then choose to Create New Version. After that, tap on Create AAC Version. Wait for a short while until the result is out, which will be shown next to the original song on your iTunes library. You can easily recognize which is the edited version as it has a shorter length compared to the original. Take note that the edited version will be saved in the M4A file format, since you selected the Create AAC Version button a while ago.
Step No. 4: Check the Set Duration by Previewing the Song
You also have the opportunity to check the settings made by previewing the edited track. This is very helpful especially if you are so unsure whether you had the markings right or not. This is just so easy to do by simply right clicking on the edited version and then click Show in Windows Explorer.
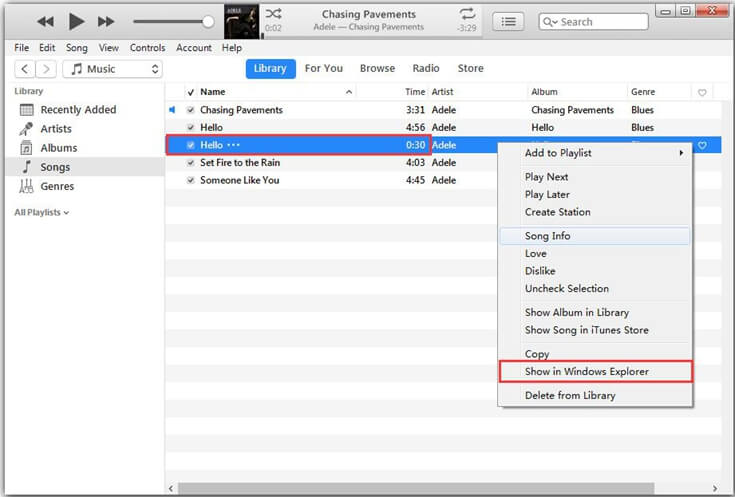
Seconds after, you will be displayed an iTunes folder where you can see the edited track. Right click the track title and then select the Properties button. After that, tap Details and then check if you had an accurate trimming. Once you are done checking and saw that it is correct, then you are good but if it isn’t, then you can always try again by following the same steps listed above on how to edit songs from your iTunes library.
Part 3. The Best Way to Cut iTunes Songs
The imparted procedure above is very helpful especially if you are using the iTunes app most of the time that you have become so much used to it. Apart from the official method shared above, there is another way on how to cut iTunes songs. This procedure can also be done by using a professional music converter that aims to help you in downloading any tracks you love and do whatever you want on them such as trimming some parts.
The best professional converter that you may use is AMusicSoft Apple Music Converter. This tool has always been on the list of the top converters that are capable of editing, downloading, and conversion. You can use AMusicSoft to convert the iTunes tracks as well as Apple Music tracks into multiple formats that are supported in a lot of devices. To cite them, you can choose from MP3, FLAC, WAV, AAC, AC3, and M4A.
You can even own the songs you’ve edited in AMusicSoft as you can download them as local files on your computer. This is all possible because iTunes DRM removal is also one of the capabilities of AMusicSoft. It is also your first choice to use in the processing of the conversion of your files so you can be able to burn music from iTunes to CDs.
To add more about AMusicSoft, the results that you can get is surely to be of high quality. Take note as well that the process will take only for a few minutes through its speed of 16x faster. Its interface is very simple and user friendly, which is very helpful especially to all beginners. Here is how to use AMusicSoft Apple Music Converter on how to download iTunes tracks after conversion.
- Get the application of AMusicSoft Apple Music Converter from the official website of AMusicSoft. As you open your browser, search for the site and then navigate to it. From here, click the Download button and proceed with the installation process.
- After a while, open the installed app and then upload all the tracks to convert. This can be done by marking the selection box located before each song title.

- Choose the output format that you wish to utilize and then allot a destination folder as well.

- Start the conversion process by tapping the Convert button and wait for a few minutes until it is finished.

- Lastly, save all the songs you’ve converted and save them in the preferred folder on your local folder.
Part 4. Final Words
After the long discussion above about how to cut iTunes songs, you must know by now that this process would only take a couple of minutes to do. The complete steps that you may use as your guide are all explained in detail above, so, all you have to do is to read and follow them properly to get the best results. Now, if you want to have the local copies of iTunes and Apple Music tracks, you should use AMusicSoft Apple Music Converter as it is very capable of giving you the best converted copies.
People Also Read
- Complete Guide On How To Create Ringtones In iTunes Free
- Why Is Your Song Not On iTunes And How To Fix It
- Easiest Way On How To Add Music In GoPro Studio
- Ultimate Guide To Import iTunes Library To MediaMonkey
- Why Does My Music Stop When I Open Facebook (Explained)
- Three Best Ways To Enjoy Apple Music On Firestick
- Enjoy Apple TV With Apple Music Via The Most Convenient Way
- How To Put A Song On Repeat On Apple Music?
 About The Author
Robert Fabry is an ardent blogger, and an enthusiast who is keen about technology, and maybe he can contaminate you by sharing some tips. He also has a passion for music and has written for AMusicSoft on these subjects.